Перейти к основному содержанию

Repair and more information for the Whirlpool WRS325FDA*0* refrigerator—a 2012 side-by-side model with a built-in door ice dispenser. This page covers information for model numbers matching the pattern WRS325FDA*0*.

2вопросов Показать все

Whirlpool Refrigerator Interior Lights Flickering

My Whirlpool WRS322FDAW01 is just over a year old and all of a sudden the interior lights on both the fridge side and the freezer side are strobing when the door is open. From what I've gathered the lights are LED and may have to be replaced in their entirety. Not sure. Please help!

Also, all of the lights on both sides of the fridge are in sync regarding the strobe effect. I'd even be ok with just shutting them off completely instead of the strobe. Any help will be much appreciated!

Thanks in advance!

Отвечено! Посмотреть ответ У меня та же проблема

Это хороший вопрос?

Оценка 33
157 Комментариев

Same thing happening to my, Model # WRS322FNAM00, side-by-side Whirlpool Refrigerator.

2 LED lights on the Fridge Side, and 1 LED light on the freezer side.

At night I am blinded if I don't turn on the kitchen lights.

Any help out there for this?

из

We have had this same issue, we've changed out the module and the light switch and the lights are still blinking

из

Should we talk about a class action law suit?

из

I am having the same issue it stop after opening and closing the doors but after two days thesame issue. Since more than a week no change.

из

I am having the same issue. since all the modules act the same way I believe that it is an issue with the controller.

из

Показать 152 больше комментариев

Добавить комментарий

16 Ответов

Выбранное решение

I think this will answer your question:

First see if it's covered under warranty, this is a factory defective part.

http://www.applianceblog.com/mainforums/...

Here's the part: WPW10515058 - Whirlpool Refrigerator Light

iFixit Staff Suggestion: Fixes for flickering are compiled on the fridge light flickering wiki. As of 2/3/23, there is still no class action lawsuit or settlement from the Whirlpool Corporation in regards to their faulty light assembly.

WPW10515058 - Whirlpool Refrigerator Light Изображение

Продукт

WPW10515058 - Whirlpool Refrigerator Light

$158.99

Был ли этот ответ полезен?

Оценка 16

45 Комментариев:

If both LEDs are flashing do both modules need to be replaced? It would be odd that both failed at the same time. That is why I would think this is a common (to both lights) power supply issue.

из

If it is a factory defect, the part should gbe recalled and the company should repair it.

из

I agree I have the same problem, it should be recalled, this doesn't look good for whirlpool as a leader in appliance"

из

I pulled the power plug out and plugged it back in.....Problem Solved

из

Where is the module located? My lights started flickering right after the warranty period. Model WRS322FDAM00

из

Показать 40 больше комментариев

Добавить комментарий
Наиболее полезный ответ

Owner's of similar model Maytag and Kenmore Refrigerators have reported the exact same issue!

There are 3x LED Lights or "Modules" located in these side-by-side style refrigerators

> 2 in the Fridge side and 1 in the Freezer

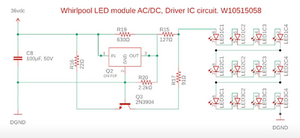
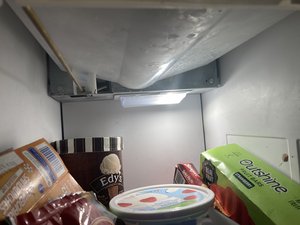
The problem (defective) LED light module is on the fridge side, located at the top. This LED module is designed with a built in dimmer! That single dimmer controls all 3 lights in your fridge. As the dimmer begins to fail, that causes the flashing, strobing, studio 54 in your kitchen effect.

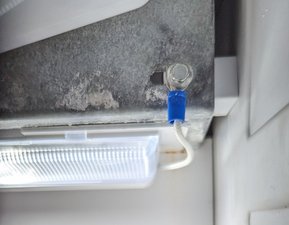
Some owners have had "short-term" success by detaching the LED module, unplugging the 2 wires, and plugging it back in. This is a short-term solution, but worth the try first round!

Makes sure to order the latest model LED module if you replace it! Some sights are selling the original part for less...enjoy that headache in another 2 years, no thank you!

Crying shame they designed the original part w/ a dimmer, know it's an issue but don't own up to it w/ their customers, and then charge $188+ for replacement part (small strip of LED lights... w/ a dimmer)

See link in previous answer for the exact replacement LED module

Был ли этот ответ полезен?

Оценка 21

20 Комментариев:

So how do I get it out, and what is the replacement part #?

из

That's more than $200 for a light. Is there another source? That's crazy talk for an fing bulb

из

Replacement part # WPW10515058

Order online at http://www.appliancepartspros.com/whirlp...

Agree, but this is the only solution at this time!

Some have just unplugged the light and have chosen to go without...

из

Removing the LED Module - it can be a little stubborn to remove! Use a flat head screwdriver to depress the 2x plastic tabs located a half an inch in from both side facing you. There are 2x additional plastic tabs on the backside about 1 inch in from both sides. Once you drop the front the back should follow by hand. Next remove the 2 connectors. That's it!

из

Thanks Brother! I thought so but I didn't want to break anything.

из

Показать 15 больше комментариев

Добавить комментарий

I had the same problem and upon inspecting the board I discovered R15 on the board was totally corroded and as soon I tried cleaning it, it came right off the board. I was able to remove it, clean it and solder it back on. Problem was solved immediately. So inspeat your board and if you have soldering skills you can repair it yourself.

Block Image

Был ли этот ответ полезен?

Оценка 21

26 Комментариев:

What board? Where is board.I don't have a tool to solder it?t

из

The board is part of the led (main light) or the right side of the fridge. It comes right off. Open fridge and use flathead to release the tabs holding it. Then disconnect the two cables attached to it. Inspect R15 and R17 for any rust. If you can have a local repair shop solder it cheap it heats having to buy a new one. If you can't just order another online.

из

Thank you DJ AB! What resistor value is R15, or can you read the code on it. I plan to replace it as mine is burned off the board. R17 is 910 which is 91 ohm +/-5%.

из

My board had same problem R15 burned out .I can fix it ,but I donot know the value of R15. Somebody can tell me? thanks

из

i belive r15 is the same as r17

из

Показать 21 больше комментариев

Добавить комментарий

I can’t possibly stress enough how easy it is to unscrew the unit from the fridge side, unplug and replug it back in. Usually solves the problem in five minutes.

PLEASE AT LEAST TRY THIS BEFORE SPENDING MONEY.

Update (02/17/2018)

Please Read!

I wish everyone would read through the answers. It's an incredibly easy fix- almost anyone can do it.

There's condensation in your fridge which creates corrosion at the connection.

Take your light housing off on the fridge side (it controls both sides.) It's pressure fit, squeeze it or use a screwdriver to pull it down. If theres any screws that need removing do so to remove the back cover. Pull the connector out and put in back in 3-5 times.

Your problem should be fixed. Put it all back together in reverse.

Был ли этот ответ полезен?

Оценка 13

12 Комментариев:

I combined this strategy with the one below, using the electrical contact spray. I taped the "on" button down with tape so there wasn't current when I was working. Lights stopped flickering after doing this. Will report back on longer term results.

из

This solution failed for me by one hour later. Lights flickering again.

из

Thanks Marshall for the advice. Keeping my fingers crossed it continues to work.

из

I tried all the above it kept failing after a few minutes. Decided to replace the kit as a whole about $240, this seems to be the lasting solution, hopedully will use this for anothee year, honestly would not recommend buying this model or whirlpool crap.

из

Thank you Marshall! You just saved me $240. I first removed and reconnected the connection, 4 times, for the 2 LED lights in my Whirlpool refrigerator (only 5-years old). No luck. Then I did the same thing for the 1 light in the freezer. Presto! It stopped strobing and went to a steady light. After I started loading the freezer back up again though... it started again... so I repeated the process on the freezer light. It took several attempts and me tugging and pushing down the wires in the connector, but it started working again. I read above someone used "electrical contact spray" (never heard of that) to keep the connection solid. I guess that will be my next step if it keeps wiggling loose. ... My wife and I have been putting up with this stupid strobing for over a month... as we are presently in this crazy coronavirus lockdown. We both feel our lives just got a whole lot better without worrying about getting some epileptic seizure every time we we got some milk! LOL

из

Показать 7 больше комментариев

Добавить комментарий

Hello everyone, I had the problem with the lights strobing/flickering everytime I opened the fridge doors. I tried removing the LED module on the fridge side- cleaning and plugging it back in (lasted me less than a day), using a heat gun carefully over the board (lasted again less than a day). It would just flicker and strobe trying to accomplish its mission of giving me a seizure.

I noticed one thing that if I kept the fridge doors open for more than 5 minutes or so, the lights would not strobe so I thought maybe the moisture build up is causing the strobing. I decided to try using a WD-40 silicone lubricant (water resistant) which I had at home. I took the board out from the LED module, wiped it carefully to make it as dry as possible and sprayed the lubricant all over. It's been over 2 months now and the lights work perfectly well. I maybe had it flickering/ strobing 2 or 3 times in this time, that's it! The brightness is the same and hasn't affected the performance of the light at all. The spray is quite inexpensive and definitely worth a try. There is another spray of WD-40 or other brand which is waterproof and not water resistant like mine, which I think will work even better. Try out this solution if it works for you.

Block Image

Был ли этот ответ полезен?

Оценка 6

9 Комментариев:

Ok. I'm giving this a try! I had given up before and had just disconnected on of the lights... so, like you way, our family could avoid getting a seizure, too!

Previously, I thought I had narrowed things down to the freezer light. So I started with that one. Did just like you said. Took the whole thing apart and gave it a generous spray of WD-40, on both sides of the circuit board. Then dabbed it dry.

It worked, it seemed for a couple minutes... but then strobing started again. So... I went ahead and did the same thing to both lights in the refrigerator side.

So far... things seem to be working again! Steady light. ... I just got up to check it again. Should have heard my squeal of delight! I can't believe it. It's still working!

I'm wondering if my wife will notice when she comes home. THANK YOU for you post! It's 7/10/20. I hope it lasts!

из

Just posting an update, it has been 8 months and still working great, and has done the strobing only 2-3 times. It started strobing this morning so i took out the unit, sprayed and plugged it in, all in 10 minutes. I am glad that is all i have to do!

из

@wesgraham I am glad it worked well for you too! Are the lights still functioning well?

из

Tried this and they are working well so far no strobe, flicker or dimming. Could not find WD40 silicone used PB blaster silicone. Working for now will keep you updated.

из

POST 1 of 3-

I just had to jump on here to say THANK YOU to everyone for the tips and tricks, and I FINALLY have solved this issue permanently! After replacing the boards almost completely 4 times I was fed up with this and cut them out! I used the existing wiring harness to wire in some new LED 120v lights in each of the three areas. I used the following parts from Amazon:

DiCUNO G8 Base Wire Connector Socket, G8 LED Light Bulb Socket Adapter, Ceramic Bulb Holder, 10 Pack https://www.amazon.com/dp/B07CG6FFMH/ref...

Makergroup 3W G8 LED Bulbs Dimmable 20W 25W 35W G8 T4 120V Halogen Replacements for Under Counter Lights, Under Cabinet Puck Lights Cool White 6000K 6-Pack https://www.amazon.com/dp/B088H849NR/ref...

из

Показать 4 больше комментариев

Добавить комментарий

Pulled light out and wiggled the wires on the back fixed the problem must have been a loose connection

Был ли этот ответ полезен?

Оценка 4

3 Комментариев:

I did this for a while until the part broke from being wiggled too many times. I even tried to solder it back together. Our frig was manufactured in 2014 and the part seems to have been made in 2010 ? Could that be right?

My husband is a paralyzed veteran, I try to fix as many things around the house as I can. It's frustrating when a part costs so much to replace when it was clearly defective in the first place. We put a lot of thought into purchasing this frig because it works well for someone in a wheelchair. (Not if you can't view the contents in the dark) Bummer. :-(

из

Mine worked for 2 1/2 yrs. It is now dim. Why do Whirlpool make this kind of lights that cost am arm and a leg? I will not purchase Whirlpool with led module anymore. They should fix this problem if it is less than 5 yrs old.

из

How do you get the housing off to get to the led contacts to wiggle? I’ve been wrestling with it with my hands, screwdriver, and nothing. There doesn’t seem to be anything that pops off!?

из

Добавить комментарий

I've been working on appliances over 40 years. 15 years whirlpool authorized service. Whirlpool, as of about 13 years ago could care less about whether your appliance is broken. Your going to have to do a class action lawsuit. Amazon sells a kit part number wpw10515057 that comes with all 3 boards for @$70. Or you could buy stick on motin activated battery powered lights.

Был ли этот ответ полезен?

Оценка 4

4 Комментариев:

Now that's an answer!

из

Count me in!

из

after reading up on the industry it seems whirlpool is one of the better mfg's

but the lighting thing is weird ,and the ice maker is not in the door where it's said other's see failure's . our's is temperamental and I'm keeping it ice or not.i'm retired and enjoyed the chase somewhat of this light repair , I might have botched the resistor replacement and will try it with a lower rated SMD resistor ,if that fails im following your recommendation of motion activated lights !!

из

Thank you for that part number. Everyone says resolder R-15 which I did but why did this resistor look damaged to begin with? Perhaps the modules down line of it are drawing too much power through this "ant-sized" component. Enough people here have said the R-15 fix does not last. We will see. If mine flickers again, I'll will have the three modules on hand and ready to go 😁

из

Добавить комментарий

I am all in for a class action law suit. This is the worst refrigerator I have ever owned. Won’t ever buy anything Whirlpool again.

Был ли этот ответ полезен?

Оценка 4

1 Комментарий:

It’s a shame because Whirlpool always had such excellent products. But when you stop caring about your customers over the bottom line - that’s when you cut your own throat.

из

Добавить комментарий

Regarding the question about the correct values of R15 and R17, it appears that they are 91-ohm and 127-ohm, respectively. This information came from the YouTube link below.

https://www.youtube.com/watch?v=OdgzfOHS...

Block Image

Both R15 and R17 were burnt-out on my board. I removed the resistors from my failed board and measured them: R15=890-ohm, R17=1.7-kOhm. These readings could indicate that the resistors were overheating and degrading over time which increased the resistance as more material was burnt away.

Был ли этот ответ полезен?

Оценка 3

7 Комментариев:

Nice work. I’m an electrical engineer and after a bit of searching I found this solution. You were correct and the fix does work.

I obtained a couple SMT resistors from work of the values you called out and was immediately rewarded with a steady light after replacing the old ones. Unfortunately about a year or two later it’s doing it again.

So I get to replace them again - still a couple pennies for resistors beats the HECK out of around a $200 replacement for what is essentially a glorified lamp.

The problem stems from the fact the circuit was improperly designed. The resistors simply do not have the proper wattage rating to handle the power going through them and consequently, as you mentioned, begin to burn out. This changes their value to a much higher value than nominal and causes the malfunction you see. (The strobing.)

The manufacture really should make good on this and fix it or offer replacement rather than just gouging people out of more money.

из

Scott, can you confirm the values for R15/17?

из

@cliff_barnes Sorry I never saw your question for some reason so I’m six months late but it’s 127 ohms for R15 and 91 ohms for R17.

I’m sorry I can’t remember if the physical package size was 0805 or 0603 but they are both dirt cheap so I’d just get both sizes to be safe. 1210 even if you can get them to fit,

Since they apparently have a problem taking the heat dissapation.

из

where did you buy the resistors ?

из

Показать 2 больше комментариев

Добавить комментарий

I had the lights not working in my Whirlpool WRS325FDAW04, looked up the part number, got sticker shock like the rest of you and went about gathering the parts to do the 26.00 fix.

It worked exactly as described and the lights are brighter than OEM!

I signed to this site just to thank y’all for helping me out!

Seth Grant, thank you especially since this seems to be your fix,

Hey Johnnymoroz, please be more specific? The whole light fixture comes loose from the interior plastic lining of the refrigerator. Your wiggle led contacts statement is confusing.

I pulled down on the front of the fixture, slid a screwdriver in there, with a flashlight I found the two tabs that needed pushed in and it was out. Good luck

Был ли этот ответ полезен?

Оценка 3

1 Комментарий:

I am glad this is working for so many people. I will tell you that I have had to change the light in the freezer twice since I did this fix, but I think it’s because the light really isn’t rated to be that cold. The bulbs are relatively inexpensive, so I’m good with having to change it once a year if necessary. I keep thinking I’ll do a YouTube of this fix, but I don’t really do that :-)

из

Добавить комментарий

I just had to jump on here to say THANK YOU to everyone for the tips and tricks, and I FINALLY have solved this issue permanently! After replacing the boards almost completely 4 times I was fed up with this and cut them out! I used the existing wiring harness to wire in some new LED 120v lights in each of the three areas. I used the following parts from Amazon:

DiCUNO G8 Base Wire Connector Socket, G8 LED Light Bulb Socket Adapter, Ceramic Bulb Holder, 10 Pack https://www.amazon.com/dp/B07CG6FFMH/ref...


Makergroup 3W G8 LED Bulbs Dimmable 20W 25W 35W G8 T4 120V Halogen Replacements for Under Counter Lights, Under Cabinet Puck Lights Cool White 6000K 6-Pack https://www.amazon.com/dp/B088H849NR/ref...


There is a trick to this! The lower refrigerator light and the freezer light are run in series back to the main top light. For the main top light connect the neutral (white) to the red going to the slaves. Connect the main hot (solid yellow) to the striped yellow running to the slaves. Then connect each of these two leads to the new LED light in the top. Connect a new LED to the two leads in the bottom of the refrigerator (red and gray). The freezer is trickier… Connect BOTH leads in the freezer light together! Then run a wire to the ground in the wiring harness just behind the freezer light (it’s just 4 bolts, so don’t panic). Then connect this new ground wire (now a neutral) to one side of a new LED, and connect both of the original leads (now connected together) to the other side of the LED.


If you used the parts I did it fits nicely behind the original plates with the old LED boards removed. You will need butt connectors, crimpers, and electrical tape for good measure. I actually wired two new LED bulbs in the top main area just for extra brightness. If you follow this exactly it will work! The g8 bases are optional, but will allow you to change out the bulbs easily IF they ever go bad.


All this to say that Whirlpool should have corrected this for us, and I’m in if there is a lawsuit. Problem solved for less than $30. Couldn’t be happier after dealing with this for three years! Reach out if you need more info!

Block Image

Block Image

Block Image

Block Image

Block Image

Block Image

Был ли этот ответ полезен?

Оценка 2

19 Комментариев:

Had same issue. Replaced one board already then the master went out. I don’t want to play this game because these boards are ridiculously expensive. I followed Sethgrant’sInstructions using the same materials from Amazon and works great. Once I had the master working the freezer light turned on so I left that alone. Thank you sir for a solution and detailed information

из

@Scott Faller I spent a lot of time and money dealing with this issue, and still go open the doors occasionally to admire my work :-) Glad it worked for you too!

из

Seth- I ordered the LEDs and the Dicuno connectors and am ready to dive into this fix. Could you elaborate on running the wire to the freezer? When I removed the four bolts there were quite a few wires running back there and wasn’t sure what you meant in that part of the instructions. Any additional details in this phase of the fix would be greatly appreciated!

из

I was also wondering about the freezer wiring I got the main refrigerator lights working but looked into the freezer behind the bolts and was confused also I can’t figure out why just wiring the two wires in the freezer one to one side of light and the other one to the other side of the light wouldn’t work I didn’t want to cut off the plug that goes into the board off and try it till I was sure it would work any help would be greatly appreciated. Thanks

Jamie

из

@tikitime

When you take the light out of the freezer there should only be one plug with two wires going to that light board. You have to connect these two wires (together) to one side of the new light fixture. Land the other side of the light fixture to the metal frame somewhere to act as a neutral.

из

Показать 14 больше комментариев

Добавить комментарий

I had this issue with my Whirlpool and it looks like the referenced resistors were compromised. I'm so glad i found this thread. I used the instructions from sethgrant and it worked! I put two lights in the top of the fridge and one on the bottom. After doing this, the original freezer light worked (though a little dimmer) so i'm not even going to bother replacing freezer light. I kind of can't believe i was able to do this wiring, but it worked great.

Был ли этот ответ полезен?

Оценка 1
Добавить комментарий

Try unplugging the light control module, imspect for any corrosion and spray some Deoxit electrical contact cleaner in the wire connectors, where the components are connected on the board and the wire connecter terminal on the controller board. Reconnect the controller and see if that fixes the problem.

Был ли этот ответ полезен?

Оценка 0

1 Комментарий:

Unfortunately that will always be temporary. My fix I posted has worked well for many people, and has been working great for me… it’s inexpensive too!

из

Добавить комментарий

How do you get the housing off to get to the led contacts to wiggle? I’ve been wrestling with it with my hands, screwdriver, and nothing. There doesn’t seem to be anything that pops off!?

Был ли этот ответ полезен?

Оценка 0
Добавить комментарий

the attached picture goes with my comment above regarding sethgrant's solution.

Block Image

Был ли этот ответ полезен?

Оценка 0

1 Комментарий:

When this SAME WONDERFUL MODEL REFRIG STARTS freezing over >> sheet of ice at bottom of freezer side along with frozen coils...ice buildup and poor refrig cooling due to aforementioned complication, the problem / solution is the following ( in most cases) >>> The freezer drain tube which drains to built in drain pan clogs up, to correct, slide out unit from wall, remove (cardboard) bottom kick-plate, observe 6" white plastic drain tube, remove screw clamp to it....flush out debris from tube, reinstall, back in BUSINESS.

из

Добавить комментарий

R15 Replacement

Used 1206 1/4W (R15 in pic) and worked but slightly bigger than original which is probably 0805 (R17). Note I have a hot air station to solder on the bigger resistor. If soldering iron probably can't get heat on the solder so best go with 0805

Block Image

Dead LED

Also found a dead LED (5630 3v) on W10515057 board. Couldn't find the matching + - pattern replacement so soldered masked off one - and soldered on a standard LED with + - on either end.

Block Image

Block Image

Used hot air station to solder on the heat sink contact under the LED. Probably not possible with soldering iron

Conformal Coating

Put on conformal coating (over the resistor and around the LED) to seal off moisture. Lets see how long these fixes last :)

Был ли этот ответ полезен?

Оценка 0
Добавить комментарий

Добавьте свой ответ

thejasontdavis будет вечно благодарен.
Просмотр статистики:

За последние 24часов: 76

За последние 7 дней: 555

За последние 30 дней: 2,132

За всё время: 386,534