Перейти к основному содержанию

2016–2020 Honda Civic Tail Light Replacement

Выберете то, что вам нужно

  1. 2016–2020 Honda Civic Tail Light Replacement, Tail Light: шаг 1, изображение 1 из 2 2016–2020 Honda Civic Tail Light Replacement, Tail Light: шаг 1, изображение 2 из 2
    • Unlock and open the trunk of the car.

    • This will allow you to access the screws once it's open.

  2. 2016–2020 Honda Civic Tail Light Replacement: шаг 2, изображение 1 из 2 2016–2020 Honda Civic Tail Light Replacement: шаг 2, изображение 2 из 2
    • On the exterior of the trunk, take notice of the bolts connected to the tail lights. You will have to work with these.

    • A #8 socket tends to work for most Civics.

  3. 2016–2020 Honda Civic Tail Light Replacement: шаг 3, изображение 1 из 3 2016–2020 Honda Civic Tail Light Replacement: шаг 3, изображение 2 из 3 2016–2020 Honda Civic Tail Light Replacement: шаг 3, изображение 3 из 3
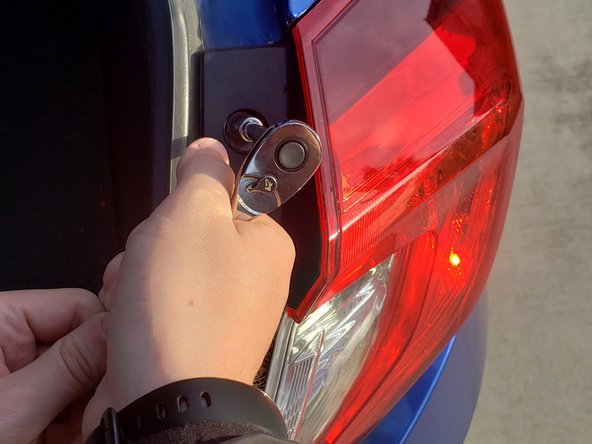
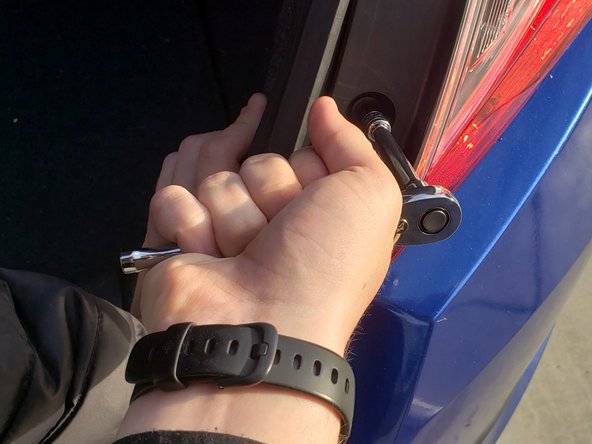
    • Attach the socket to the ratchet and loosen each of the bolts, twisting the ratchet in a counterclockwise direction.

    • Use your hand to secure the tail light so it doesn't fall off once the bolts are loose.

  4. 2016–2020 Honda Civic Tail Light Replacement: шаг 4, изображение 1 из 2 2016–2020 Honda Civic Tail Light Replacement: шаг 4, изображение 2 из 2
    • Once you have removed the screws, place them somewhere safe because you will be using them to reattach the tail light.

    • If the screws are damaged, you can replace them with two new 8.0 mm Phillips screws.

  5. 2016–2020 Honda Civic Tail Light Replacement: шаг 5, изображение 1 из 3 2016–2020 Honda Civic Tail Light Replacement: шаг 5, изображение 2 из 3 2016–2020 Honda Civic Tail Light Replacement: шаг 5, изображение 3 из 3
    • Pull the tail light out from the rear bumper.

    • Since this could be a tight connection, do not be afraid to use some force or you may need to move it side to side to work it out of the socket.

    • When pulling it out, be careful that you don't rip it out as it is connected to several wires.

  6. 2016–2020 Honda Civic Tail Light Replacement: шаг 6, изображение 1 из 3 2016–2020 Honda Civic Tail Light Replacement: шаг 6, изображение 2 из 3 2016–2020 Honda Civic Tail Light Replacement: шаг 6, изображение 3 из 3
    • Once the tail light is removed, twist the light bulb connector counterclockwise to loosen and then pull it out of the socket.

  7. 2016–2020 Honda Civic Tail Light Replacement: шаг 7, изображение 1 из 3 2016–2020 Honda Civic Tail Light Replacement: шаг 7, изображение 2 из 3 2016–2020 Honda Civic Tail Light Replacement: шаг 7, изображение 3 из 3
    • Put on gloves and pull the bulb out.

    • Pull the bulb out with caution as it can take some force to pull it out.

    • For replacement, a 7740 size bulb is recommended.

  8. 2016–2020 Honda Civic Tail Light Replacement: шаг 8, изображение 1 из 3 2016–2020 Honda Civic Tail Light Replacement: шаг 8, изображение 2 из 3 2016–2020 Honda Civic Tail Light Replacement: шаг 8, изображение 3 из 3
    • Replace the new the light bulb by pushing it back by pushing it back into the socket.

    • It is important to use gloves when doing this as the oils on your hands and fingers will damage the bulb and cause a shorter life for the bulb.

  9. 2016–2020 Honda Civic Tail Light Replacement: шаг 9, изображение 1 из 3 2016–2020 Honda Civic Tail Light Replacement: шаг 9, изображение 2 из 3 2016–2020 Honda Civic Tail Light Replacement: шаг 9, изображение 3 из 3
    • Reattach the tail light.

    • This won’t require much force for it to stay attached.

  10. 2016–2020 Honda Civic Tail Light Replacement: шаг 10, изображение 1 из 3 2016–2020 Honda Civic Tail Light Replacement: шаг 10, изображение 2 из 3 2016–2020 Honda Civic Tail Light Replacement: шаг 10, изображение 3 из 3
    • Use the #8 socket to replace the bolts that secure the tail light.

  11. 2016–2020 Honda Civic Tail Light Replacement: шаг 11, изображение 1 из 2 2016–2020 Honda Civic Tail Light Replacement: шаг 11, изображение 2 из 2
    • Lightly tighten each bolt in the clockwise direction, alternating between each one in order to avoid one misalignment.

Заключение

To reassemble your device, follow these instructions in reverse order.

2 участников успешно повторили данное руководство.

Billy Ouattara

Участник с: 04/19/23

229 Репутация

1 руководство автора

Команда

UCD-MORRIS-S23S1G5 Участник UCD-MORRIS-S23S1G5

Community

2 членов

Автор 1 руководств

0 Комментариев

Добавить комментарий

Просмотр статистики:

За последние 24часов: 3

За последние 7 дней: 15

За последние 30 дней: 84

За всё время: 826