Перейти к основному содержанию
Присоединяйся к сообществу ремонтников - Создай аккаунт

68cc Gas Bike Compression Head Replacement

Выберете то, что вам нужно

    1. 68cc Gas Bike Compression Head Replacement, Compression Head: шаг 1, изображение 1 из 1
      • Clean the compression head with an alcohol based cleaner to ensure a perfect fit on the engine.

      • DO NOT use soap or an acid based cleaner. They will ruin the compression head.

      Спросите у FixBot

      Добавить комментарий

    2. 68cc Gas Bike Compression Head Replacement: шаг 2, изображение 1 из 2 68cc Gas Bike Compression Head Replacement: шаг 2, изображение 2 из 2
      • Detach the rubber CDI from the spark plug by gently pulling up and away from the engine.

      • The rubber part that grabs the spark plug on the CDI is very delicate and may break with excessive force, use minimal force

      Спросите у FixBot

      Добавить комментарий

    3. 68cc Gas Bike Compression Head Replacement: шаг 3, изображение 1 из 2 68cc Gas Bike Compression Head Replacement: шаг 3, изображение 2 из 2
      • Place the spark plug tool on the spark plug and twist it counter clockwise to loosen it.

      • After loosening the spark plug all the way, remove it by lifting up.

      Спросите у FixBot

      Добавить комментарий

    4. 68cc Gas Bike Compression Head Replacement: шаг 4, изображение 1 из 3 68cc Gas Bike Compression Head Replacement: шаг 4, изображение 2 из 3 68cc Gas Bike Compression Head Replacement: шаг 4, изображение 3 из 3
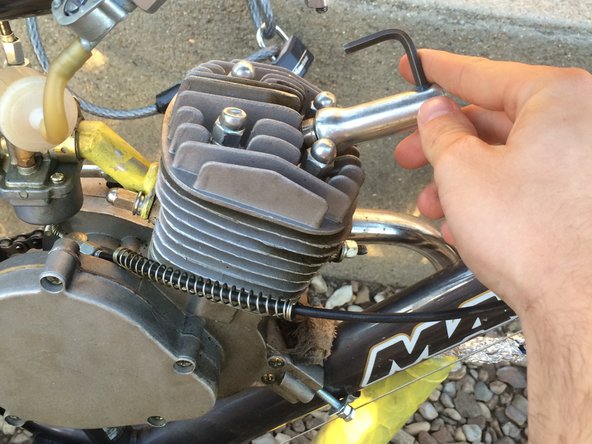
      • Place your 3/8" wrench on any of the four top cap nuts on the compression head currently on the bike.

      • Turn the wrench counter clock wise to loosen the cap nut and remove it. Then remove the washer and the locking washer. Repeat this for all cap nuts.

      • Keep the washers and lock washers with the cap nut they were with on the compression head, it is not recommended to mix them up.

      • Use the flat head screw driver to remove washers stuck to the compression head.

      • Sometimes the bolt gets stuck on the nut and comes out, do not worry, this is normal.

      Спросите у FixBot

      Добавить комментарий

    5. 68cc Gas Bike Compression Head Replacement: шаг 5, изображение 1 из 3 68cc Gas Bike Compression Head Replacement: шаг 5, изображение 2 из 3 68cc Gas Bike Compression Head Replacement: шаг 5, изображение 3 из 3
      • Remove the compression head by lifting up.

      • Remove the head gasket from the engine. Sometimes the head gasket gets stuck to the compression, remove the head gasket if it is stuck to the compression head.

      • Clean metal head gasket with the rubbing alcohol.

      • Reinstall metal head gasket on the engine after cleaning.

      • Without the head gasket properly cleaned and replaced onto the engine the engine will not run properly.

      Спросите у FixBot

      Добавить комментарий

    6. 68cc Gas Bike Compression Head Replacement: шаг 6, изображение 1 из 3 68cc Gas Bike Compression Head Replacement: шаг 6, изображение 2 из 3 68cc Gas Bike Compression Head Replacement: шаг 6, изображение 3 из 3
      • Place the new compression head on the engine.

      • Place the washers and locking washers back in their respective places and place the cap nuts on top. Hand tighten the bolts.

      Спросите у FixBot

      Добавить комментарий

    7. 68cc Gas Bike Compression Head Replacement: шаг 7, изображение 1 из 2 68cc Gas Bike Compression Head Replacement: шаг 7, изображение 2 из 2
      • This is important information for the next few steps.

      • This is nut #1, the one on the right closest to the camera.

      • This is nut #2, the one on the right farthest from the camera.

      • This is nut #3, the one on the right farthest from the camera.

      • This is nut #4, the one on the left closest to the camera.

      • Pay close attention to the relation of the nuts to the carburetor and the exhaust.

      • If you are looking at the engine from this view the handle bars will be to your right and the seat will be to your left.

      Спросите у FixBot

      Добавить комментарий

    8. 68cc Gas Bike Compression Head Replacement: шаг 8, изображение 1 из 2 68cc Gas Bike Compression Head Replacement: шаг 8, изображение 2 из 2
      • THE NEXT TWO STEPS ARE VERY IMPORTANT AND MAY HINDER PERFORMANCE OR CAUSE ENGINE FAILURE IF DONE INCORRECTLY.

      • Using your 3/8” wrench, place it on the first cap nut labeled in the picture above. This is the cap nut in the red circle. Tighten it 2 full turns clock wise.

      • Next, place the wrench on cap screw three and tighten it 2 full turns clock wise. Cap screw three is the one labeled with by yellow arrows or circles.

      Спросите у FixBot

      Добавить комментарий

    9. 68cc Gas Bike Compression Head Replacement: шаг 9, изображение 1 из 2 68cc Gas Bike Compression Head Replacement: шаг 9, изображение 2 из 2
      • Place the wrench on cap screw two and tighten it 2 full turns clock wise. Cap screw three is the one labeled with by orange arrows or circles.

      • Place the wrench on cap screw four and tighten for 2 turns. Cap screw four is labeled in green.

      Спросите у FixBot

      Добавить комментарий

    10. 68cc Gas Bike Compression Head Replacement: шаг 10, изображение 1 из 1
      • Repeat the tightening pattern two more times to make sure that all screws have the same amount of tightness one them.

      • The tightening sequence is 1 to 3 to2 to 4, and repeat. Or color wise, red to yellow to orange to green.

      Спросите у FixBot

      Добавить комментарий

    11. 68cc Gas Bike Compression Head Replacement: шаг 11, изображение 1 из 2 68cc Gas Bike Compression Head Replacement: шаг 11, изображение 2 из 2
      • Use the spark plug tool to reinstall the spark plug by screwing it in clock wise.

      • Reattach the rubber CDI to the spark plug.

      • Make a quick visual inspection to make sure nothing looks out of the ordinary.

      • You have now installed a new compression head on your 68cc gas bike!

      • Go out for a short ride to test the new compression head to make sure all components are properly installed.

      Спросите у FixBot

      Добавить комментарий

Финишная прямая

Отменить: Я не выполнил это руководство.

10 человек успешно провели ремонт по этому руководству.

Jake DeBoer

Участник с: 09/29/15

442 Репутация

1 руководство автора

Команда

Cal Poly, Team 15-1, Green Fall 2015 Участник Cal Poly, Team 15-1, Green Fall 2015

CPSU-GREEN-F15S15G1

5 членов

Автор 47 руководств

0 Комментарии к руководству

Добавить комментарий

Статистика просмотров:

За последние 24 часов: 2

За последние 7 дней: 21

За последние 30 дней: 104

За всё время: 4,323