Перейти к основному содержанию
Присоединяйся к сообществу ремонтников - Создай аккаунт

ACN Iris WG4K Blade Connector Replacement

Выберете то, что вам нужно

  1. ACN Iris WG4K Blade Connector Replacement, Handset: шаг 1, изображение 1 из 2 ACN Iris WG4K Blade Connector Replacement, Handset: шаг 1, изображение 2 из 2
    • Press upwards with your index finger on the 4P4C connector as shown in the image.

    • Pull the connector gently out of its socket.

    Спросите у FixBot

    Добавить комментарий

  2. ACN Iris WG4K Blade Connector Replacement, Lower Case: шаг 2, изображение 1 из 1
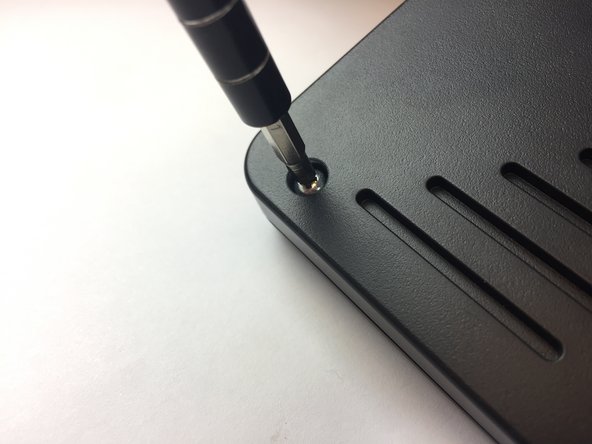
    • Flip the main body of the video phone so that the bottom is facing up.

    • Use the Phillips #0 Screwdriver to remove the four Phillips head screws (6 mm) highlighted by the red circles.

    Спросите у FixBot

    Добавить комментарий

  3. ACN Iris WG4K Blade Connector Replacement: шаг 3, изображение 1 из 2 ACN Iris WG4K Blade Connector Replacement: шаг 3, изображение 2 из 2
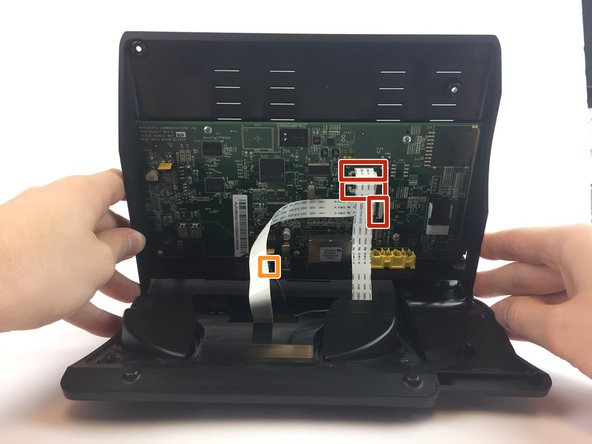
    • Lift the back case upwards to expose the inside components.

    • Red rectangles indicate the three ribbon cables.

    • The orange square indicates the blade connector.

    Спросите у FixBot

    Добавить комментарий

  4. ACN Iris WG4K Blade Connector Replacement: шаг 4, изображение 1 из 3 ACN Iris WG4K Blade Connector Replacement: шаг 4, изображение 2 из 3 ACN Iris WG4K Blade Connector Replacement: шаг 4, изображение 3 из 3
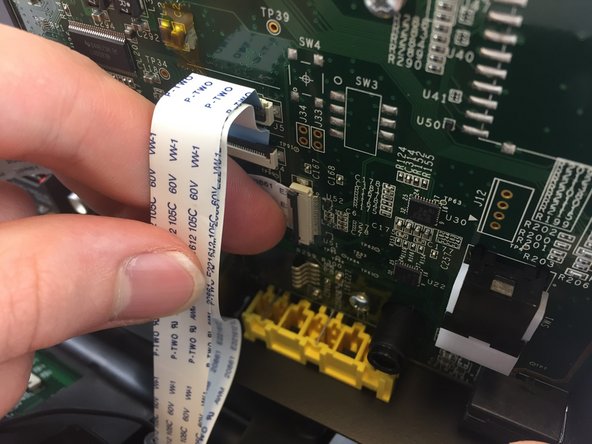
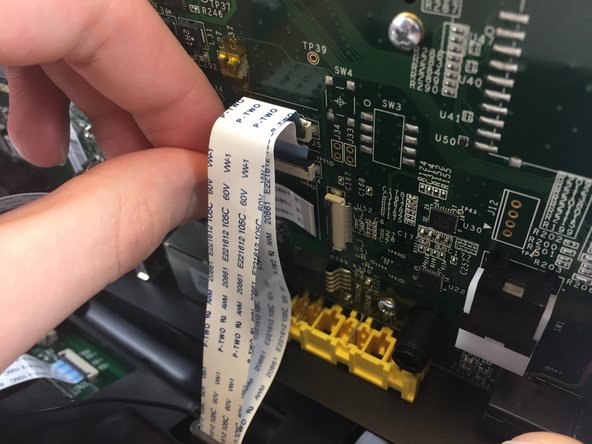
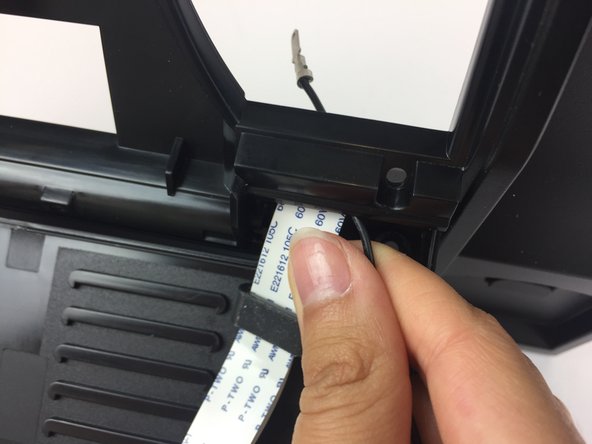
    • Disconnect the three ribbon cables from their insulation-displacement connectors by flipping up the black plastic clip.

    • Gently pull the ribbon cables out of their insulation-displacement connectors.

    Спросите у FixBot

    Добавить комментарий

  5. ACN Iris WG4K Blade Connector Replacement: шаг 5, изображение 1 из 2 ACN Iris WG4K Blade Connector Replacement: шаг 5, изображение 2 из 2
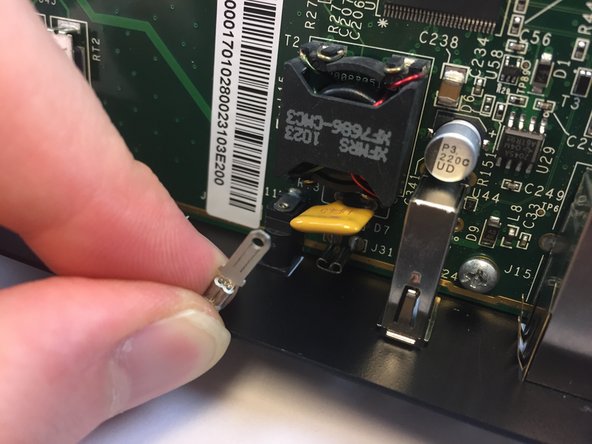
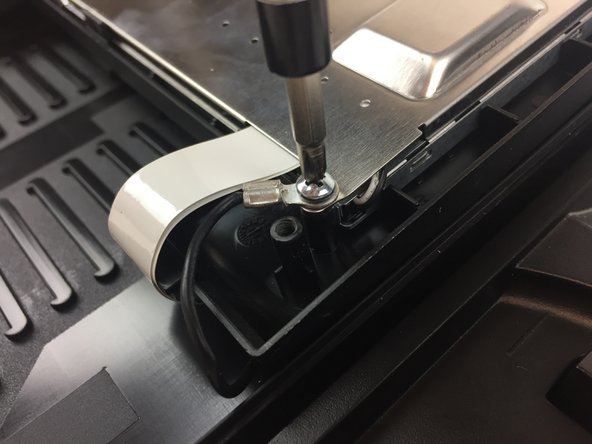
    • Disconnect the blade connector from the blade receptacle by gripping the exposed area of the blade connector.

    • Gently pull the blade connector out of the blade receptacle.

    Спросите у FixBot

    Добавить комментарий

  6. ACN Iris WG4K Blade Connector Replacement: шаг 6, изображение 1 из 1
    • Gently lift up the lower case to separate it from the top case.

    Спросите у FixBot

    Добавить комментарий

  7. ACN Iris WG4K Blade Connector Replacement, Blade Connector: шаг 7, изображение 1 из 1
    • Use the Phillips #0 Screwdriver to remove the four Phillips head screws (6 mm) highlighted by the red circles.

    Спросите у FixBot

    Добавить комментарий

  8. ACN Iris WG4K Blade Connector Replacement: шаг 8, изображение 1 из 1
    • Gently lift up on the upper case to separate it from the keypad/speaker panel.

    Спросите у FixBot

    Добавить комментарий

  9. ACN Iris WG4K Blade Connector Replacement: шаг 9, изображение 1 из 1
    • Use the Phillips #0 Screwdriver to remove the two Phillips head screws (5 mm) located on the upper case.

    Спросите у FixBot

    Добавить комментарий

  10. ACN Iris WG4K Blade Connector Replacement: шаг 10, изображение 1 из 1
    • Rotate the top case 180 degrees so that the video screen is closest to you.

    • Lift up the bottom up so that it is perpendicular to the table (this helps you reach the two top screws).

    • The four Phillips head screws (6 mm) are highlighted by the red circles.

    Спросите у FixBot

    Добавить комментарий

  11. ACN Iris WG4K Blade Connector Replacement: шаг 11, изображение 1 из 1
    • Use the Phillips #0 Screwdriver to remove the four Phillips head screws (6 mm).

    Спросите у FixBot

    Добавить комментарий

  12. ACN Iris WG4K Blade Connector Replacement: шаг 12, изображение 1 из 1
    • Flip the top case so that the video screen is facing up.

    Спросите у FixBot

    Добавить комментарий

  13. ACN Iris WG4K Blade Connector Replacement: шаг 13, изображение 1 из 1
    • Rotate the top case 180 degrees.

    • Gently lift up on the video screen and the blade and ribbon connector to give you more slack to work with.

    Спросите у FixBot

    Добавить комментарий

  14. ACN Iris WG4K Blade Connector Replacement: шаг 14, изображение 1 из 1
    • Place the video screen face down to expose the two screws. The screws are indicated by the red circles.

    Спросите у FixBot

    Добавить комментарий

  15. ACN Iris WG4K Blade Connector Replacement: шаг 15, изображение 1 из 2 ACN Iris WG4K Blade Connector Replacement: шаг 15, изображение 2 из 2
    • Use the Phillips #0 Screwdriver to remove the two Phillips head screws (6 mm)

    Спросите у FixBot

    Добавить комментарий

  16. ACN Iris WG4K Blade Connector Replacement: шаг 16, изображение 1 из 2 ACN Iris WG4K Blade Connector Replacement: шаг 16, изображение 2 из 2
    • Pull the ribbon connector and blade connector through the top case.

    Спросите у FixBot

    Добавить комментарий

Заключение

To reassemble your device, follow these instructions in reverse order.

Отменить: Я не выполнил это руководство.

Itze Kenney

Участник с: 02/14/17

1 066 Репутация

Автор 9 руководств

Команда

USF Tampa, Team 20-4, Remmell Spring 2017 Участник USF Tampa, Team 20-4, Remmell Spring 2017

USFT-REMMELL-S17S20G4

4 членов

Автор 20 руководств

0 Комментарии к руководству

Добавить комментарий

Статистика просмотров:

За последние 24 часов: 3

За последние 7 дней: 6

За последние 30 дней: 39

За всё время: 491