Перейти к основному содержанию

AMD AM3+ Desktop Processor Replacement and AMD 125W Cooler cleaning.

Выберете то, что вам нужно

  1. AMD AM3+ Desktop Processor Replacement and AMD 125W Cooler cleaning., Initial precautions: шаг 1, изображение 1 из 1
    • Shutdown your PC. Do not remove or unplug the power cable! It will provide the Ground that and electrostatic charge you have will be dissipated to! Electrostatic Discharge (ESD)

    • Remove the case cover, clip the crocodile clip of the anti-static wrist band to an unpainted part of the metal case attach the the wristband on the other end of the cable to your wrist, left is best if you are right handed.

  2. AMD AM3+ Desktop Processor Replacement and AMD 125W Cooler cleaning., Remove the CPU cooler.: шаг 2, изображение 1 из 3 AMD AM3+ Desktop Processor Replacement and AMD 125W Cooler cleaning., Remove the CPU cooler.: шаг 2, изображение 2 из 3 AMD AM3+ Desktop Processor Replacement and AMD 125W Cooler cleaning., Remove the CPU cooler.: шаг 2, изображение 3 из 3
    • Does your new processor run hotter than the processor you are replacing it with? This is termed TDP ( thermal design power) and can be easily found with a google search. Check that your existing cooler is designed to dissipate the new processors maximum heat output . If it is not you must replace it!

    • Before removing the cooler, unplug the fan from the motherboard.

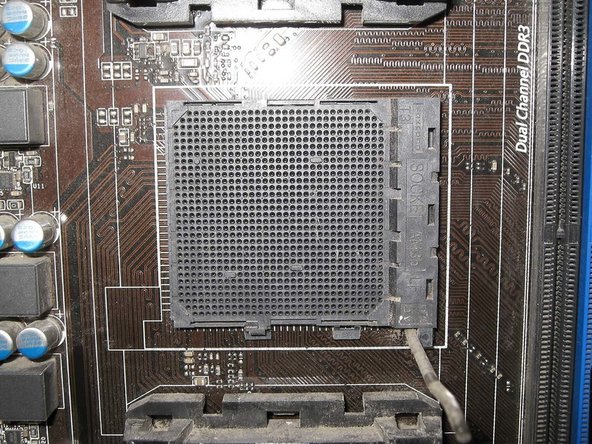
    • You will see the processor as shown. It is held in place to the AM3+ socket by two notches. On the left of the first picture you will see a leaver, pull this leave up till it faces the other way. This will un-tension the retaining mechanism allowing you to remove first one side from its notche the the other.

  3. AMD AM3+ Desktop Processor Replacement and AMD 125W Cooler cleaning., (Optional) If you are keeping the cooler you should clean it thoroughly!: шаг 3, изображение 1 из 3 AMD AM3+ Desktop Processor Replacement and AMD 125W Cooler cleaning., (Optional) If you are keeping the cooler you should clean it thoroughly!: шаг 3, изображение 2 из 3 AMD AM3+ Desktop Processor Replacement and AMD 125W Cooler cleaning., (Optional) If you are keeping the cooler you should clean it thoroughly!: шаг 3, изображение 3 из 3
    • When your CPU is working under high load it will generate heat approaching it TDP. If the heatsink of the cooler is clog with dust and debis or the fan is not working well the CPU will over heat. You do not want this to happen!

    • Spin the fan with your finger it should spin freely and without noise, resistance.

    • As you can see a lot of dust had built up under the heatsink, even though the top had recently been cleaned!

    • How far you go in cleaning the heatsink is your decision. I removed the Fan assembly to clean it thoroughly.

    • The Fan assembly was held on with four plastic clips. very carefully use a flat blade screwdriver to pry the clip up a little and push the assembly up, repeat until the fan assembly comes off.

    • Remove the metal plate in the center of the heatsink. Clean it and put it somewhere safe. You do not want to loose this inside a vacuum cleaner!

  4. AMD AM3+ Desktop Processor Replacement and AMD 125W Cooler cleaning., (Optional) Cleaning the cooler: шаг 4, изображение 1 из 3 AMD AM3+ Desktop Processor Replacement and AMD 125W Cooler cleaning., (Optional) Cleaning the cooler: шаг 4, изображение 2 из 3 AMD AM3+ Desktop Processor Replacement and AMD 125W Cooler cleaning., (Optional) Cleaning the cooler: шаг 4, изображение 3 из 3
    • Use a paint brush, and Vacuum cleaner to remove all dust and debris from the Heatsink.

    • Clean the fan assembly with a disinfectant wipe(s) and then dry it with a lint free cloth.

    • Ensure you clean the base of the heatsink that will be in contact with the processor very well. There should be no remnants of the old heatsink compound.

  5. AMD AM3+ Desktop Processor Replacement and AMD 125W Cooler cleaning., (Optional) Cooler cleaner re-assembly: шаг 5, изображение 1 из 3 AMD AM3+ Desktop Processor Replacement and AMD 125W Cooler cleaning., (Optional) Cooler cleaner re-assembly: шаг 5, изображение 2 из 3 AMD AM3+ Desktop Processor Replacement and AMD 125W Cooler cleaning., (Optional) Cooler cleaner re-assembly: шаг 5, изображение 3 из 3
    • Re-insert the metal plate you removed before vacuuming. Place it in the hole and push it down with the handle of a pair of pliers or something similar to prevent it falling sideways.

    • Re-insert the retaining mechanism, note the metal plate is to spread the force of the clamping mechanism

    • Carefully Clip the fan assembly back on top of the heatsink.

  6. AMD AM3+ Desktop Processor Replacement and AMD 125W Cooler cleaning., (Optional) Fan replacement: шаг 6, изображение 1 из 3 AMD AM3+ Desktop Processor Replacement and AMD 125W Cooler cleaning., (Optional) Fan replacement: шаг 6, изображение 2 из 3 AMD AM3+ Desktop Processor Replacement and AMD 125W Cooler cleaning., (Optional) Fan replacement: шаг 6, изображение 3 из 3
    • To remove the Fan just flex the retaining frame from the sides marked AVC and the fan will pup out!

    • I could not buy the original fan from the US so a substituted an HP Foxconn fan. the important thing is to get a high-speed fan of original power rating so 0.7a/700mA or higher. This fan spins at 6000rpm and seems to cool better but is loud! Gave up and put a Zalman CNPS9900 in cooler and quieter!!! *See Pic 3*

    • If you swap the fan use a hardware monitor program to check the CPU temperature to ensure the fan is cooling sufficiently: See step 9!

  7. AMD AM3+ Desktop Processor Replacement and AMD 125W Cooler cleaning., Remove the the old Processor.: шаг 7, изображение 1 из 3 AMD AM3+ Desktop Processor Replacement and AMD 125W Cooler cleaning., Remove the the old Processor.: шаг 7, изображение 2 из 3 AMD AM3+ Desktop Processor Replacement and AMD 125W Cooler cleaning., Remove the the old Processor.: шаг 7, изображение 3 из 3
    Инструмент, используемый на этом этапе:
    Anti-Static Wrist Strap
    $7.95
    Купить
    • The Processor socket is a ZIF socket. '''Z'''ero '''I'''nsertion '''F'''orce. There should be no time when you have to apply any pressure or force when removing or inserting a processor!

    • To remove the processor on an AM3+ board gently push the leave on the socket way from under it's retaining clip and lift it up into a vertical position. If the machine is a tower chances are the processor will drop out.

    • Put the old processor into an anti-static container, Ensure your anti-static strap is connected. Remove the new processor from its anti-static container and gently place it in the socket. Both the processor and socket are marked as shown with a triangle to show the processor orientation.

    • If the processor does not drop into the socket cleanly invert it and ensure all of the pins are straight. If they are not box it up and return it if you can. Straighten processor pins is difficult and they can easily break.

  8. AMD AM3+ Desktop Processor Replacement and AMD 125W Cooler cleaning., Apply a Thin layer of Thermal paste: шаг 8, изображение 1 из 3 AMD AM3+ Desktop Processor Replacement and AMD 125W Cooler cleaning., Apply a Thin layer of Thermal paste: шаг 8, изображение 2 из 3 AMD AM3+ Desktop Processor Replacement and AMD 125W Cooler cleaning., Apply a Thin layer of Thermal paste: шаг 8, изображение 3 из 3
    Инструмент, используемый на этом этапе:
    Plastic Cards
    $2.99
    Купить
    • Place a blob of Thermal paste to the processor and spread it with a plastic card or similar. The Thermal paste should be spread in a thin even layer. I placed the heat sink on the processor and moved it around a little to further even out the thermal compound.

    • Do not apply too much Thermal paste/ compound! Its purpose is to maximize the contact surface area, filling in scratches and imperfections in the cooler or CPU surfaces.

  9. AMD AM3+ Desktop Processor Replacement and AMD 125W Cooler cleaning., Fit the Cooler and connect its fan.: шаг 9, изображение 1 из 3 AMD AM3+ Desktop Processor Replacement and AMD 125W Cooler cleaning., Fit the Cooler and connect its fan.: шаг 9, изображение 2 из 3 AMD AM3+ Desktop Processor Replacement and AMD 125W Cooler cleaning., Fit the Cooler and connect its fan.: шаг 9, изображение 3 из 3
    • If you chose to replace your cooler, use a cooler approved by the processor manufacturer. If you intend to Over Clock your new CPU you may be exceeding its TDP and require more cooling. Buy the best cooling solution you can. Shown in the last photograph is a friend's Noctua cooler as you can see it has massive heat dissipation capacity. I fitted a CNPS9900

    • Place the cooler on the CPU. Attach the bracket without the locking mechanism to its notch first then an attach the other side. Ensure both sides are attached, push the tension leaver into the locked position.

    • Once you have re-assembled your PC and powered it on you may be prompted to go into Setup/BIOS to save the new hardware configuration. If you have set any static voltage or timing values for the old CPU you may need to changed them or set them back to auto.

    • For Windows machines you can download a free utility to check temperatures and voltages: HWMonitor

    • For Linux machines you can use I-Nex to check temperatures and voltages

Заключение

To reassemble your device, follow these instructions in reverse order.

2 участников успешно повторили данное руководство.

Robin Taylor

Участник с: 11/25/18

1 235 Репутация

Автор 7 руководств

0 Комментариев

Добавить комментарий

Просмотр статистики:

За последние 24часов: 2

За последние 7 дней: 18

За последние 30 дней: 59

За всё время: 1,833