Перейти к основному содержанию

ASUS VivoBook S400C Speaker Replacement

Выберете то, что вам нужно

  1. ASUS VivoBook S400C Speaker Replacement, Remove the Bottom Cover: шаг 1, изображение 1 из 1
    • Flip the device over and remove the ten 5.7 mm screws with a Phillips #0 screwdriver.

  2. ASUS VivoBook S400C Speaker Replacement: шаг 2, изображение 1 из 2 ASUS VivoBook S400C Speaker Replacement: шаг 2, изображение 2 из 2
    • Use a spudger or your fingers to go around and lift the edges and release the back panel.

  3. ASUS VivoBook S400C Speaker Replacement, Disconnect the Battery: шаг 3, изображение 1 из 1
    • Using a spudger, lift up the plug connecting the battery to the motherboard.

  4. ASUS VivoBook S400C Speaker Replacement, Battery: шаг 4, изображение 1 из 1
    • With a Phillips #0 screwdriver, remove the four 5.7 mm screws holding the battery to the laptop.

  5. ASUS VivoBook S400C Speaker Replacement: шаг 5, изображение 1 из 1
    • Carefully lift the battery up and out of the device.

  6. ASUS VivoBook S400C Speaker Replacement, Hard Drive: шаг 6, изображение 1 из 1
    • Remove the three Phillips #0 screws holding the the hard drive in place:

    • Two 3.8 mm screws.

    • One 5.7 mm screw.

  7. ASUS VivoBook S400C Speaker Replacement: шаг 7, изображение 1 из 1
    • Pull left and lift out the hard drive.

  8. ASUS VivoBook S400C Speaker Replacement, LED Board: шаг 8, изображение 1 из 3 ASUS VivoBook S400C Speaker Replacement, LED Board: шаг 8, изображение 2 из 3 ASUS VivoBook S400C Speaker Replacement, LED Board: шаг 8, изображение 3 из 3
    • Disconnect the ribbon cable connecting the LED daughterboard and the motherboard by lifting the white tab on the LED side of the cable.

  9. ASUS VivoBook S400C Speaker Replacement: шаг 9, изображение 1 из 2 ASUS VivoBook S400C Speaker Replacement: шаг 9, изображение 2 из 2
    • Pull out the ribbon cable on the LED side by pulling on the blue tab.

  10. ASUS VivoBook S400C Speaker Replacement: шаг 10, изображение 1 из 3 ASUS VivoBook S400C Speaker Replacement: шаг 10, изображение 2 из 3 ASUS VivoBook S400C Speaker Replacement: шаг 10, изображение 3 из 3
    • The LED board is held in place by a hook on the left end and a latch on the right.

    • Press the latch with a spudger while lifting with a fingernail.

    • Pull the LED board to the right to clear the left-hand hook.

  11. ASUS VivoBook S400C Speaker Replacement, Speakers: шаг 11, изображение 1 из 2 ASUS VivoBook S400C Speaker Replacement, Speakers: шаг 11, изображение 2 из 2
    • Pull out the black cable connecting the motherboard to the speakers.

  12. ASUS VivoBook S400C Speaker Replacement: шаг 12, изображение 1 из 2 ASUS VivoBook S400C Speaker Replacement: шаг 12, изображение 2 из 2
    • Deroute the speaker wire from the motherboard to the left speaker.

  13. ASUS VivoBook S400C Speaker Replacement: шаг 13, изображение 1 из 3 ASUS VivoBook S400C Speaker Replacement: шаг 13, изображение 2 из 3 ASUS VivoBook S400C Speaker Replacement: шаг 13, изображение 3 из 3
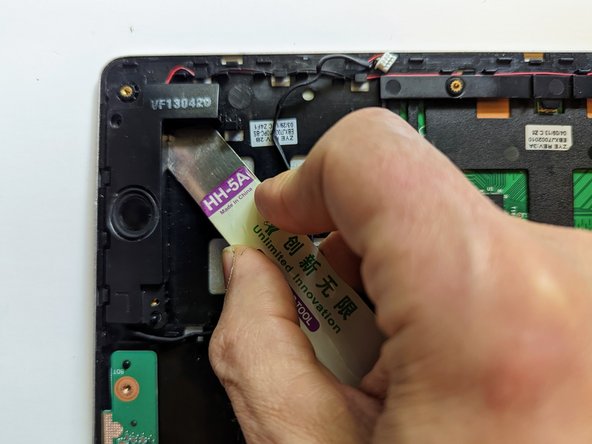
    • Using a metal opening tool, pry off the left speaker.

    • A fairly strong adhesive is used between the speakers and the body of the laptop, requiring considerable force to take apart. Work slowly and use caution when working near the delicate wires connecting the two speakers.

  14. ASUS VivoBook S400C Speaker Replacement: шаг 14, изображение 1 из 2 ASUS VivoBook S400C Speaker Replacement: шаг 14, изображение 2 из 2
    • Deroute the wires from the left speaker to the right.

  15. ASUS VivoBook S400C Speaker Replacement: шаг 15, изображение 1 из 2 ASUS VivoBook S400C Speaker Replacement: шаг 15, изображение 2 из 2
    • Continue to deroute the speaker wire to the right speaker.

  16. ASUS VivoBook S400C Speaker Replacement: шаг 16, изображение 1 из 3 ASUS VivoBook S400C Speaker Replacement: шаг 16, изображение 2 из 3 ASUS VivoBook S400C Speaker Replacement: шаг 16, изображение 3 из 3
    • Using a metal opening tool, pry off the right speaker.

    • It bears repeating that a fairly strong adhesive is used between the speakers and the body of the laptop, requiring considerable force to take apart.

Заключение

To reassemble your device, follow these instructions in reverse order.

Еще один человек закончил это руководство.

Bryan Chung

Участник с: 10/18/19

437 Репутация

Автор 4 руководств

Команда

UC Santa Barbara, Team A-1, Bator Winter 2022 Участник UC Santa Barbara, Team A-1, Bator Winter 2022

UCSB-BATOR-W22SAG1

4 членов

Автор 4 руководств

0 Комментариев

Добавить комментарий

Просмотр статистики:

За последние 24часов: 0

За последние 7 дней: 2

За последние 30 дней: 10

За всё время: 986