Перейти к основному содержанию

ASUS X552LAV-BBI5N08 Screen Replacement

Выберете то, что вам нужно

  1. ASUS X552LAV-BBI5N08 Screen Replacement, Battery: шаг 1, изображение 1 из 1
    • Battery is not showed in pictures.

    • Flip the laptop face down.

  2. ASUS X552LAV-BBI5N08 Screen Replacement: шаг 2, изображение 1 из 3 ASUS X552LAV-BBI5N08 Screen Replacement: шаг 2, изображение 2 из 3 ASUS X552LAV-BBI5N08 Screen Replacement: шаг 2, изображение 3 из 3
    • Slide the right button to the left.

    • Hold the left button to the right.

    • While you hold the left button in position, slide the battery out by pushing it away from you.

  3. ASUS X552LAV-BBI5N08 Screen Replacement, Screen: шаг 3, изображение 1 из 3 ASUS X552LAV-BBI5N08 Screen Replacement, Screen: шаг 3, изображение 2 из 3 ASUS X552LAV-BBI5N08 Screen Replacement, Screen: шаг 3, изображение 3 из 3
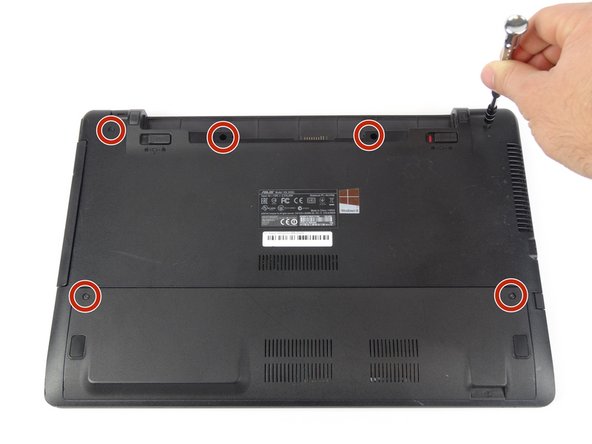
    • Remove the six 12mm screws located at both the battery area and the bottom panel, with a Tri-wing Y1 screwdriver.

    • Slide the bottom panel down and lift it up to remove.

    • Remove the seven 5.5mm screws located at the bottom area with a Tri-wing Y1 screwdriver.

  4. ASUS X552LAV-BBI5N08 Screen Replacement: шаг 4, изображение 1 из 3 ASUS X552LAV-BBI5N08 Screen Replacement: шаг 4, изображение 2 из 3 ASUS X552LAV-BBI5N08 Screen Replacement: шаг 4, изображение 3 из 3
    • Use an opening tool to split keyboard from base of the laptop.

    • Make sure to start from one end and go around the edges.

    • Flip laptop to sit on its bottom.

    • Lift keyboard up by the front edge.

  5. ASUS X552LAV-BBI5N08 Screen Replacement: шаг 5, изображение 1 из 3 ASUS X552LAV-BBI5N08 Screen Replacement: шаг 5, изображение 2 из 3 ASUS X552LAV-BBI5N08 Screen Replacement: шаг 5, изображение 3 из 3
    • Flip up the small locking flap for the two ZIF connectors.

    • Unplug the connectors that are keeping the keyboard connected.

  6. ASUS X552LAV-BBI5N08 Screen Replacement: шаг 6, изображение 1 из 3 ASUS X552LAV-BBI5N08 Screen Replacement: шаг 6, изображение 2 из 3 ASUS X552LAV-BBI5N08 Screen Replacement: шаг 6, изображение 3 из 3
    • Flip up the locking flap for the ZIF connector.

    • Unplug the connector.

  7. ASUS X552LAV-BBI5N08 Screen Replacement: шаг 7, изображение 1 из 3 ASUS X552LAV-BBI5N08 Screen Replacement: шаг 7, изображение 2 из 3 ASUS X552LAV-BBI5N08 Screen Replacement: шаг 7, изображение 3 из 3
    • Flip laptop to sit with the screen on the bottom.

    • Use tweezers to remove the square decorative sticker from the top of screws from the edge of the screen frame.

    • Remove six 4mm screws (with a JIS #1 screwdriver) from under the stickers and both of the hinges.

  8. ASUS X552LAV-BBI5N08 Screen Replacement: шаг 8, изображение 1 из 2 ASUS X552LAV-BBI5N08 Screen Replacement: шаг 8, изображение 2 из 2
    • Release hinges with the motion of opening a book.

  9. ASUS X552LAV-BBI5N08 Screen Replacement: шаг 9, изображение 1 из 3 ASUS X552LAV-BBI5N08 Screen Replacement: шаг 9, изображение 2 из 3 ASUS X552LAV-BBI5N08 Screen Replacement: шаг 9, изображение 3 из 3
    • Use an opening tool to pry apart the frame from the edge of the screen

    • Go around the edges til the frame pops off from the screen

  10. ASUS X552LAV-BBI5N08 Screen Replacement: шаг 10, изображение 1 из 3 ASUS X552LAV-BBI5N08 Screen Replacement: шаг 10, изображение 2 из 3 ASUS X552LAV-BBI5N08 Screen Replacement: шаг 10, изображение 3 из 3
    • Remove eight 4mm screws from the corners of the screen using a JIS #000 screwdriver.

    • Flip the screen towards the bottom panel face down.

  11. ASUS X552LAV-BBI5N08 Screen Replacement: шаг 11, изображение 1 из 3 ASUS X552LAV-BBI5N08 Screen Replacement: шаг 11, изображение 2 из 3 ASUS X552LAV-BBI5N08 Screen Replacement: шаг 11, изображение 3 из 3
    • Use tweezers to remove the tape from the top of yellow lock.

    • Open the yellow ZIF connector.

  12. ASUS X552LAV-BBI5N08 Screen Replacement: шаг 12, изображение 1 из 2 ASUS X552LAV-BBI5N08 Screen Replacement: шаг 12, изображение 2 из 2
    • Remove the tape completely from the back panel.

  13. ASUS X552LAV-BBI5N08 Screen Replacement: шаг 13, изображение 1 из 3 ASUS X552LAV-BBI5N08 Screen Replacement: шаг 13, изображение 2 из 3 ASUS X552LAV-BBI5N08 Screen Replacement: шаг 13, изображение 3 из 3
    • Remove the casing from the edges of the screen by removing the eight 2mm screws with a JIS #000 screwdriver.

    • Pull the screen up to remove it.

Заключение

To reassemble your device, follow these instructions in reverse order.

Jason Vo

Участник с: 02/15/18

857 Репутация

Автор 5 руководств

Команда

USF Tampa, Team S17-G1, Boczar Spring 2018 Участник USF Tampa, Team S17-G1, Boczar Spring 2018

USFT-BOCZAR-S18S17G1

4 членов

Автор 5 руководств

0 Комментариев

Добавить комментарий

Просмотр статистики:

За последние 24часов: 0

За последние 7 дней: 2

За последние 30 дней: 5

За всё время: 365