Эта версия возможно содержит некорректные исправления. Переключить на последнюю проверенную версию.
Выберете то, что вам нужно
-
Этот шаг не переведен. Помогите перевести
-
Don't be afraid to use extra force to get these components to open.
-
1) There is two side of the component to remove for the first picture
-
Before removing component in the third picture, there are two screws to be removed (one on each side).
-
-
Этот шаг не переведен. Помогите перевести
-
Pull the component out in the first picture with force!
-
Reach underneath the white component connected to wire and along there, push to remove it from the AUX component (black rectangle thing)
-
Once the white component detached, simply push AUX component out (toward you).
-
-
Этот шаг не переведен. Помогите перевести
-
Apply pressure where the toothpick is pointing and remove the cap at the same time. (Can get tricky)
-
Finally, like the third picture, remove the AUX circuit with force but try to be gentle also.
-
-
-
Этот шаг не переведен. Помогите перевести
-
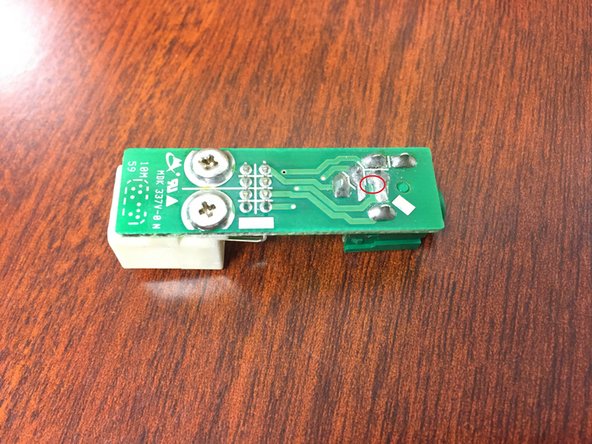
The center pin is located where the red circle is at on the picture
-
-
Этот шаг не переведен. Помогите перевести
-
Hold the soldering gun in one hand and the solder in another. Lightly touch them together where the pin is shown in previous step.
-
-
Этот шаг не переведен. Помогите перевести
-
Soldering does not have to be perfect as long as it connects the two pin we located in the previous picture.
-


Отменить: Я не выполнил это руководство.
11 участников успешно повторили данное руководство.
13 Комментариев
nice descriptions you could also wrap aluminum foil around the two middle prongs if you do not own or know how to solder
Hello Gary,
How would wrap aluminum foil around it? I mean how would you stick it to the pins so it doesn’t fall?
You are the man! This is perfect, it defeats the automatic change source when the cable is removed thing. I think what was happening is that the contacts on the plug got old and dirty and the radio was seeing very short disconnections, like a millisecond and was thinking that the cable was removed and switching inputs. This mod makes the radio think that the cable is always plugged in so it stays on the aux input, it's the way the radio should have been designed. The aux connection stays stable and it works perfectly, everyone should do this mod!
Much appreciated! I was getting so frustrated with this issue, very glad you put this guide together. I had some trouble trying to remove the AUX circuit from it’s protective housing, but then realized you don’t need to. So I pulled it out just enough to solder the 2 pins then put it right back in.