Перейти к основному содержанию

Acer Aspire 5251-1513 Motherboard Replacement

Выберете то, что вам нужно

  1. Acer Aspire 5251-1513 Motherboard Replacement, Battery: шаг 1, изображение 1 из 1
    • Turn over the laptop so the back is facing up.

  2. Acer Aspire 5251-1513 Motherboard Replacement: шаг 2, изображение 1 из 2 Acer Aspire 5251-1513 Motherboard Replacement: шаг 2, изображение 2 из 2
    • Next to the battery is a switch with a lock symbol on it.

    • Unlock the switch by sliding it to reveal a red unlock symbol.

  3. Acer Aspire 5251-1513 Motherboard Replacement: шаг 3, изображение 1 из 2 Acer Aspire 5251-1513 Motherboard Replacement: шаг 3, изображение 2 из 2
    • Pull the other switch completely while the red unlock symbol is still present. The battery pack should pop up a bit.

  4. Acer Aspire 5251-1513 Motherboard Replacement: шаг 4, изображение 1 из 2 Acer Aspire 5251-1513 Motherboard Replacement: шаг 4, изображение 2 из 2
    • Remove the battery pack via the indentation at the top of the battery in between the two switches.

  5. Acer Aspire 5251-1513 Motherboard Replacement, Motherboard: шаг 5, изображение 1 из 1
    • Unscrew the 8.6 mm screws on the back panel with a Phillips #0 screwdriver.

  6. Acer Aspire 5251-1513 Motherboard Replacement: шаг 6, изображение 1 из 2 Acer Aspire 5251-1513 Motherboard Replacement: шаг 6, изображение 2 из 2
    • Using a plastic opening tool, lift up the panel and remove it completely.

  7. Acer Aspire 5251-1513 Motherboard Replacement: шаг 7, изображение 1 из 2 Acer Aspire 5251-1513 Motherboard Replacement: шаг 7, изображение 2 из 2
    • Flip the laptop over as shown.

    • Locate the six tabs keeping the keyboard in place.

    • The tabs are hard to see because they are in-between the keys and the top cover but if you look close, there are black tabs you can push in so they are invisible.

  8. Acer Aspire 5251-1513 Motherboard Replacement: шаг 8, изображение 1 из 1
    • Pull on the edge of the keyboard using a spudger or your hands.

    • As you pull on the keyboard, push the tabs in one by one using small tweezers.

    • The keyboard may feel like its bending as you pop it out, but don't worry.

  9. Acer Aspire 5251-1513 Motherboard Replacement: шаг 9, изображение 1 из 1
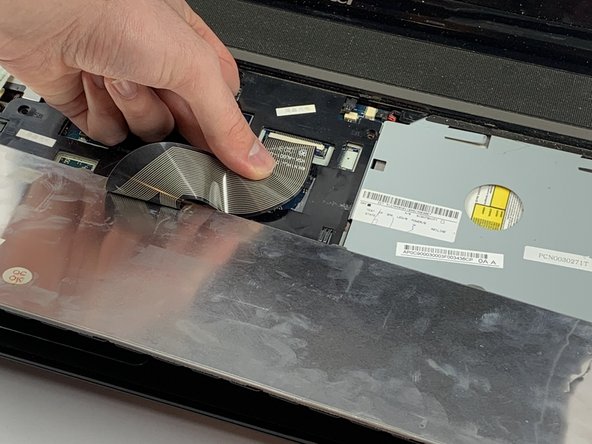
    • Once you pop it out and its separated, slowly turn it over to reveal its attachment to the connector.

    • Do not pull the keyboard out too hard because you risk damaging both the connector and the laptop.

  10. Acer Aspire 5251-1513 Motherboard Replacement: шаг 10, изображение 1 из 1
    • Using tweezers, slide the the tab down. This will release the connector that you can gently pull out of the socket.

    • If it does not come out easily, then you did not release it with the tabs and you risk ripping the connector.

  11. Acer Aspire 5251-1513 Motherboard Replacement: шаг 11, изображение 1 из 1
    • Once freed, remove the keyboard entirely and put it aside.

  12. Acer Aspire 5251-1513 Motherboard Replacement: шаг 12, изображение 1 из 2 Acer Aspire 5251-1513 Motherboard Replacement: шаг 12, изображение 2 из 2
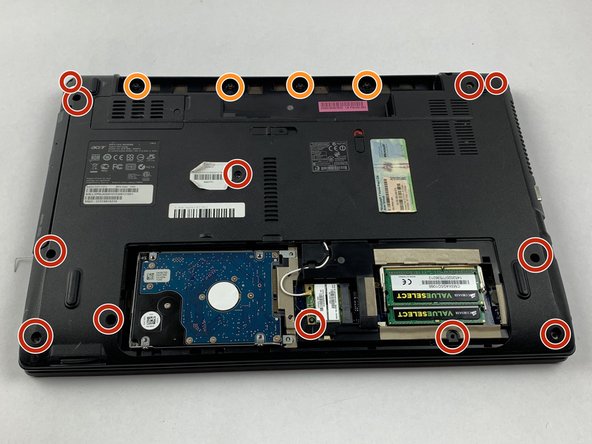
    • Flip the computer gently so that the back is facing you.

    • Remove all 12 of the 7.6 mm screws on the backside with a Phillips #0 screwdriver.

    • Remove 4 of the 5.4 mm screws on the backside with a Phillips #00 screwdriver.

  13. Acer Aspire 5251-1513 Motherboard Replacement: шаг 13, изображение 1 из 1
    • Flip the computer back over.

    • Unscrew the seven 5.6 mm screws located on the top cover using a Phillips #0 screwdriver.

  14. Acer Aspire 5251-1513 Motherboard Replacement: шаг 14, изображение 1 из 1
    • Locate the 4 connectors that must also be disconnected.

  15. Acer Aspire 5251-1513 Motherboard Replacement: шаг 15, изображение 1 из 1
    • Disconnect the connector using tweezers to pull down the brown tabs.

    • For the smaller right and left speaker cables, pull out the black tab completely also using tweezers.

  16. Acer Aspire 5251-1513 Motherboard Replacement: шаг 16, изображение 1 из 2 Acer Aspire 5251-1513 Motherboard Replacement: шаг 16, изображение 2 из 2
    • Using a plastic spudger or your hands, carefully lift up the corner of the top panel.

    • Continue to lift the panel until it is removed completely.

  17. Acer Aspire 5251-1513 Motherboard Replacement: шаг 17, изображение 1 из 2 Acer Aspire 5251-1513 Motherboard Replacement: шаг 17, изображение 2 из 2
    • For the video cable connector, use tweezers to pull up on the white tabs to release the connector.

    • Remove the remaining connectors using the same technique from previous steps: pull on brown tabs using a tweezer.

  18. Acer Aspire 5251-1513 Motherboard Replacement: шаг 18, изображение 1 из 1
    • Unscrew the 5.6 mm screws keeping the motherboard in place using a Phillips #0 screwdriver.

  19. Acer Aspire 5251-1513 Motherboard Replacement: шаг 19, изображение 1 из 1
    • Lift up the motherboard from its base slowly.

    • Please be careful because the motherboard is still attached to the computer through a DC Jack cable.

  20. Acer Aspire 5251-1513 Motherboard Replacement: шаг 20, изображение 1 из 2 Acer Aspire 5251-1513 Motherboard Replacement: шаг 20, изображение 2 из 2
    • Disconnect the cable attached to the bottom of the motherboard.

    • Pull on the brown tab using tweezers until its completely disconnected and remove the motherboard.

Заключение

To reassemble your device, follow these instructions in reverse order.

3 участников успешно повторили данное руководство.

Gicely Rodriguez

Участник с: 02/14/19

1 029 Репутация

Автор 5 руководств

Команда

USF Tampa, Team S1-G6, Leahy Spring 2019 Участник USF Tampa, Team S1-G6, Leahy Spring 2019

USFT-LEAHY-S19S1G6

4 членов

Автор 5 руководств

Один комментарий

ola tudo bem?

voce sabe a ultima versao da bios?

julio garcia - Ответить

Добавить комментарий

Просмотр статистики:

За последние 24часов: 1

За последние 7 дней: 7

За последние 30 дней: 23

За всё время: 1,354