Эта версия возможно содержит некорректные исправления. Переключить на последнюю проверенную версию.
Выберете то, что вам нужно
-
Этот шаг не переведен. Помогите перевести
-
"Unlock" your battery by moving the switch as shown so that an unlocked lock on a red background is shown.
-
-
Этот шаг не переведен. Помогите перевести
-
Next move the other switch, while the unlocked symbol is still showing. The battery should pop up, and no longer be flush with the bottom of the laptop.
-
-
Этот шаг не переведен. Помогите перевести
-
Now remove the battery by lifting it out of the laptop by the side closest to the switches.
-
-
Этот шаг не переведен. Помогите перевести
-
You have successfully removed the battery. Congratulations!
-
-
Этот шаг не переведен. Помогите перевести
-
Now, locate the two screws that hold the back cover panel onto the laptop.
-
-
Этот шаг не переведен. Помогите перевести
-
Unscrew both of the screws that are holding the back panel in place with the Philips #00 head.
-
-
Этот шаг не переведен. Помогите перевести
-
Once both screws have been removed use a plastic opening tool to lift the panel up. Starting with the indented notch , and moving left and right from there.
-
-
Этот шаг не переведен. Помогите перевести
-
After the panel has been loosened by the plastic opening tool, take your finger, place it in the gap, and remove the panel from the laptop.
-
-
Этот шаг не переведен. Помогите перевести
-
Locate the two screws that are holding the hard drive in place.
-
-
-
Этот шаг не переведен. Помогите перевести
-
Carefully slide the hard drive in the opposite direction of where the screws are located until it dislocates.
-
-
Этот шаг не переведен. Помогите перевести
-
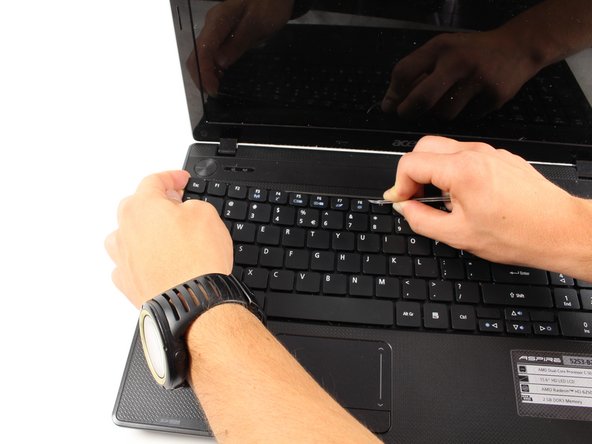
Using thin tweezers push the tabs in the keyboard in and pull up on the edge of the keyboard.
-
-
Этот шаг не переведен. Помогите перевести
-
Once the keyboard begins popping out of place use your hand to keep the part that has been detached from the laptop in the air.
-
Continue pushing in tabs and lifting up the keyboard as described above.
-
-
Этот шаг не переведен. Помогите перевести
-
Once the keyboard has been separated from the body of the laptop carefully lift the keyboard up and tilt it forward, leaving it to rest on the laptop as shown.
-
-
Этот шаг не переведен. Помогите перевести
-
Using tweezers pull the white tab down on both sides. This will release the blue and black connector.
-
-
Этот шаг не переведен. Помогите перевести
-
After you have removed all of the prerequisites its time to unscrew a few more screws. Flip your laptop over and first remove all the screw highlighted in red with the Phillips #00 screwdriver. These are 1/4" head diameter by 3/8" screw length screws.
-
Now remove the screws highlighted in orange with the Phillips #00 screwdriver. These are 5/32" head diameter by 5/32" screw length screws. Keep these separate from the other screws.
-
-
Этот шаг не переведен. Помогите перевести
-
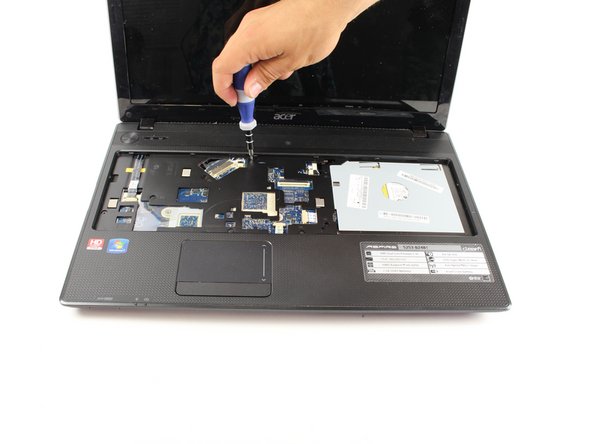
Flip the Laptop back over, and unscrew the 1/4" diameter head 7/32" length screws indicated in the picture.
-
-
Этот шаг не переведен. Помогите перевести
-
The indicated spots show where different components are attached to the motherboard (such as the power button and the track pad). You will have to remove these connections the same way you undid the keyboard using the tweezers.
-
-
Этот шаг не переведен. Помогите перевести
-
Here is a close-up of all of the connectors. Remember to use tweezers on the black part and carefully pull out both sides. Once it has been moved back slightly, pull the connector out just like the keyboard.
-
The third picture shows the connector to the speakers which can just be pulled straight out by tweezers.
-
-
Этот шаг не переведен. Помогите перевести
-
Use a plastic opening tool or your hands to carefully lift up the corner of the top panel of the laptop.
-
Once it starts coming off continue to lift it with the opening tool, or your hand, until it lifts off completely.
-
-
Этот шаг не переведен. Помогите перевести
-
With the top panel off the laptop will look like this. Locate the fan.
-
-
Этот шаг не переведен. Помогите перевести
-
Once you manage to locate the fan use the screwdriver to unscrew the three screws highlighted.
-
-
Этот шаг не переведен. Помогите перевести
-
Use tweezers to disconnect the wires connecting the fan to the laptop.
-
-
Этот шаг не переведен. Помогите перевести
-
Now the fan is fully disconnected and you can pull it away from the laptop.
-


Отменить: Я не выполнил это руководство.
13 участников успешно повторили данное руководство.
Команда

Cal Poly, Team 8-11, Regan Spring 2014 Участник Cal Poly, Team 8-11, Regan Spring 2014
CPSU-REGAN-S14S8G11
4 членов
Автор 15 руководств
2 Комментариев
I was 20 % started when I decided to find out if some one post on fan removal and lo and behold your post became,very useful, ,the rest was easy like sunday morning ,thanks guy for posting
Merci bonne courage