Перейти к основному содержанию

Acer Aspire E1-510-2500 Motherboard Replacement

Выберете то, что вам нужно

  1. Acer Aspire E1-510-2500 Motherboard Replacement, Battery: шаг 1, изображение 1 из 1
    • Ensure that your laptop is completely switched off, and disconnected from the power source.

    • Flip the laptop so that the base of the laptop is facing up.

  2. Acer Aspire E1-510-2500 Motherboard Replacement: шаг 2, изображение 1 из 2 Acer Aspire E1-510-2500 Motherboard Replacement: шаг 2, изображение 2 из 2
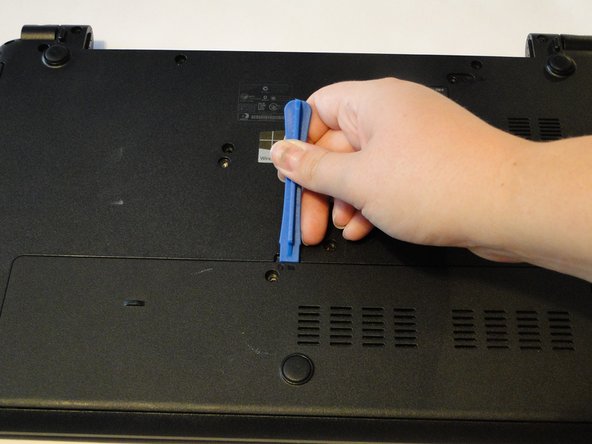
    • Insert a spudger into the battery release latch.

    • Slide the battery release latch to the right, this will eject the battery for safe removal.

  3. Acer Aspire E1-510-2500 Motherboard Replacement: шаг 3, изображение 1 из 2 Acer Aspire E1-510-2500 Motherboard Replacement: шаг 3, изображение 2 из 2
    • Carefully slide the battery out of the battery's home.

  4. Acer Aspire E1-510-2500 Motherboard Replacement, Motherboard: шаг 4, изображение 1 из 3 Acer Aspire E1-510-2500 Motherboard Replacement, Motherboard: шаг 4, изображение 2 из 3 Acer Aspire E1-510-2500 Motherboard Replacement, Motherboard: шаг 4, изображение 3 из 3
    • Using a Phillips 1 screwdriver, remove the 17 9 mm screws from the bottom of the laptop, including the one in the back panel.

    • Using a plastic opening tool, carefully remove the back panel.

    • Remove the 9mm screw under the back panel.

    • When reassembling, insert the back panel from the bottom edge first.

  5. Acer Aspire E1-510-2500 Motherboard Replacement: шаг 5, изображение 1 из 1
    • Using a plastic opening tool, carefully separate the frame along the edges of the laptop. This should separate the keyboard assembly from the bottom portion of the laptop.

  6. Acer Aspire E1-510-2500 Motherboard Replacement: шаг 6, изображение 1 из 3 Acer Aspire E1-510-2500 Motherboard Replacement: шаг 6, изображение 2 из 3 Acer Aspire E1-510-2500 Motherboard Replacement: шаг 6, изображение 3 из 3
    • Open the laptop, leaving the screen flat on the table.

    • Carefully pull the keyboard assembly out away from the base of the laptop. There should be three connections visible in the gap between the keyboard assembly and the base.

    • Using tweezers, carefully detach the connections from the base.

    • Place the keyboard assembly and the disk tray place holder aside.

    • For reassembly, leave the disk tray place holder out until after the blue tape connector has been reconnected, to have enough space to reattach the tape. The disk tray place holder can then be slid back into place from the side of the laptop.

  7. Acer Aspire E1-510-2500 Motherboard Replacement: шаг 7, изображение 1 из 1
    • Remove the six wire connections to the motherboard.

    • Remove the tape connection by lifting the plastic black holding piece and carefully pulling the tape out of it's slot.

  8. Acer Aspire E1-510-2500 Motherboard Replacement: шаг 8, изображение 1 из 2 Acer Aspire E1-510-2500 Motherboard Replacement: шаг 8, изображение 2 из 2
    • Using a Phillips 1 screwdriver, remove the two 5mm screws from the motherboard.

    • Using a Phillips 1 screwdriver, remove the black 5mm screw from the fan.

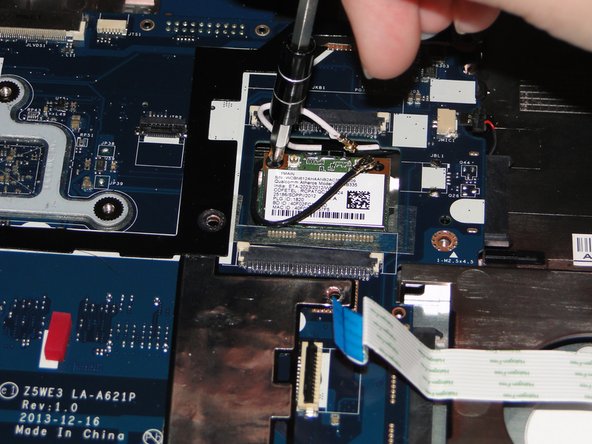
    • Using a Phillips 1 screwdriver, remove the black 3mm screw from the WiFi card.

  9. Acer Aspire E1-510-2500 Motherboard Replacement: шаг 9, изображение 1 из 1
    • Carefully remove the motherboard by lifting along the right edge first.

    • The headphone jack and the connection to the battery are both attached to the motherboard and under part of the casing. Pulling roughly at the motherboard could damage either or both of these pieces.

Заключение

To reassemble your device, follow these instructions in reverse order.

2 участников успешно повторили данное руководство.

Sebastian Taylor

Участник с: 10/19/17

733 Репутация

Автор 6 руководств

Команда

UMass Dartmouth, Team S2-G5, Julie Fall 2017 Участник UMass Dartmouth, Team S2-G5, Julie Fall 2017

UMASSD-JULIE-F17S2G5

3 членов

Автор 6 руководств

Один комментарий

The wude blue touchpad ribbon is difficult to use, what is the correct way to remove/replace it?

Redally Wood - Ответить

Добавить комментарий

Просмотр статистики:

За последние 24часов: 1

За последние 7 дней: 6

За последние 30 дней: 25

За всё время: 2,155