Перейти к основному содержанию

Acer Aspire E1-510-2500 RAM Card Replacement

Выберете то, что вам нужно

  1. Acer Aspire E1-510-2500 RAM Card Replacement, Battery: шаг 1, изображение 1 из 1
    • Ensure that your laptop is completely switched off, and disconnected from the power source.

    • Flip the laptop so that the base of the laptop is facing up.

  2. Acer Aspire E1-510-2500 RAM Card Replacement: шаг 2, изображение 1 из 2 Acer Aspire E1-510-2500 RAM Card Replacement: шаг 2, изображение 2 из 2
    • Insert a spudger into the battery release latch.

    • Slide the battery release latch to the right, this will eject the battery for safe removal.

  3. Acer Aspire E1-510-2500 RAM Card Replacement: шаг 3, изображение 1 из 2 Acer Aspire E1-510-2500 RAM Card Replacement: шаг 3, изображение 2 из 2
    • Carefully slide the battery out of the battery's home.

  4. Acer Aspire E1-510-2500 RAM Card Replacement, RAM Card: шаг 4, изображение 1 из 2 Acer Aspire E1-510-2500 RAM Card Replacement, RAM Card: шаг 4, изображение 2 из 2
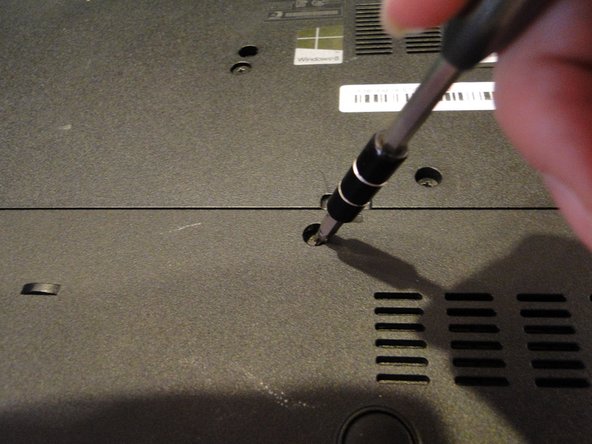
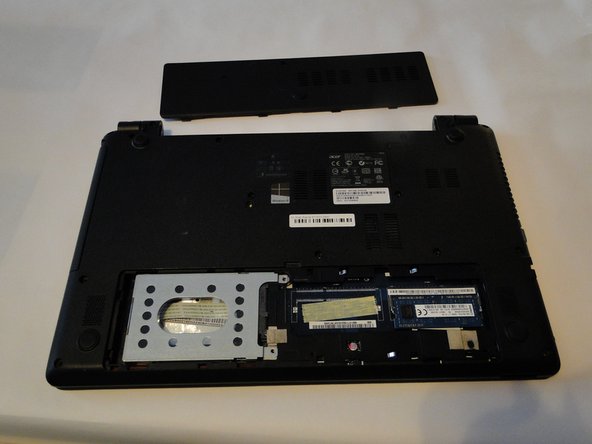
    • Using a Phillips 1 screwdriver, remove the 9 mm screw which secures the back panel.

  5. Acer Aspire E1-510-2500 RAM Card Replacement: шаг 5, изображение 1 из 2 Acer Aspire E1-510-2500 RAM Card Replacement: шаг 5, изображение 2 из 2
    • Use a plastic opening tool to carefully pry the back panel from its home.

    • When reassembling, insert the panel from the edge opposite the screw first.

  6. Acer Aspire E1-510-2500 RAM Card Replacement: шаг 6, изображение 1 из 3 Acer Aspire E1-510-2500 RAM Card Replacement: шаг 6, изображение 2 из 3 Acer Aspire E1-510-2500 RAM Card Replacement: шаг 6, изображение 3 из 3
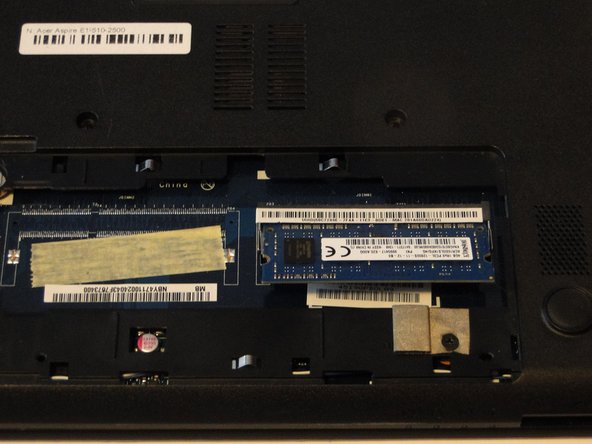
    • Locate the tabs on either side of the RAM card.

    • Push out on both tabs simultaneously to release the RAM card.

    • The RAM card should raise slightly at the unattached edge.

  7. Acer Aspire E1-510-2500 RAM Card Replacement: шаг 7, изображение 1 из 2 Acer Aspire E1-510-2500 RAM Card Replacement: шаг 7, изображение 2 из 2
    • Carefully remove the RAM card from its home.

Заключение

To reassemble your device, follow these instructions in reverse order.

Еще один человек закончил это руководство.

Sebastian Taylor

Участник с: 10/19/17

733 Репутация

Автор 6 руководств

Команда

UMass Dartmouth, Team S2-G5, Julie Fall 2017 Участник UMass Dartmouth, Team S2-G5, Julie Fall 2017

UMASSD-JULIE-F17S2G5

3 членов

Автор 6 руководств

0 Комментариев

Добавить комментарий

Просмотр статистики:

За последние 24часов: 3

За последние 7 дней: 7

За последние 30 дней: 18

За всё время: 567