Перейти к основному содержанию

Acer Aspire One 751h-1948 Hard Drive Replacement

Выберете то, что вам нужно

  1. Acer Aspire One 751h-1948 Hard Drive Replacement, Battery: шаг 1, изображение 1 из 1
    • Close the laptop and flip it over to view the back of the laptop.

  2. Acer Aspire One 751h-1948 Hard Drive Replacement: шаг 2, изображение 1 из 3 Acer Aspire One 751h-1948 Hard Drive Replacement: шаг 2, изображение 2 из 3 Acer Aspire One 751h-1948 Hard Drive Replacement: шаг 2, изображение 3 из 3
    • Unlock the right side of the battery by sliding the battery lock to the right. Then slide the left lock to the left and remove the battery.

  3. Acer Aspire One 751h-1948 Hard Drive Replacement, Hard Drive: шаг 3, изображение 1 из 1
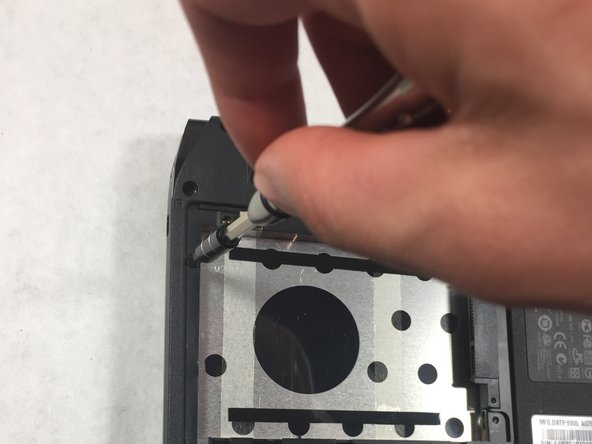
    • Unscrew the Phillips 0# (M2 L2.5 mm) screw and remove the cover panel.

    • These screws will not come out all the way.

  4. Acer Aspire One 751h-1948 Hard Drive Replacement: шаг 4, изображение 1 из 3 Acer Aspire One 751h-1948 Hard Drive Replacement: шаг 4, изображение 2 из 3 Acer Aspire One 751h-1948 Hard Drive Replacement: шаг 4, изображение 3 из 3
    • Remove the hard drive by sliding it to the left and pull it out.

  5. Acer Aspire One 751h-1948 Hard Drive Replacement: шаг 5, изображение 1 из 2 Acer Aspire One 751h-1948 Hard Drive Replacement: шаг 5, изображение 2 из 2
    • Unscrew the Phillips #0 (M2-L2.5 mm) screws.

Заключение

To reassemble your device, follow these instructions in reverse order.

Francisco Monteiro Junior

Участник с: 03/05/17

548 Репутация

Автор 4 руководств

Команда

UMass Dartmouth, Team S8-G2, Catania Spring 2017 Участник UMass Dartmouth, Team S8-G2, Catania Spring 2017

UMASSD-CATANIA-S17S8G2

3 членов

Автор 8 руководств

0 Комментариев

Добавить комментарий

Просмотр статистики:

За последние 24часов: 0

За последние 7 дней: 2

За последние 30 дней: 4

За всё время: 313