Перейти к основному содержанию

Acer Aspire TimelineX 1830T-68U118 Fan Replacement

Выберете то, что вам нужно

  1. Acer Aspire TimelineX 1830T-68U118 Fan Replacement, Battery: шаг 1, изображение 1 из 1
    • Turn your laptop over, and find the laptop battery release button locks for your Acer laptop.

  2. Acer Aspire TimelineX 1830T-68U118 Fan Replacement: шаг 2, изображение 1 из 3 Acer Aspire TimelineX 1830T-68U118 Fan Replacement: шаг 2, изображение 2 из 3 Acer Aspire TimelineX 1830T-68U118 Fan Replacement: шаг 2, изображение 3 из 3
    • Hold the battery release button, and pull the battery out of the laptop.

  3. Acer Aspire TimelineX 1830T-68U118 Fan Replacement, Fan: шаг 3, изображение 1 из 3 Acer Aspire TimelineX 1830T-68U118 Fan Replacement, Fan: шаг 3, изображение 2 из 3 Acer Aspire TimelineX 1830T-68U118 Fan Replacement, Fan: шаг 3, изображение 3 из 3
    • Remove battery before beginning.

    • Use a Phillips #0 screwdriver to remove the 5 screws from the bottom cover.

    • Pry open the cover using the Spudger tool.

  4. Acer Aspire TimelineX 1830T-68U118 Fan Replacement: шаг 4, изображение 1 из 3 Acer Aspire TimelineX 1830T-68U118 Fan Replacement: шаг 4, изображение 2 из 3 Acer Aspire TimelineX 1830T-68U118 Fan Replacement: шаг 4, изображение 3 из 3
    • Remove the keyboard with a plastic opening tool or spudger.

    • There is a plastic film that needs to be gently peeled from the laptop base.

    • Use caution when removing the keyboard as it is fragile.

  5. Acer Aspire TimelineX 1830T-68U118 Fan Replacement: шаг 5, изображение 1 из 2 Acer Aspire TimelineX 1830T-68U118 Fan Replacement: шаг 5, изображение 2 из 2
    • Use a Phillips #0 screwdriver to remove the 4 screws from the motherboard shield.

  6. Acer Aspire TimelineX 1830T-68U118 Fan Replacement: шаг 6, изображение 1 из 2 Acer Aspire TimelineX 1830T-68U118 Fan Replacement: шаг 6, изображение 2 из 2
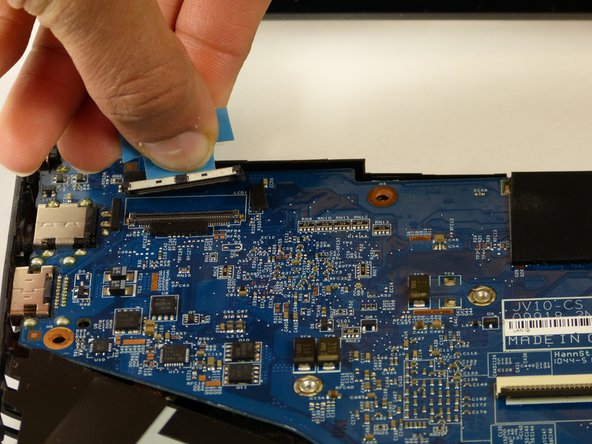
    • Remove the motherboard from the base of the laptop by unscrew the screw drivers using PH0 mm Phillips Head.

    • Carefully remove the charger attachment in the top left.

  7. Acer Aspire TimelineX 1830T-68U118 Fan Replacement: шаг 7, изображение 1 из 3 Acer Aspire TimelineX 1830T-68U118 Fan Replacement: шаг 7, изображение 2 из 3 Acer Aspire TimelineX 1830T-68U118 Fan Replacement: шаг 7, изображение 3 из 3
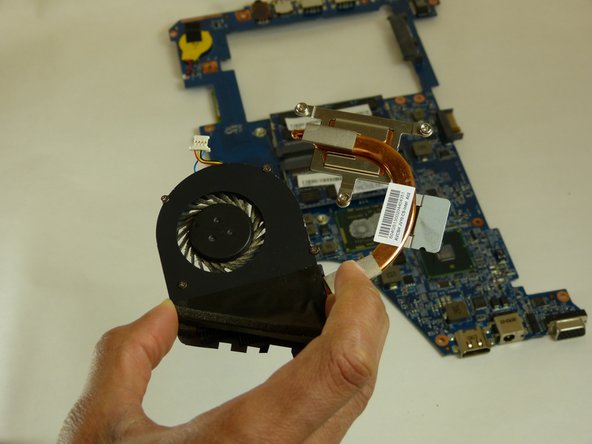
    • Carefully remove the fan from the motherboard by detaching the plastic insert as seen in the pictures

Заключение

To reassemble your device, follow these instructions in reverse order.

Brenna Waterbury

Участник с: 09/19/17

523 Репутация

Автор 5 руководств

Команда

Idaho State University, Team S4-G6, Watkins Fall 2017 Участник Idaho State University, Team S4-G6, Watkins Fall 2017

ISU-WATKINS-F17S4G6

4 членов

Автор 5 руководств

0 Комментариев

Добавить комментарий

Просмотр статистики:

За последние 24часов: 0

За последние 7 дней: 7

За последние 30 дней: 13

За всё время: 1,228