Перейти к основному содержанию

Acer Chromebook 15 CB5-571-C09S Screen Replacement

Выберете то, что вам нужно

  1. Acer Chromebook 15 CB5-571-C09S Screen Replacement, Screen: шаг 1, изображение 1 из 2 Acer Chromebook 15 CB5-571-C09S Screen Replacement, Screen: шаг 1, изображение 2 из 2
    • Wedge one of the plastic opening tool in the inside of the screen cover and run it along the inside perimeter of the screen.

  2. Acer Chromebook 15 CB5-571-C09S Screen Replacement: шаг 2, изображение 1 из 2 Acer Chromebook 15 CB5-571-C09S Screen Replacement: шаг 2, изображение 2 из 2
    • Wedge the plastic opening tool inside the back of the screen cover and run along the perimeter of the screen.

  3. Acer Chromebook 15 CB5-571-C09S Screen Replacement: шаг 3, изображение 1 из 2 Acer Chromebook 15 CB5-571-C09S Screen Replacement: шаг 3, изображение 2 из 2
    • Remove the screen cover from the screen.

    • Pry off a pair of small covers at the back of the hinges first.

    • Carefully grab the edges of the screen cover from opposite ends and pull off the screen towards you.

  4. Acer Chromebook 15 CB5-571-C09S Screen Replacement: шаг 4, изображение 1 из 3 Acer Chromebook 15 CB5-571-C09S Screen Replacement: шаг 4, изображение 2 из 3 Acer Chromebook 15 CB5-571-C09S Screen Replacement: шаг 4, изображение 3 из 3
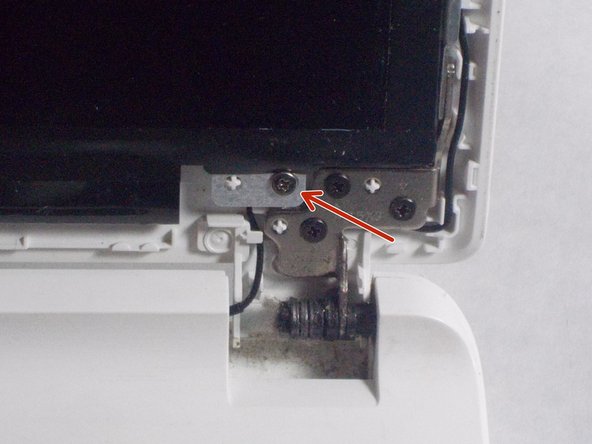
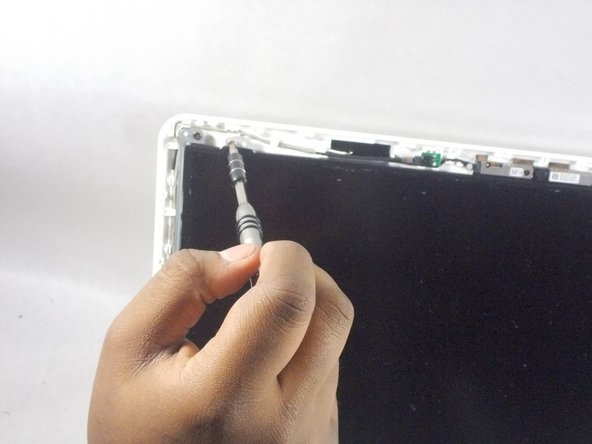
    • Unscrew the four 3 mm PH00 Phillips head screws located on the inside corners of the screen.

    • Be sure to unscrew the inner screws attached to the screen and not the outer screws.

  5. Acer Chromebook 15 CB5-571-C09S Screen Replacement: шаг 5, изображение 1 из 1
    • Grab the edges of the screen and pull it out towards you.

    • Do not try to remove the screen from the device at this point. There are still connections in the back that need to be disconnected before the screen can be removed.

  6. Acer Chromebook 15 CB5-571-C09S Screen Replacement: шаг 6, изображение 1 из 1
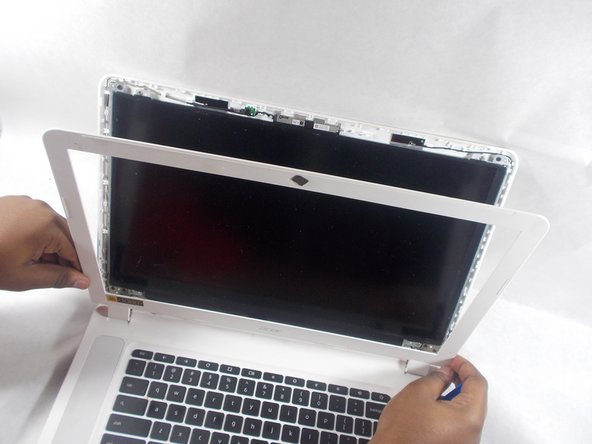
    • Take out screen from top part of the device and lay it down flat on the key board.

  7. Acer Chromebook 15 CB5-571-C09S Screen Replacement: шаг 7, изображение 1 из 3 Acer Chromebook 15 CB5-571-C09S Screen Replacement: шаг 7, изображение 2 из 3 Acer Chromebook 15 CB5-571-C09S Screen Replacement: шаг 7, изображение 3 из 3
    • Remove the screen connector from the back of the screen.

    • The screen connector is a "plug" that is connected to the back of the screen with a grey wire.

    • The screen connector is attached to the back of the screen with a sticker.

    • Peel and remove the sticker connecting the screen connector to the screen.

  8. Acer Chromebook 15 CB5-571-C09S Screen Replacement: шаг 8, изображение 1 из 2 Acer Chromebook 15 CB5-571-C09S Screen Replacement: шаг 8, изображение 2 из 2
    • Lift the screen back up from the keyboard and remove from the device.

Заключение

To reassemble your device, follow these instructions in reverse order.

5 участников успешно повторили данное руководство.

Sakiynah Howard

Участник с: 10/17/17

1 000 Репутация

Автор 6 руководств

Команда

UMass Dartmouth, Team S1-G3, Simcock Fall 2017 Участник UMass Dartmouth, Team S1-G3, Simcock Fall 2017

UMASSD-SIMCOCK-F17S1G3

3 членов

Автор 12 руководств

Один комментарий

Where can I find the replacement screen?

Riccardo Rigamondi - Ответить

Добавить комментарий

Просмотр статистики:

За последние 24часов: 0

За последние 7 дней: 1

За последние 30 дней: 20

За всё время: 2,043