Перейти к основному содержанию

Acer Chromebook 15 CB5-571-C09S Solid State Drive Replacement

Выберете то, что вам нужно

  1. Acer Chromebook 15 CB5-571-C09S Solid State Drive Replacement, Back Cover: шаг 1, изображение 1 из 1
    • Place the device on a flat surface faced down so that the fan vents are at the top of the device.

  2. Acer Chromebook 15 CB5-571-C09S Solid State Drive Replacement: шаг 2, изображение 1 из 2 Acer Chromebook 15 CB5-571-C09S Solid State Drive Replacement: шаг 2, изображение 2 из 2
    • Unscrew the eighteen 6 mm PH0 Phillips head screws from the back of the device.

  3. Acer Chromebook 15 CB5-571-C09S Solid State Drive Replacement: шаг 3, изображение 1 из 2 Acer Chromebook 15 CB5-571-C09S Solid State Drive Replacement: шаг 3, изображение 2 из 2
    • Use a plastic opening tool to pry open the back cover around the edges of the device.

    • Be careful not to crack or break the back cover of the device.

    • You will have to adjust the position of the device to pry it open along all the edges.

  4. Acer Chromebook 15 CB5-571-C09S Solid State Drive Replacement: шаг 4, изображение 1 из 2 Acer Chromebook 15 CB5-571-C09S Solid State Drive Replacement: шаг 4, изображение 2 из 2
    • Stand the device up with the hinges on top and carefully pull apart the back cover from the device.

  5. Acer Chromebook 15 CB5-571-C09S Solid State Drive Replacement, Solid State Drive: шаг 5, изображение 1 из 3 Acer Chromebook 15 CB5-571-C09S Solid State Drive Replacement, Solid State Drive: шаг 5, изображение 2 из 3 Acer Chromebook 15 CB5-571-C09S Solid State Drive Replacement, Solid State Drive: шаг 5, изображение 3 из 3
    • The Solid State Drive is the blue chip locate right beneath the fan.

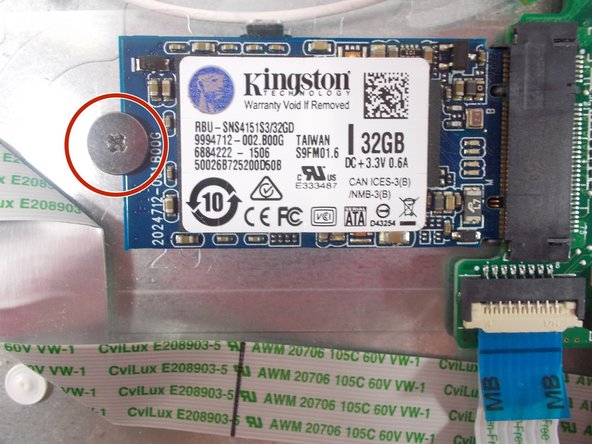
    • Unscrew the 3 mm PH00 Phillips head screw located on the left side of the SSD.

  6. Acer Chromebook 15 CB5-571-C09S Solid State Drive Replacement: шаг 6, изображение 1 из 2 Acer Chromebook 15 CB5-571-C09S Solid State Drive Replacement: шаг 6, изображение 2 из 2
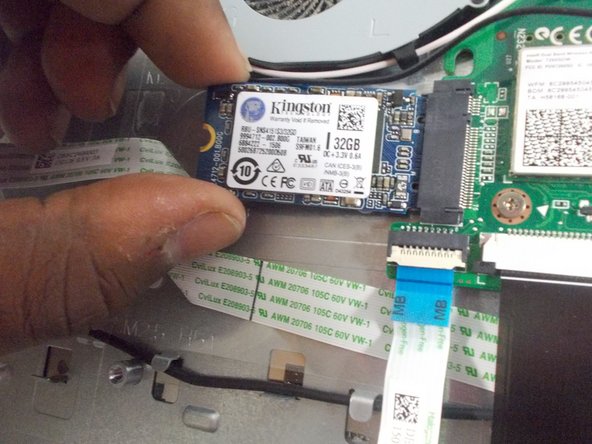
    • Grab the top and bottom edges of the SSD and carefully pull it out from the motherboard.

Заключение

To reassemble your device, follow these instructions in reverse order.

5 участников успешно повторили данное руководство.

Sakiynah Howard

Участник с: 10/17/17

1 000 Репутация

Автор 6 руководств

Команда

UMass Dartmouth, Team S1-G3, Simcock Fall 2017 Участник UMass Dartmouth, Team S1-G3, Simcock Fall 2017

UMASSD-SIMCOCK-F17S1G3

3 членов

Автор 12 руководств

Один комментарий

Mine has a positive and neutral wire moving away from the SSD, and removing the chip entirely hasn't impeded operation whatsoever despite me doing it to force developer mode.

Helios Bajammin - Ответить

Добавить комментарий

Просмотр статистики:

За последние 24часов: 3

За последние 7 дней: 11

За последние 30 дней: 38

За всё время: 3,243