Перейти к основному содержанию

Acer Chromebook C740-C4PE Heatsink Replacement

Выберете то, что вам нужно

  1. Acer Chromebook C740-C4PE Heatsink Replacement, Heatsink: шаг 1, изображение 1 из 3 Acer Chromebook C740-C4PE Heatsink Replacement, Heatsink: шаг 1, изображение 2 из 3 Acer Chromebook C740-C4PE Heatsink Replacement, Heatsink: шаг 1, изображение 3 из 3
    • Make sure the laptop is turned off and laid down on a flat surface.

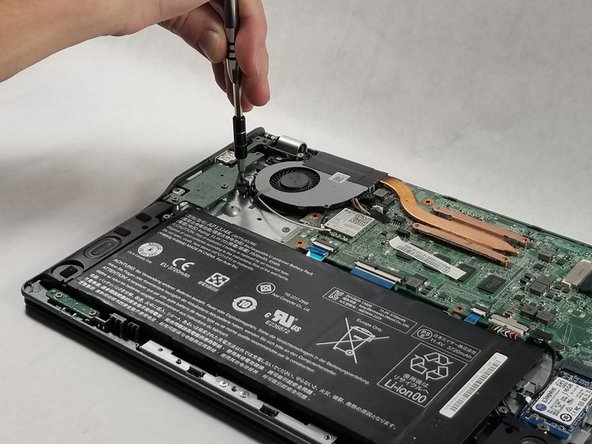
    • Unscrew the thirteen 10mm screws on the back of the device using a Phillips #0 screwdriver.

    • Use the spudger or any other prying tool to pry the back plate off of the device.

    • Be sure not to pry too hard as it may result in snapping the back plate.

  2. Acer Chromebook C740-C4PE Heatsink Replacement: шаг 2, изображение 1 из 2 Acer Chromebook C740-C4PE Heatsink Replacement: шаг 2, изображение 2 из 2
    • Remove the four 5mm screws on the heatsink using the Phillips #0 screwdriver.

  3. Acer Chromebook C740-C4PE Heatsink Replacement: шаг 3, изображение 1 из 2 Acer Chromebook C740-C4PE Heatsink Replacement: шаг 3, изображение 2 из 2
    • Loosen the two Phillips-head screws on the fan attached to the heatsink.

  4. Acer Chromebook C740-C4PE Heatsink Replacement: шаг 4, изображение 1 из 1
    • Detach the two antennae cables from the WiFi card by gently pulling on them.

  5. Acer Chromebook C740-C4PE Heatsink Replacement: шаг 5, изображение 1 из 1
    • Gently pull the fan cable out of the motherboard.

    • Pulling too hard may break the wires or the connector itself.

  6. Acer Chromebook C740-C4PE Heatsink Replacement: шаг 6, изображение 1 из 1
    • Remove the cable routed through the fan.

    • Do not completely remove the cables as they are attached to the motherboard. Once they are no longer routed in the fan, leave them as they are.

  7. Acer Chromebook C740-C4PE Heatsink Replacement: шаг 7, изображение 1 из 1
    • Remove the heatsink from the motherboard.

    • Before changing the heatsink/fan, you must clean off the thermal paste from the CPU and apply new thermal paste.

Заключение

To reassemble your device, follow these instructions in reverse order.

Еще один человек закончил это руководство.

Dylan Tocci

Участник с: 10/17/17

237 Репутация

Автор 2 руководств

Команда

UMass Dartmouth, Team S6-G4, Rockett Fall 2017 Участник UMass Dartmouth, Team S6-G4, Rockett Fall 2017

UMASSD-ROCKETT-F17S6G4

3 членов

Автор 12 руководств

Один комментарий

What type of thermal paste is best used?

Tracey Arria - Ответить

Добавить комментарий

Просмотр статистики:

За последние 24часов: 0

За последние 7 дней: 4

За последние 30 дней: 8

За всё время: 353