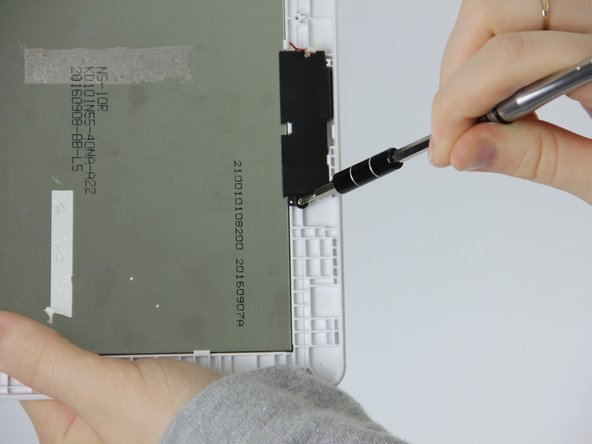
Перейти к основному содержанию

Acer Iconia One 10 B3-A30 Repair Screen Replacement

Выберете то, что вам нужно

  1. Acer Iconia One 10 B3-A30 Repair Screen Replacement, Battery: шаг 1, изображение 1 из 2 Acer Iconia One 10 B3-A30 Repair Screen Replacement, Battery: шаг 1, изображение 2 из 2
    • Make sure the device is powered off.

    • Open media port cover at the top of the tablet.

    • Use the Phillips #00 screwdriver to remove the 1 mm screw.

  2. Acer Iconia One 10 B3-A30 Repair Screen Replacement: шаг 2, изображение 1 из 3 Acer Iconia One 10 B3-A30 Repair Screen Replacement: шаг 2, изображение 2 из 3 Acer Iconia One 10 B3-A30 Repair Screen Replacement: шаг 2, изображение 3 из 3
    • Using the metal spudger, carefully pry open the back cover.

  3. Acer Iconia One 10 B3-A30 Repair Screen Replacement: шаг 3, изображение 1 из 1
    • Remove small section of grey tape.

  4. Acer Iconia One 10 B3-A30 Repair Screen Replacement: шаг 4, изображение 1 из 2 Acer Iconia One 10 B3-A30 Repair Screen Replacement: шаг 4, изображение 2 из 2
    • Unplug the connection cord from the motherboard.

  5. Acer Iconia One 10 B3-A30 Repair Screen Replacement: шаг 5, изображение 1 из 3 Acer Iconia One 10 B3-A30 Repair Screen Replacement: шаг 5, изображение 2 из 3 Acer Iconia One 10 B3-A30 Repair Screen Replacement: шаг 5, изображение 3 из 3
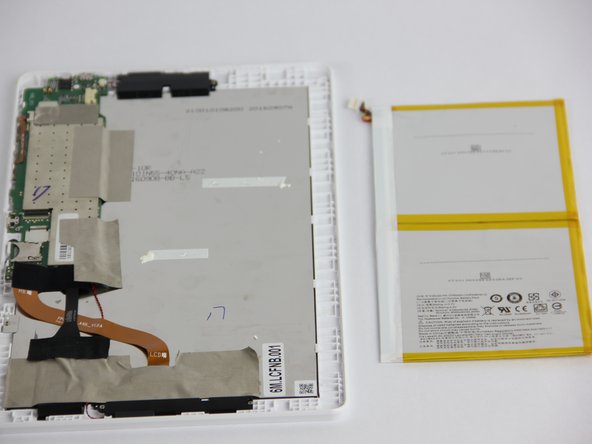
    • Try to remove the battery by pulling on the blue tabs.

    • If unsuccessful, use the black plastic spudger to gently break the glue bonds underneath and pull up to remove the battery.

    • Be very cautious not to puncture or bend the battery.

  6. Acer Iconia One 10 B3-A30 Repair Screen Replacement, Motherboard: шаг 6, изображение 1 из 3 Acer Iconia One 10 B3-A30 Repair Screen Replacement, Motherboard: шаг 6, изображение 2 из 3 Acer Iconia One 10 B3-A30 Repair Screen Replacement, Motherboard: шаг 6, изображение 3 из 3
    • Remove all of the tape surrounding the motherboard.

  7. Acer Iconia One 10 B3-A30 Repair Screen Replacement: шаг 7, изображение 1 из 2 Acer Iconia One 10 B3-A30 Repair Screen Replacement: шаг 7, изображение 2 из 2
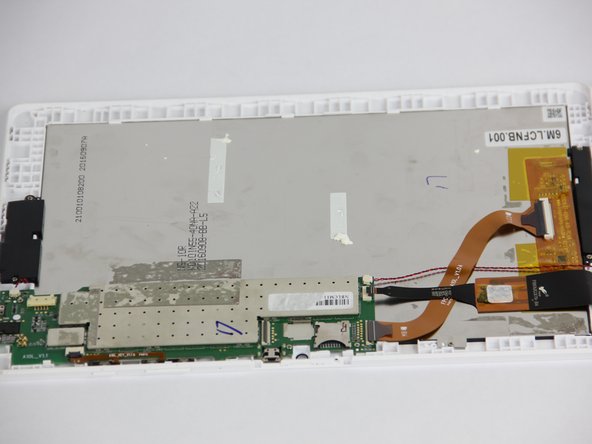
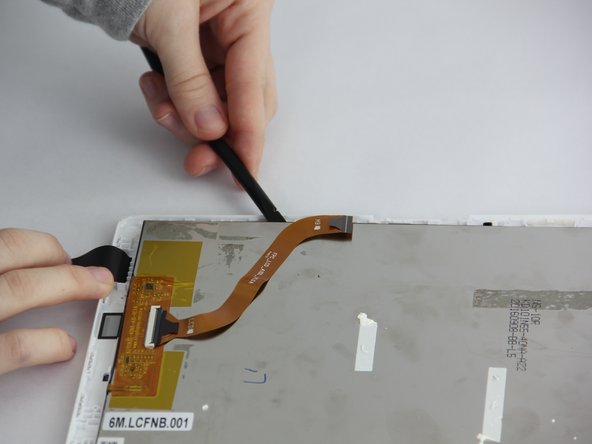
    • Starting with the 2 large connections use the plastic opening tool to gently pry on the connections and pop them out.

    • Now, disconnect the two smaller black and red cords from the motherboard.

  8. Acer Iconia One 10 B3-A30 Repair Screen Replacement: шаг 8, изображение 1 из 1
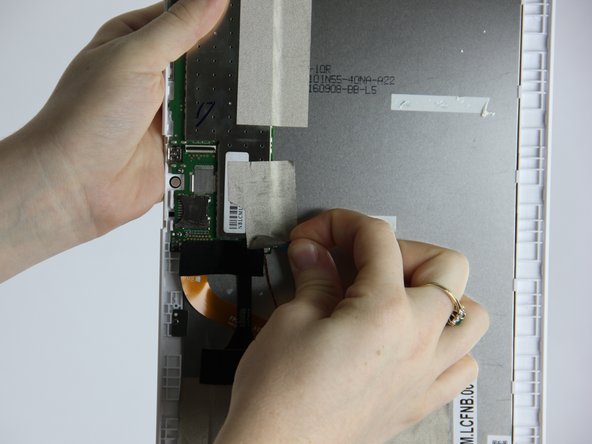
    • Scrape away the small square sticker to reveal one small screw. Use the Phillips #00 screwdriver to remove the screw.

    • Using the same screwdriver remove the other three screws on the motherboard.

  9. Acer Iconia One 10 B3-A30 Repair Screen Replacement: шаг 9, изображение 1 из 2 Acer Iconia One 10 B3-A30 Repair Screen Replacement: шаг 9, изображение 2 из 2
    • Using the small plastic tool, carefully pry the motherboard out of the device.

  10. Acer Iconia One 10 B3-A30 Repair Screen Replacement, Screen: шаг 10, изображение 1 из 3 Acer Iconia One 10 B3-A30 Repair Screen Replacement, Screen: шаг 10, изображение 2 из 3 Acer Iconia One 10 B3-A30 Repair Screen Replacement, Screen: шаг 10, изображение 3 из 3
    • Using a plastic spudger pry the square connection away from the screen.

  11. Acer Iconia One 10 B3-A30 Repair Screen Replacement: шаг 11, изображение 1 из 1
    • Using the Philips #00 head unscrew the screw holding in the small plate.

  12. Acer Iconia One 10 B3-A30 Repair Screen Replacement: шаг 12, изображение 1 из 3 Acer Iconia One 10 B3-A30 Repair Screen Replacement: шаг 12, изображение 2 из 3 Acer Iconia One 10 B3-A30 Repair Screen Replacement: шаг 12, изображение 3 из 3
    • Using the Philips #00 unscrew the remaining 4 screws along the two speakers.

  13. Acer Iconia One 10 B3-A30 Repair Screen Replacement: шаг 13, изображение 1 из 2 Acer Iconia One 10 B3-A30 Repair Screen Replacement: шаг 13, изображение 2 из 2
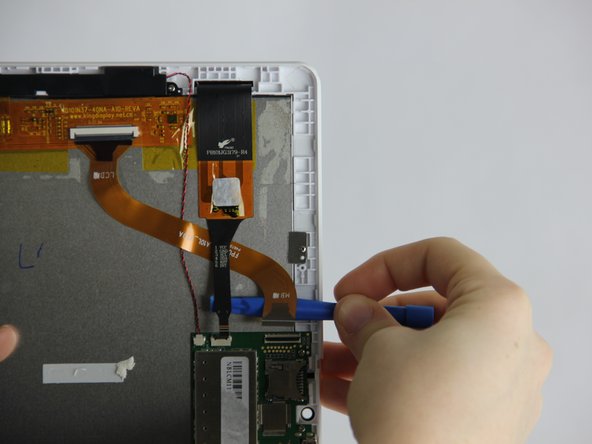
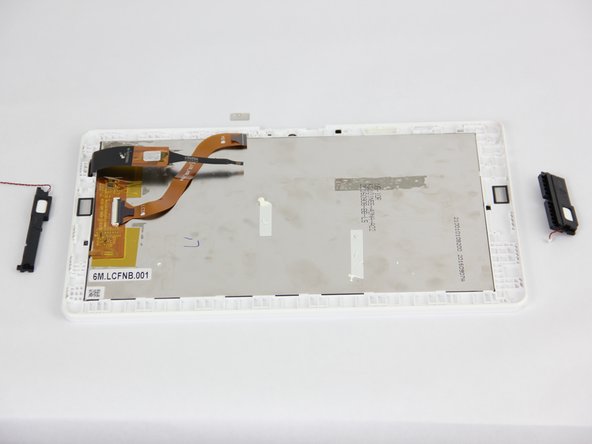
    • Using the plastic spudger gently pry the screen along the plastic clips.

    • Once at least 1/2 of the screen is unclipped slide it out of the frame using hands.

Заключение

To reassemble your device, follow these instructions in reverse order.

14 участников успешно повторили данное руководство.

Austin Pickart

Участник с: 09/28/17

688 Репутация

Автор 5 руководств

Команда

USF Tampa, Team S1-G5, Nance Fall 2017 Участник USF Tampa, Team S1-G5, Nance Fall 2017

USFT-NANCE-F17S1G5

4 членов

Автор 5 руководств

11 Комментариев

It worked! I’m very happy

marmaesker - Ответить

This helped out a lot, thanks

feje75 - Ответить

Fantastic set of instructions. Very much appreciated. Cheers very much!!

Chris Wilson - Ответить

To replace just the digitiser glass, could I just disconnect the black digitiser ribbon shown in step 7 and then use a heat gun on the front and remove the glass that way? Then I would just need to slide the new ribbon cable through and seal, with no need to remove the motherboard, battery etc.

In theory i’m sure this would work, I might try it and give an update in a week or so once my part arrives.

Liam Flatley - Ответить

So for glass only does the battery and motherboard need to come out?

northstar -

thanks so much im soglad I don't have to use a mouse to type on my tablet anymore!!! what is thebest way to glue the battery though?

CozmicPlayz Minecraft - Ответить

Is the LCD fused to the touch digitizer here? Wondering if I can just get the LCD, or need the complete assembly, because my touch layer still works, just the LCD is cracked

tipoo - Ответить

tout s’est bien passé remplacement effectué, mais il n’est absolument pas nécessaire de retirer la batterie, en fait en déconnectant la tresse façade et en enlevant toutes les vis, on peut tout sortir d’un coup, rien d’autre à débrancher.

La seule vis à ne pas oublier d’enlever c’est celle qui est sous le petit carré de papier collant à proximité de la prise USB

Si non beau travail mais à simplifier

Daniel Popy - Ответить

That wasn’t too bad, all fixed!

Just try to get the pull tabs out straight and clean, otherwise having to manipulate the battery (which seems to bend easy!) can be worrying.

tipoo - Ответить

Добавить комментарий

Просмотр статистики:

За последние 24часов: 0

За последние 7 дней: 5

За последние 30 дней: 26

За всё время: 12,817