Перейти к основному содержанию

Acer Spin 5 SP513-51-57TP Motherboard Replacement

Выберете то, что вам нужно

  1. Acer Spin 5 SP513-51-57TP Motherboard Replacement, Battery: шаг 1, изображение 1 из 1
    • Flip your laptop over so that the model sticker is facing upward towards the ceiling.

    • Make sure your computer is turned off before starting to avoid getting shocked.

  2. Acer Spin 5 SP513-51-57TP Motherboard Replacement: шаг 2, изображение 1 из 2 Acer Spin 5 SP513-51-57TP Motherboard Replacement: шаг 2, изображение 2 из 2
    • Use a Phillips #1 screwdriver to remove the thirteen 6.5mm screws that secure the back cover.

  3. Acer Spin 5 SP513-51-57TP Motherboard Replacement: шаг 3, изображение 1 из 3 Acer Spin 5 SP513-51-57TP Motherboard Replacement: шаг 3, изображение 2 из 3 Acer Spin 5 SP513-51-57TP Motherboard Replacement: шаг 3, изображение 3 из 3
    • Use a plastic opening tool to gently separate the back cover from the laptop. A snapping sound will be heard as a signal that the clips are being disengaged.

    • Do not use any metal tools to pry open the device.

    • It is recommended that you start from one corner and run the tool along the edges of your laptop from corner to corner for a safe removal.

  4. Acer Spin 5 SP513-51-57TP Motherboard Replacement: шаг 4, изображение 1 из 3 Acer Spin 5 SP513-51-57TP Motherboard Replacement: шаг 4, изображение 2 из 3 Acer Spin 5 SP513-51-57TP Motherboard Replacement: шаг 4, изображение 3 из 3
    • Use a Phillips #1 screwdriver to remove two 4 mm screws that secure the battery.

  5. Acer Spin 5 SP513-51-57TP Motherboard Replacement: шаг 5, изображение 1 из 3 Acer Spin 5 SP513-51-57TP Motherboard Replacement: шаг 5, изображение 2 из 3 Acer Spin 5 SP513-51-57TP Motherboard Replacement: шаг 5, изображение 3 из 3
    • Use your hand to carefully pull out the wiring harness from its port that is located between the battery and the motherboard.

    • Remove the battery from the case.

  6. Acer Spin 5 SP513-51-57TP Motherboard Replacement, CMOS Battery: шаг 6, изображение 1 из 3 Acer Spin 5 SP513-51-57TP Motherboard Replacement, CMOS Battery: шаг 6, изображение 2 из 3 Acer Spin 5 SP513-51-57TP Motherboard Replacement, CMOS Battery: шаг 6, изображение 3 из 3
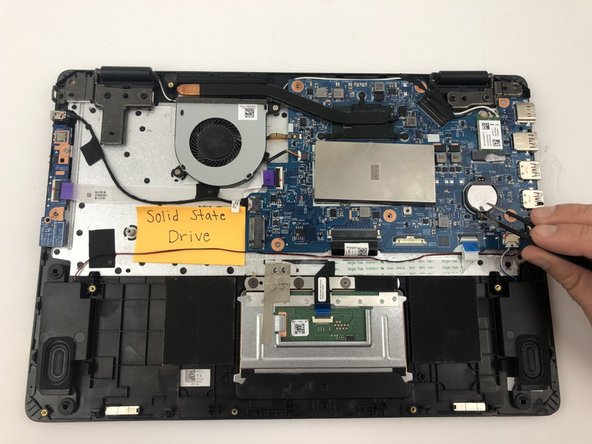
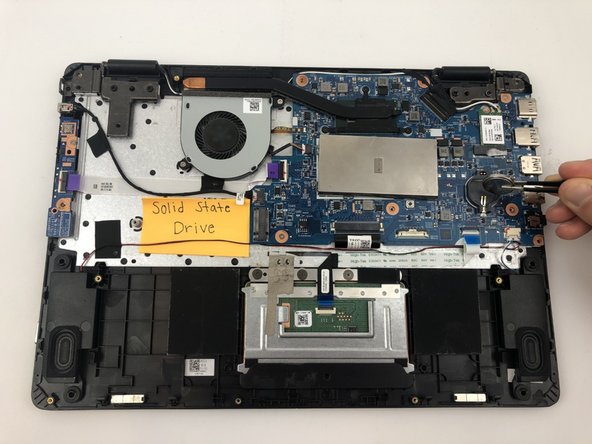
    • Grasp the CMOS battery with the tweezers and remove it from the motherboard.

  7. Acer Spin 5 SP513-51-57TP Motherboard Replacement, Solid State Drive: шаг 7, изображение 1 из 3 Acer Spin 5 SP513-51-57TP Motherboard Replacement, Solid State Drive: шаг 7, изображение 2 из 3 Acer Spin 5 SP513-51-57TP Motherboard Replacement, Solid State Drive: шаг 7, изображение 3 из 3
    • Using a Phillips #1 screwdriver, remove the one 4mm screw that secures the Solid State Drive.

  8. Acer Spin 5 SP513-51-57TP Motherboard Replacement: шаг 8, изображение 1 из 3 Acer Spin 5 SP513-51-57TP Motherboard Replacement: шаг 8, изображение 2 из 3 Acer Spin 5 SP513-51-57TP Motherboard Replacement: шаг 8, изображение 3 из 3
    • Use your hand to pull out the Solid State Drive from the motherboard.

    • You will be pulling the solid state drive out to the left, as it will be connected to the port on the motherboard on its right side. This is opposite the direction that the pictures depict it.

  9. Acer Spin 5 SP513-51-57TP Motherboard Replacement, Cooling Fan: шаг 9, изображение 1 из 3 Acer Spin 5 SP513-51-57TP Motherboard Replacement, Cooling Fan: шаг 9, изображение 2 из 3 Acer Spin 5 SP513-51-57TP Motherboard Replacement, Cooling Fan: шаг 9, изображение 3 из 3
    • Use Phillips #1 screwdriver to remove the two 4mm screws that are securing the fan.

  10. Acer Spin 5 SP513-51-57TP Motherboard Replacement: шаг 10, изображение 1 из 2 Acer Spin 5 SP513-51-57TP Motherboard Replacement: шаг 10, изображение 2 из 2
    • Using Phillips #1 screwdriver remove three 5 mm screws to remove the heatsink.

    • When removing the cooling fan, the heatsink component will stay connected.

  11. Acer Spin 5 SP513-51-57TP Motherboard Replacement: шаг 11, изображение 1 из 3 Acer Spin 5 SP513-51-57TP Motherboard Replacement: шаг 11, изображение 2 из 3 Acer Spin 5 SP513-51-57TP Motherboard Replacement: шаг 11, изображение 3 из 3
    • Using your hand, pull out wiring harness to disconnect the fan from the motherboard.

    • Lift the fan out of the case to remove it.

  12. Acer Spin 5 SP513-51-57TP Motherboard Replacement, Motherboard: шаг 12, изображение 1 из 3 Acer Spin 5 SP513-51-57TP Motherboard Replacement, Motherboard: шаг 12, изображение 2 из 3 Acer Spin 5 SP513-51-57TP Motherboard Replacement, Motherboard: шаг 12, изображение 3 из 3
    • Use the tweezers to disconnect the wiring harness in the bottom right corner of your laptop.

  13. Acer Spin 5 SP513-51-57TP Motherboard Replacement: шаг 13, изображение 1 из 3 Acer Spin 5 SP513-51-57TP Motherboard Replacement: шаг 13, изображение 2 из 3 Acer Spin 5 SP513-51-57TP Motherboard Replacement: шаг 13, изображение 3 из 3
    • Using the tweezers, flip the white lock tab of the ZIF connector upward.

    • Pull the blue "MB High-Tek" ribbon cable out.

  14. Acer Spin 5 SP513-51-57TP Motherboard Replacement: шаг 14, изображение 1 из 2 Acer Spin 5 SP513-51-57TP Motherboard Replacement: шаг 14, изображение 2 из 2
    • Using the tweezers, pull the black CQWP connection wire from its port.

  15. Acer Spin 5 SP513-51-57TP Motherboard Replacement: шаг 15, изображение 1 из 2 Acer Spin 5 SP513-51-57TP Motherboard Replacement: шаг 15, изображение 2 из 2
    • Using the tweezers, flip up the black lock tab of the ZIF connector upward.

    • Pull out the MB purple ribbon cable out.

  16. Acer Spin 5 SP513-51-57TP Motherboard Replacement: шаг 16, изображение 1 из 3 Acer Spin 5 SP513-51-57TP Motherboard Replacement: шаг 16, изображение 2 из 3 Acer Spin 5 SP513-51-57TP Motherboard Replacement: шаг 16, изображение 3 из 3
    • Using the tweezers, remove the black drift cable from its port.

  17. Acer Spin 5 SP513-51-57TP Motherboard Replacement: шаг 17, изображение 1 из 2 Acer Spin 5 SP513-51-57TP Motherboard Replacement: шаг 17, изображение 2 из 2
    • Using the tweezers, pull out the orange GND VCC connection wire.

  18. Acer Spin 5 SP513-51-57TP Motherboard Replacement: шаг 18, изображение 1 из 3 Acer Spin 5 SP513-51-57TP Motherboard Replacement: шаг 18, изображение 2 из 3 Acer Spin 5 SP513-51-57TP Motherboard Replacement: шаг 18, изображение 3 из 3
    • Using the tweezers, flip up the black lock from the connector holding the display cable.

    • Remove the display connection wire from its port.

  19. Acer Spin 5 SP513-51-57TP Motherboard Replacement: шаг 19, изображение 1 из 3 Acer Spin 5 SP513-51-57TP Motherboard Replacement: шаг 19, изображение 2 из 3 Acer Spin 5 SP513-51-57TP Motherboard Replacement: шаг 19, изображение 3 из 3
    • Using Phillips #1 screwdriver, remove the 4mm screw that secure the WiFi card.

    • Remove WiFi card from its port.

  20. Acer Spin 5 SP513-51-57TP Motherboard Replacement: шаг 20, изображение 1 из 3 Acer Spin 5 SP513-51-57TP Motherboard Replacement: шаг 20, изображение 2 из 3 Acer Spin 5 SP513-51-57TP Motherboard Replacement: шаг 20, изображение 3 из 3
    • Using Philips #1 screwdriver remove the seven 4mm screws that secure the motherboard to the laptop.

    • Remove the motherboard by lifting it out from the back case.

Заключение

To reassemble your device, follow these instructions in reverse order.

Anthony Vansell

Участник с: 01/24/20

872 Репутация

Автор 5 руководств

Команда

Hufflepuff Участник Hufflepuff

Repair Café

3 членов

Автор 5 руководств

Один комментарий

I was wondering if the CPU is soldered to the motherboard? Is it possible to remove the CPU and replace it with an upgraded CPU?

Drew Nelson - Ответить

Добавить комментарий

Просмотр статистики:

За последние 24часов: 1

За последние 7 дней: 2

За последние 30 дней: 10

За всё время: 1,452