Этот документ имеет более свежие изменения. Перейти к последней непроверенной версии.
Введение
This guide will show how to replace a faulty cooling fan which can cause the computer overheating.
Выберете то, что вам нужно
-
-
Unscrew the two 4mm screws from the plastic covering.
-
Pull the plastic cover up and slide off.
-
-
-
Look for the yellow tab inside the computer.
-
Disconnect the black wire with the yellow tab.
-
This disconnects the battery.
-
-
-
-
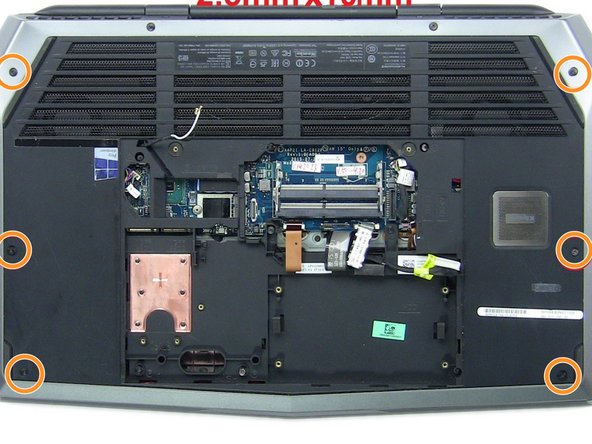
Remove all sixteen of the screws on the underside of the laptop.
-
Eight 2.5mm x 8mm
-
Six 2.5mm x 10mm
-
Two 2.5mm x 18mm
-
-
-
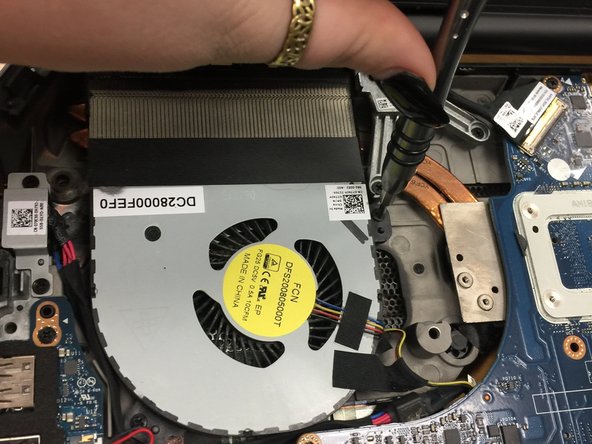
Unscrew and remove the two 5mm screws.
-
Finally, remove the Fan from the rest of the laptop.
-


To reassemble your device, follow these instructions in reverse order.
To reassemble your device, follow these instructions in reverse order.
Отменить: Я не выполнил это руководство.
3 участников успешно повторили данное руководство.
Команда

University of North Texas, Team S6-G4, Thomas Fall 2017 Участник University of North Texas, Team S6-G4, Thomas Fall 2017
UNT-THOMAS-F17S6G4
3 членов
Автор 6 руководств
3 Комментариев
It looks like fan removal requires the motherboard to be taken out because there is a metal flange on the bottomside of the fans that go along the copper heatpipe. I cannot lift the fans much and no room to pivot the flange out of the way to get the fans out.
Yep motherboard removal is necessary! There are guides on Youtube. Be careful of the WIFI wires, they nick easily and the circular connectors are delicate, use fingers not metal tool. Also require screen removal. Keep a hand on it as you take off the screws for the hinges so there is no strain.
Requires Phillips #00 for the small screw of the SSD stick and a few others not just Phillips #0
Motherboard removal is necessary because on my 4th gen i7 Intel R2 laptop, the fan screws are on the underside, so when it's all put together, the screws are under the motherboard and the non-removable underbody plastic is covering it. Have to remove the motherboard, flip it over so you see all the heat pipes.