Перейти к основному содержанию

Alienware M17x P01E Graphics Card Replacement

Выберете то, что вам нужно

  1. Alienware M17x P01E Graphics Card Replacement, Battery: шаг 1, изображение 1 из 1
    • Please power off the computer and deplete the battery before attempting the following step.

  2. Alienware M17x P01E Graphics Card Replacement: шаг 2, изображение 1 из 2 Alienware M17x P01E Graphics Card Replacement: шаг 2, изображение 2 из 2
    • Press down on the battery latch and slide it to the left.

    • Lift the battery out once it pops out.

  3. Alienware M17x P01E Graphics Card Replacement, Compartment Door: шаг 3, изображение 1 из 1
    • Loosen the two silver Phillips #1 screws.

    • The screws are held to the compartment door by a washer and cannot be removed.

  4. Alienware M17x P01E Graphics Card Replacement: шаг 4, изображение 1 из 2 Alienware M17x P01E Graphics Card Replacement: шаг 4, изображение 2 из 2
    • Use your hand to gently lift and remove the compartment door.

  5. Alienware M17x P01E Graphics Card Replacement, Center Control Cover: шаг 5, изображение 1 из 3 Alienware M17x P01E Graphics Card Replacement, Center Control Cover: шаг 5, изображение 2 из 3 Alienware M17x P01E Graphics Card Replacement, Center Control Cover: шаг 5, изображение 3 из 3
    • Remove the two 2mm Phillips #0 screws from the recesses on the left and right side of the processor fan.

  6. Alienware M17x P01E Graphics Card Replacement: шаг 6, изображение 1 из 2 Alienware M17x P01E Graphics Card Replacement: шаг 6, изображение 2 из 2
    • Turn the laptop top side up and fully open the display.

    • The center control panel is between the display and the keyboard. Fully opening the display ensures that there is enough room to pry and lift the center control panel.

    • Pry the center control panel up from its left and right edges with the Spudger.

    • The center control panel may require a decent amount of force to pry free. Do not immediately lift the panel from the laptop once it has been pried free. A cable is connected from the laptop to the center control panel.

  7. Alienware M17x P01E Graphics Card Replacement: шаг 7, изображение 1 из 2 Alienware M17x P01E Graphics Card Replacement: шаг 7, изображение 2 из 2
    • Lift the center control panel from the laptop.

    • Tilt the center control panel away from the display carefully.

    • Lift the latch open to remove the cable connecting from the laptop to the center control panel.

  8. Alienware M17x P01E Graphics Card Replacement, Keyboard: шаг 8, изображение 1 из 1
    • Remove the five 3mm Phillips #0 screws.

  9. Alienware M17x P01E Graphics Card Replacement: шаг 9, изображение 1 из 3 Alienware M17x P01E Graphics Card Replacement: шаг 9, изображение 2 из 3 Alienware M17x P01E Graphics Card Replacement: шаг 9, изображение 3 из 3
    • There two cables connected from the underside of the keyboard to the laptop.

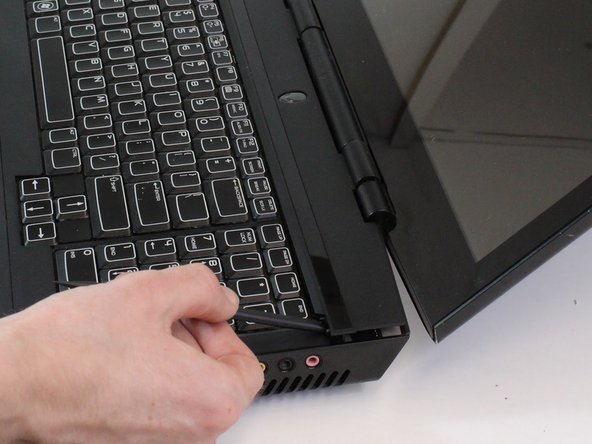
    • Slide and lift the keyboard towards the display to unhook it from the laptop.

    • Tilt the keyboard away from the display carefully.

  10. Alienware M17x P01E Graphics Card Replacement: шаг 10, изображение 1 из 2 Alienware M17x P01E Graphics Card Replacement: шаг 10, изображение 2 из 2
    • Flip open the two latches that connect the wide keyboard cable and thin light cable to the laptop.

    • Lift the keyboard off the laptop and set aside.

    • Don't be alarmed if the cables are already disconnected. Simply lifting the keyboard from the laptop may cause the cables to disconnect because the latches require very little force to open.

  11. Alienware M17x P01E Graphics Card Replacement, Graphics Card: шаг 11, изображение 1 из 2 Alienware M17x P01E Graphics Card Replacement, Graphics Card: шаг 11, изображение 2 из 2
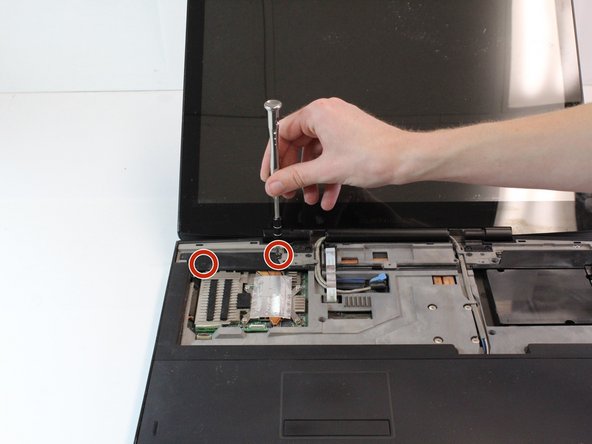
    • Unscrew the two Phillips #1 screws that secure the bracket.

    • The screws are held to the bracket by a washer and cannot be removed.

    • Use your hand to remove the bracket.

  12. Alienware M17x P01E Graphics Card Replacement: шаг 12, изображение 1 из 1
    • Remove the two 4mm Phillips #1 screws that secure the Graphics Card.

  13. Alienware M17x P01E Graphics Card Replacement: шаг 13, изображение 1 из 2 Alienware M17x P01E Graphics Card Replacement: шаг 13, изображение 2 из 2
    • Use the spudger to pry and lift the Graphics Card from its compartment.

    • Use your hand to lift and pull out the Graphics Card.

Заключение

To reassemble your device, follow these instructions in reverse order.

Andrew Ruvalcaba

Участник с: 09/17/18

148 Репутация

1 руководство автора

Команда

CSU Fullerton, Team S2-G2, Bruce Fall 2018 Участник CSU Fullerton, Team S2-G2, Bruce Fall 2018

CSUF-BRUCE-F18S2G2

4 членов

Автор 8 руководств

0 Комментариев

Добавить комментарий

Просмотр статистики:

За последние 24часов: 2

За последние 7 дней: 7

За последние 30 дней: 16

За всё время: 2,446