Перейти к основному содержанию

Эта версия возможно содержит некорректные исправления. Переключить на последнюю проверенную версию.

Выберете то, что вам нужно

  1. Этот шаг не переведен. Помогите перевести

    : шаг 1, изображение 1 из 1
    • Before you begin, make sure the sander is turned off and unplugged.

    • Use a 3/16" hex key or driver bit to remove the six 23.4 mm-long screws holding the two halves of the handle enclosure together.

  2. Этот шаг не переведен. Помогите перевести

    : шаг 2, изображение 1 из 3 : шаг 2, изображение 2 из 3 : шаг 2, изображение 3 из 3
    • The rear half of the enclosure is bolted to the handle support, so the front half will be removed first.

    • Pull the front half of the enclosure straight away from the rear half to separate the enclosure.

    • If the interlock assembly comes out with the front half of the enclosure, detach it and place it back into the rear half.

    • Remove the front half of the handle enclosure.

  3. Этот шаг не переведен. Помогите перевести

    : шаг 3, изображение 1 из 3 : шаг 3, изображение 2 из 3 : шаг 3, изображение 3 из 3
    • Pull the wires connected to the interlock assembly straight out of their connectors.

    • Keep track of where each wire connects on the interlock assembly.

  4. Этот шаг не переведен. Помогите перевести

    : шаг 4, изображение 1 из 1
    • After all wires are disconnected from the interlock assembly, remove the interlock assembly from the handle.

  5. Этот шаг не переведен. Помогите перевести

    : шаг 5, изображение 1 из 1
    • Use a 4 mm hex key to remove the two 13.8 mm-long screws securing the green ground wires to the handle enclosure.

    • These screws have lock washers on them. Be sure to retain the washers for reinstallation.

  6. Этот шаг не переведен. Помогите перевести

    : шаг 6, изображение 1 из 1
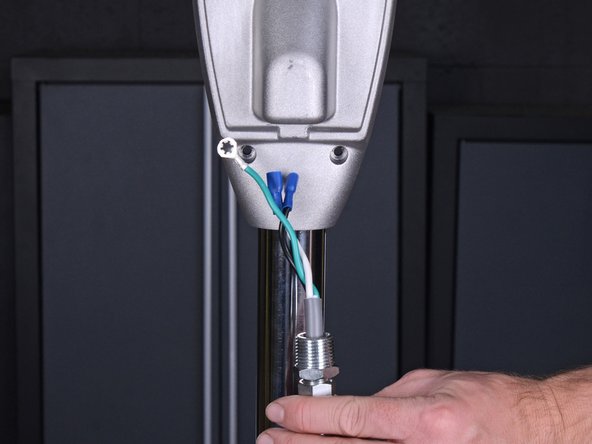
    • Use a 7/8" wrench to loosen the coupling securing the power cord to the handle enclosure.

  7. Этот шаг не переведен. Помогите перевести

    : шаг 7, изображение 1 из 2 : шаг 7, изображение 2 из 2
    • Pull the power cord straight down, out of the handle.

    • To avoid damaging the wires, remove the power cord slowly and make sure the wires don't snag on anything as they come out.

  8. Этот шаг не переведен. Помогите перевести

    : шаг 8, изображение 1 из 1
    • Use a 3/16" hex key or driver bit to remove the 13.8 mm-long screw securing the rear half of the handle enclosure to the handle tube.

    • This screw has a washer. Be sure to retain it for reinstallation.

  9. Этот шаг не переведен. Помогите перевести

    : шаг 9, изображение 1 из 1
    • Remove the rear half of the handle assembly.

Финишная черта

Miles Robinson

Участник с: 03/04/19

896 Репутация

Автор 7 руководств

Команда

The Home Depot Участник The Home Depot

Community

14 343 членов

Автор 76 руководств

0 Комментариев

Добавить комментарий

Просмотр статистики:

За последние 24часов: 1

За последние 7 дней: 5

За последние 30 дней: 6

За всё время: 80