Введение
I fixed the loosen optical unit by (double-sided) adhesive. The most "difficult" part is just the proper fixing of the optical unit to the bottom cover because holding up-side-down is neccessary...
Выберете то, что вам нужно
-
-
Remove 3 black adhesives and screws underneath.
-
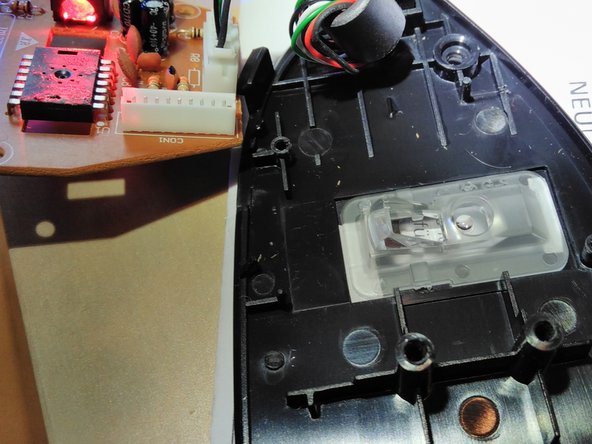
Lift top cover carefully
-
disconnect the white connector by the help of a screw driver or by finger to remove the cover completely
-
-
-
carefully remove the black adhesive tape
-
remove 2 screws
-
lift up the entire mainboard and take care of the two black fixing points
-
you have now the mainboard and the optical unit separated
-
-
-
-
hold the mainboard between your finger as shown in the image
-
place the transparent optical unit as shown in the image
-
take care, that the unit is properly aligned horizontally
-
while continue holding the mainboard, take the black BOTTOM cover and place it up-side-down to the mainboard, such that ...
-
1.) the optical unit is placed to the corresponding window of the cover and that ...
-
2.) the black fixing points and the two screw-supporting points properly click into the mainboard holes
-
-
-
You can now directly place back the screws...
-
...or again remove the mainboard and ensure that the optical unit stays at the place and is fixed properly.
-
-
-
place some double-sided tape inside the gap on both side (white in the image)
-
gently press down the black cover to fix close the gap
-
to let the black cover let stay sticked to the mainboard/tape I placed some black, strong adhesive tape ontop of the black cover of the red LED to permanently press it down.
-
I wanted to be save and fixed the optical unit and the red LED with some more black tape to keep in place and avoid any movement.
-
I made again a functional test by plugging in the USB and shaked the mouse. No mouse pointer movement was present anymore --> SUCCESS!
-
-
-
put back the metal weights and screws
-
plug-in again the connector
-
put back the top cover
-
tighten again the screews and place back the sliding tapes
-
ENYOU THE WORKING DEVICE!
-


Отменить: Я не выполнил это руководство.
6 участников успешно повторили данное руководство.
5 Комментариев
i have a slightly newer model of this mouse. the cursor was making a repeated square motion. Seems like the photodiode picked up the blinking blue LED, which I think is only an indicator for the user. The actual functional LED seems to be infrared rather than red in the new model, and placed closer to the blue LED. I fixed my problem by covering the LED more completely with opaque tape. Not sure if my explanation makes sense? This is what I deduced, with the help of the above post and some trial and error, seeing that the cursor movement correlated with the blue light blinking and that the behavior was prevented by blocking the blue light with my fingertip. Also broke the battery leads in the process and had to resolder the through-hole connections.
How do I disassemble the top part which has the buttons and scroll wheel.
To disassemble the button-unit you have to follow complete step 1 and disconnect the grey cable.
If you look into the top button carrying unit you see a clip (or two?) at the side opposite to the scroll wheel which you can carefully click out with a finger or a screw driver. Then only the buttons itself should lift up alittle bit and you can push it a little bit out. At the tip of the button unit there are just two hooks wich you can carefully pull out of the holes. Then you should have removed the buttons and can see the red button-devices underneath.
Did this help?
With this procedure I regularly adjust the pressure point of the left mouse button as it sometimes looses connection to the button-device. So I glue some stuff (for now very thin metal of <1x1mm² worked quite well) on the black cross-shaped “spike”.
Robert -
@Robert Thanks for the instructions on how to disassemble the button-unit. My scroll wheel was dirty and your comment made it possible for me to get in there and clean it. Didn’t even consider that both the left and right click buttons would clip off first before separating the unit. I think a visual guide for disassembling the button unit would be very useful as well. Thanks again!
I used my girlfriend’s hair dryer on medium setting to melt the glue a little before pulling the covers off.
It made the removal easier and helped not to damage then.
Tug - Ответить
fo you have the pinout for buttons of this modal please
Mina Nabil - Ответить