Введение
If your Chromebook’s keyboard is not working correctly, then this guide is going to help you get your keys working the way they're suppose to. When working on replacing your keyboard, be sure to ground yourself. Static can short circuit your Chromebook, so be sure to either wear an anti-static wrist strap or work on a surface that doesn't generate static electricity, like wood, tile, or other hard floors.
Выберете то, что вам нужно
-
-
Flip the laptop upside down with the rear end of the computer away from you.
-
-
-
Remove the two rear rubber feet by using one of the small, blue plastic spudgers.
-
-
-
Use the J0 screwdriver to remove the eight 5mm black screws on the bottom of the laptop, which includes the two that were hidden under the rear rubber feet.
-
-
-
Turn the laptop on its side. Use a small, blue opening tool to pry the keyboard cover and laptop apart. Begin from the top right, next to the power button, and slowly work your way around to the opposite side until the keyboard cover is detached.
-
-
-
-
Gently flip the keyboard cover away from the laptop. Rest it safely upside down so the cables are not strained and are easily accessible.
-
-
-
Use the metal spudger to gently pry up the small tabs that are clamping down on the keyboard cables.
-
-
-
Carefully pull the keyboard cables out of the connecting ports that are attached to the motherboard.
-
-
-
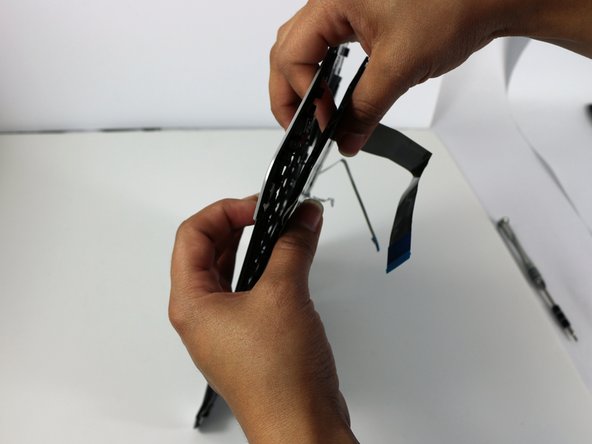
Gently, with force, pop the keyboard from the palm rest assembly.
Mine had a metal backing plate which was plastic welded with through holes. It required a little persuasion with a putty knife but I got it.
Thanks for the guide, I got into it and was looking at those small rivets trying to discern whether they were stand-offs, rivets, 1mm hex, or other - the answer was gently pry off the keyboard.
-


To reassemble your device, follow these instructions in reverse order.
To reassemble your device, follow these instructions in reverse order.
Отменить: Я не выполнил это руководство.
4 участников успешно повторили данное руководство.
Команда

USF Tampa, Team 2-51, Cagle Spring 2016 Участник USF Tampa, Team 2-51, Cagle Spring 2016
USFT-CAGLE-S16S2G51
4 членов
Автор 10 руководств
2 Комментариев
Thanks!
Took me about 30 minutes, despite losing a couple of screws (which I did find on the floor/chair), interruptions from kids, and forgetting to put a little rubber pad on the new keyboard, requiring almost complete re-disassembly and assembly.
Only real issue I had was that the old keyboard coming out was basically snapping off little bits of the white keyboard case. (The “gently with force” section.) I suspect that it’s designed as a one-way connection and removal will break those little snaps irrespective of what care is taken. But reassembling it seems to work without those snaps just fine.
Thanks!
A couple more notes:
I did it without removing the cable for the touchpad at all. I didn’t see any reason to disconnect that.
After examining the old keyboard more carefully, I realized the plastic sheet on the bottom was removable (it’s just glued on) and should be affixed to the bottom of the old one, so once more I took it apart and added that back. (That sheet had probably saved the computer from killing more than the keyboard when coffee was spilled.)
Also, the two slightly longer screws go under the rubber feet.