Перейти к основному содержанию

Asus Chromebook C300MA-BBCLN12 Battery Replacement

Выберете то, что вам нужно

  1. Asus Chromebook C300MA-BBCLN12 Battery Replacement, Battery: шаг 1, изображение 1 из 2 Asus Chromebook C300MA-BBCLN12 Battery Replacement, Battery: шаг 1, изображение 2 из 2
    • Remove the eight 9.0mm Phillips #00 screws.

    • Remove the three 6.0mm Phillips #00 screws.

  2. Asus Chromebook C300MA-BBCLN12 Battery Replacement: шаг 2, изображение 1 из 3 Asus Chromebook C300MA-BBCLN12 Battery Replacement: шаг 2, изображение 2 из 3 Asus Chromebook C300MA-BBCLN12 Battery Replacement: шаг 2, изображение 3 из 3
    • Separate the palm rest assembly from the bottom housing using the plastic opening tool.

    • It is recommended that you start from a corner and run the plastic opening tool along the edge of the housing.

    • Lift the palm rest assembly slowly to prevent damaging the two cables that connect it to the motherboard.

  3. Asus Chromebook C300MA-BBCLN12 Battery Replacement: шаг 3, изображение 1 из 3 Asus Chromebook C300MA-BBCLN12 Battery Replacement: шаг 3, изображение 2 из 3 Asus Chromebook C300MA-BBCLN12 Battery Replacement: шаг 3, изображение 3 из 3
    • Flip back the hinges on the connectors that secure the wide black cable and the narrow white cable using the tweezers.

    • Disconnect the wide black cable from the motherboard by pulling the blue cable tab away from the connector.

    • Disconnect the white ribbon cable from the motherboard by pulling the blue cable tab away from the connector.

  4. Asus Chromebook C300MA-BBCLN12 Battery Replacement: шаг 4, изображение 1 из 1
    • Remove the six 6.0mm Phillips #00 screws that secure the battery to the bottom housing.

  5. Asus Chromebook C300MA-BBCLN12 Battery Replacement: шаг 5, изображение 1 из 2 Asus Chromebook C300MA-BBCLN12 Battery Replacement: шаг 5, изображение 2 из 2
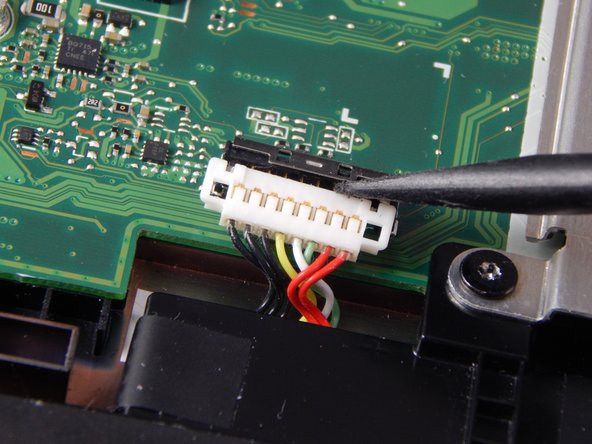
    • Disconnect the bundled cable connector that attaches the battery to the motherboard using the small plastic spudger.

  6. Asus Chromebook C300MA-BBCLN12 Battery Replacement: шаг 6, изображение 1 из 1
    • Remove the battery from the bottom housing.

Заключение

To reassemble your device, follow these instructions in reverse order.

Brooke Austin

Участник с: 10/05/17

419 Репутация

Автор 4 руководств

Команда

Portland State University, Team S1-G2, Read Fall 2017 Участник Portland State University, Team S1-G2, Read Fall 2017

PSUN-READ-F17S1G2

4 членов

Автор 10 руководств

0 Комментариев

Добавить комментарий

Просмотр статистики:

За последние 24часов: 0

За последние 7 дней: 3

За последние 30 дней: 10

За всё время: 375