Перейти к основному содержанию

Этот документ имеет более свежие изменения. Перейти к последней непроверенной версии.

Asus Eee PC 1005PEB Hard Drive Replacement

Выберете то, что вам нужно

  1. Asus Eee PC 1005PEB Hard Drive Replacement, Battery: шаг 1, изображение 1 из 1
    • Start by placing the laptop upside-down on a flat surface.

    • Find the two clips on the back portion of the laptop.

  2. Asus Eee PC 1005PEB Hard Drive Replacement: шаг 2, изображение 1 из 1
    • Using your finger, push the clip labeled with a "1" on the laptop from the lock position to unlock position.

    • This clip will hold itself, so after you move it to the unlock position you can remove your finger.

  3. Asus Eee PC 1005PEB Hard Drive Replacement: шаг 3, изображение 1 из 2 Asus Eee PC 1005PEB Hard Drive Replacement: шаг 3, изображение 2 из 2
    • Using your finger, push and hold the pin indicated by a "2" on the laptop from the lock to unlock position.

    • While holding this pin in the unlock position, use your other hand to pull the battery horizontally away from the laptop.

    • When the pins on the battery that reach towards the laptop are away from the laptop, you can release the "2" clip.

  4. Asus Eee PC 1005PEB Hard Drive Replacement: шаг 4, изображение 1 из 1
    • Using both hands, pull the battery horizontally away from the laptop.

  5. Asus Eee PC 1005PEB Hard Drive Replacement, Keyboard: шаг 5, изображение 1 из 1
    • Face the laptop so the 4 silver "clips" along the middle of the battery cartridge are in front of you.

  6. Asus Eee PC 1005PEB Hard Drive Replacement: шаг 6, изображение 1 из 3 Asus Eee PC 1005PEB Hard Drive Replacement: шаг 6, изображение 2 из 3 Asus Eee PC 1005PEB Hard Drive Replacement: шаг 6, изображение 3 из 3
    • Using the wide opening tool, unhook each clip from its original position by pulling the clip towards you.

    • Repeat for all four of the clips.

  7. Asus Eee PC 1005PEB Hard Drive Replacement: шаг 7, изображение 1 из 1
    • Turn the laptop right side up and lift the lid.

    • Insert the flat end of the spudger into the small gap between the top of the keyboard and the plastic of the laptop.

    • Using the spudger as leverage, lift the keyboard up from the rest of the laptop.

    • Run the spudger across the seam until the entire top edge is exposed. The two sides of the keyboard should also pop up in this process.

  8. Asus Eee PC 1005PEB Hard Drive Replacement: шаг 8, изображение 1 из 1
    • The keyboard should now lift from the base of the laptop.

    • Do not lift the keyboard up to quickly or too hard, since a ribbon cable is still attached to the keyboard and doing so could break it.

  9. Asus Eee PC 1005PEB Hard Drive Replacement: шаг 9, изображение 1 из 3 Asus Eee PC 1005PEB Hard Drive Replacement: шаг 9, изображение 2 из 3 Asus Eee PC 1005PEB Hard Drive Replacement: шаг 9, изображение 3 из 3
    • Using the pointed end of the spudger tool, disconnect the ribbon cable that extends from the bottom of the keyboard to the computer by pushing on the connections of the cable.

    • Once the ribbon cable is disconnected, the keyboard can be fully removed by lifting it away from the laptop.

  10. Asus Eee PC 1005PEB Hard Drive Replacement, Hard Drive: шаг 10, изображение 1 из 2 Asus Eee PC 1005PEB Hard Drive Replacement, Hard Drive: шаг 10, изображение 2 из 2
    • Turn the laptop upside-down.

    • Find and unscrew the 6.65 mm Phillips #1 screw on the ram cover.

    • The screw will not detach from the ram cover.

  11. Asus Eee PC 1005PEB Hard Drive Replacement: шаг 11, изображение 1 из 1
    • Remove the four 6mm screws with the Phillips #1 screwdriver.

  12. Asus Eee PC 1005PEB Hard Drive Replacement: шаг 12, изображение 1 из 2 Asus Eee PC 1005PEB Hard Drive Replacement: шаг 12, изображение 2 из 2
    • Carefully remove the cover by lifting it with your fingers.

    • Make sure that you do not pull the cover too hard because this could damage the plastic pins that hold the cover on.

  13. Asus Eee PC 1005PEB Hard Drive Replacement: шаг 13, изображение 1 из 2 Asus Eee PC 1005PEB Hard Drive Replacement: шаг 13, изображение 2 из 2
    • Locate and remove the silver 6.65 mm Phillips #1 screw in the bottom right corner of the opening.

  14. Asus Eee PC 1005PEB Hard Drive Replacement: шаг 14, изображение 1 из 3 Asus Eee PC 1005PEB Hard Drive Replacement: шаг 14, изображение 2 из 3 Asus Eee PC 1005PEB Hard Drive Replacement: шаг 14, изображение 3 из 3
    • Identify the 3 black clips in the area where the battery was.

    • Release the 3 black clips in the battery area by pushing them in with the pointed end of the spudger.

  15. Asus Eee PC 1005PEB Hard Drive Replacement: шаг 15, изображение 1 из 1
    • The following step will void the warranty.

    • Remove the six 5.5 mm Phillips #1 screw.

  16. Asus Eee PC 1005PEB Hard Drive Replacement: шаг 16, изображение 1 из 3 Asus Eee PC 1005PEB Hard Drive Replacement: шаг 16, изображение 2 из 3 Asus Eee PC 1005PEB Hard Drive Replacement: шаг 16, изображение 3 из 3
    • Locate the ribbon cable.

    • Using the flat end of the spudger push up the black clip that holds down the cable and pull the cable away from the clip.

  17. Asus Eee PC 1005PEB Hard Drive Replacement: шаг 17, изображение 1 из 3 Asus Eee PC 1005PEB Hard Drive Replacement: шаг 17, изображение 2 из 3 Asus Eee PC 1005PEB Hard Drive Replacement: шаг 17, изображение 3 из 3
    • Pry up the plastic frame at the top corners with your fingers.

    • Use the spudger and slide it between the bottom case and the plastic frame to release it.

  18. Asus Eee PC 1005PEB Hard Drive Replacement: шаг 18, изображение 1 из 1
    • Remove the 4.6 mm Phillip #1 screw.

  19. Asus Eee PC 1005PEB Hard Drive Replacement: шаг 19, изображение 1 из 3 Asus Eee PC 1005PEB Hard Drive Replacement: шаг 19, изображение 2 из 3 Asus Eee PC 1005PEB Hard Drive Replacement: шаг 19, изображение 3 из 3
    • Using the wide end of the spudger, lift up the black connector holding the ribbon cable.

    • Pull out the ribbon cable that goes across the top of hard drive.

    • Fold over the ribbon cable to the left side of the hard drive.

  20. Asus Eee PC 1005PEB Hard Drive Replacement: шаг 20, изображение 1 из 2 Asus Eee PC 1005PEB Hard Drive Replacement: шаг 20, изображение 2 из 2
    • Remove the Security Screw at the corner. Then Slightly lift up the hard drive using the black tab attached to the left side of the hard drive.

    • Pull tab to the left to remove it.

    • Be sure to not lift up hard drive to high because it could cause damage to the pins of the hard drive.

  21. Asus Eee PC 1005PEB Hard Drive Replacement: шаг 21, изображение 1 из 2 Asus Eee PC 1005PEB Hard Drive Replacement: шаг 21, изображение 2 из 2
    • Remove the two 3.6 mm screws on the side of the hard drive casing.

    • Turn over and repeat step above.

  22. Asus Eee PC 1005PEB Hard Drive Replacement: шаг 22, изображение 1 из 3 Asus Eee PC 1005PEB Hard Drive Replacement: шаг 22, изображение 2 из 3 Asus Eee PC 1005PEB Hard Drive Replacement: шаг 22, изображение 3 из 3
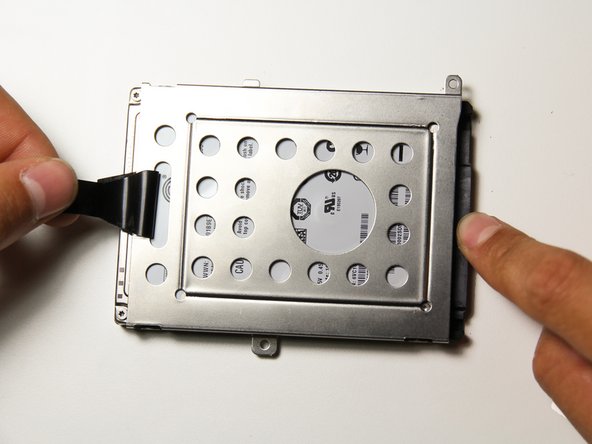
    • Using the tab on the hard drive case, pull the case up and away from the hard drive to remove it.

    • This may require some effort to remove the case.

Заключение

To reassemble your device, follow these instructions in reverse order.

12 участников успешно повторили данное руководство.

Aaron Arenas

Участник с: 04/20/14

751 Репутация

Автор 5 руководств

Команда

Cal Poly, Team 13-32, Maness Spring 2014 Участник Cal Poly, Team 13-32, Maness Spring 2014

CPSU-MANESS-S14S13G32

5 членов

Автор 5 руководств

Один комментарий

When I did this one, I was not careful enough with the keyboard removal, somehow causing the trackpad to stop working. Still, keyboard worked, so just used an external mouse and had a nice SSD.

Sanjay Aiyagari - Ответить

Добавить комментарий

Просмотр статистики:

За последние 24часов: 1

За последние 7 дней: 4

За последние 30 дней: 31

За всё время: 7,881