Введение
This guide will help you replace your Asus EeeBook X205TA motherboard in case it is damaged, you want a faster RAM, better data transfers or better graphics. If disposing motherboard , please follow the laws and regulations for proper disposal.
Выберете то, что вам нужно
-
-
Unscrew all 10 2mm screws located on the bottom of the laptop using a Phillips #2 screwdriver.
-
-
-
Insert the plastic opening tool in the crevice between the back of the laptop and the rest of the case.
-
Carefully pry open the case from several points.
-
-
-
-
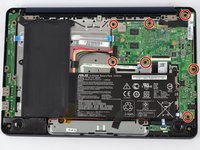
Unscrew all seven screws around the outer edge of the motherboard using 2mm Phillips Screwdriver.
-
-
-
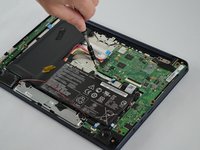
Unplug the No-Fuss Ribbon battery, screen, and speakers from the motherboard.
-
Carefully remove the ZIF screen connector.
-


To reassemble your device, follow these instructions in reverse order.
To reassemble your device, follow these instructions in reverse order.
Отменить: Я не выполнил это руководство.
10 человек успешно провели ремонт по этому руководству.
Команду

USF Tampa, Team 2-2, Sullivan Fall 2016 Участник USF Tampa, Team 2-2, Sullivan Fall 2016
USFT-SULLIVAN-F16S2G2
3 членов
Автор 10 руководств
3 Комментариев
Here is a more detailed view of all the cables that have to be unplugged before the motherboard can be extracted: https://ibb.co/jcgwUQ
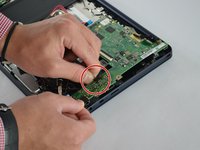
Also, be aware that, even after all screws and cables are removed, it will still require a little bit of force to remove the motherboard, due to the thermal adhesive on the CPU and GPU. Do not be afraid to pull the motherboard! As long as you followed the instructions and disconnected all the EIGHT cables and SEVEN screws, you are not going to damage anything, it’s just thermal tape!
I guess because if the spill damage, the motherboard stop my keyboard from working and the usual from