Перейти к основному содержанию

Asus GL551JW-AH71 Display Assembly Replacement

Выберете то, что вам нужно

  1. Asus GL551JW-AH71 Display Assembly Replacement, Battery: шаг 1, изображение 1 из 1
    • Close the device and lay it upside down.

    • Unplug the device and make sure the device is powered off before removing the battery.

  2. Asus GL551JW-AH71 Display Assembly Replacement: шаг 2, изображение 1 из 2 Asus GL551JW-AH71 Display Assembly Replacement: шаг 2, изображение 2 из 2
    • Move the battery eject button to the right. The battery will be ejected.

  3. Asus GL551JW-AH71 Display Assembly Replacement: шаг 3, изображение 1 из 2 Asus GL551JW-AH71 Display Assembly Replacement: шаг 3, изображение 2 из 2
    • Grab the battery and remove it from the device.

  4. Asus GL551JW-AH71 Display Assembly Replacement, Optical Drive: шаг 4, изображение 1 из 2 Asus GL551JW-AH71 Display Assembly Replacement, Optical Drive: шаг 4, изображение 2 из 2
    • Use a Phillips #000 screwdriver to remove the single 10mm optical drive screw.

  5. Asus GL551JW-AH71 Display Assembly Replacement: шаг 5, изображение 1 из 3 Asus GL551JW-AH71 Display Assembly Replacement: шаг 5, изображение 2 из 3 Asus GL551JW-AH71 Display Assembly Replacement: шаг 5, изображение 3 из 3
    • Insert a probe or paperclip gently into the eject pin hole to eject the optical drive tray.

  6. Asus GL551JW-AH71 Display Assembly Replacement: шаг 6, изображение 1 из 2 Asus GL551JW-AH71 Display Assembly Replacement: шаг 6, изображение 2 из 2
    • Gently grasp the optical drive assembly and slide it out of the laptop body.

  7. Asus GL551JW-AH71 Display Assembly Replacement, Upper Assembly: шаг 7, изображение 1 из 2 Asus GL551JW-AH71 Display Assembly Replacement, Upper Assembly: шаг 7, изображение 2 из 2
    • Using a Phillips #000 screwdriver, remove the two 11mm screws that hold the access panel in place.

  8. Asus GL551JW-AH71 Display Assembly Replacement: шаг 8, изображение 1 из 2 Asus GL551JW-AH71 Display Assembly Replacement: шаг 8, изображение 2 из 2
    • Carefully remove the access panel.

  9. Asus GL551JW-AH71 Display Assembly Replacement: шаг 9, изображение 1 из 2 Asus GL551JW-AH71 Display Assembly Replacement: шаг 9, изображение 2 из 2
    • Using a Phillips #000 screwdriver, remove the seven 11mm screws holding lower case to the laptop.

  10. Asus GL551JW-AH71 Display Assembly Replacement: шаг 10, изображение 1 из 1
    • Turn the laptop over and open the screen.

  11. Asus GL551JW-AH71 Display Assembly Replacement: шаг 11, изображение 1 из 3 Asus GL551JW-AH71 Display Assembly Replacement: шаг 11, изображение 2 из 3 Asus GL551JW-AH71 Display Assembly Replacement: шаг 11, изображение 3 из 3
    • Gently pry open the case with an iFixit opening tool.

    • The upper and lower assembly are connected with a display cable that will be removed in the next step. Do not pull the parts apart more than a few inches.

  12. Asus GL551JW-AH71 Display Assembly Replacement: шаг 12, изображение 1 из 3 Asus GL551JW-AH71 Display Assembly Replacement: шаг 12, изображение 2 из 3 Asus GL551JW-AH71 Display Assembly Replacement: шаг 12, изображение 3 из 3
    • Flip the laptop on the right side while still holding the upper and lower assemblies close together.

    • Unplug the display connector from the motherboard.

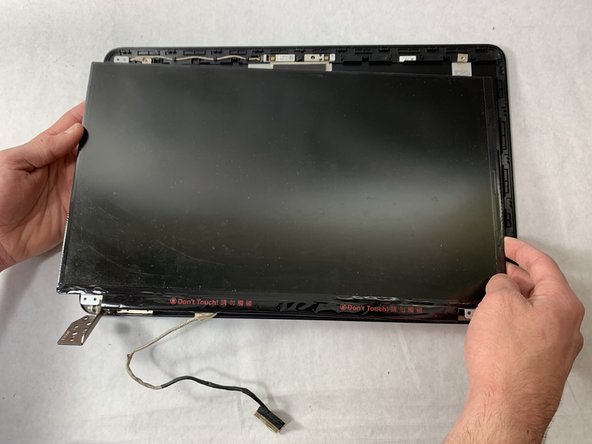
    • Remove the upper assembly.

  13. Asus GL551JW-AH71 Display Assembly Replacement, Display Assembly: шаг 13, изображение 1 из 2 Asus GL551JW-AH71 Display Assembly Replacement, Display Assembly: шаг 13, изображение 2 из 2
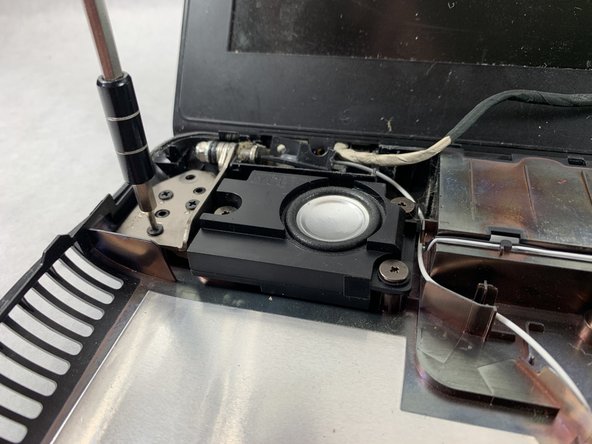
    • Remove the three 5mm screws located in each circle with a Phillips #000 screwdriver.

    • A total of twelve 5mm screw should be removed in order to free the display assembly from the base.

  14. Asus GL551JW-AH71 Display Assembly Replacement: шаг 14, изображение 1 из 2 Asus GL551JW-AH71 Display Assembly Replacement: шаг 14, изображение 2 из 2
    • Lift the display assembly up, separating it from the base of the device.

  15. Asus GL551JW-AH71 Display Assembly Replacement: шаг 15, изображение 1 из 3 Asus GL551JW-AH71 Display Assembly Replacement: шаг 15, изображение 2 из 3 Asus GL551JW-AH71 Display Assembly Replacement: шаг 15, изображение 3 из 3
    • Using a plastic opening tool, separate the bezel from the screen.

    • Insert the tool and slide it right to left to release the bezel from the screen.

  16. Asus GL551JW-AH71 Display Assembly Replacement: шаг 16, изображение 1 из 2 Asus GL551JW-AH71 Display Assembly Replacement: шаг 16, изображение 2 из 2
    • Remove the four screws using a Phillips #0 screwdriver.

  17. Asus GL551JW-AH71 Display Assembly Replacement: шаг 17, изображение 1 из 2 Asus GL551JW-AH71 Display Assembly Replacement: шаг 17, изображение 2 из 2
    • Grab the screen in the corners and lift up to remove it.

Заключение

To reassemble your device, follow these instructions in reverse order.

3 участников успешно повторили данное руководство.

Alec Pimentel

Участник с: 03/21/19

258 Репутация

1 руководство автора

Команда

UMass Dartmouth, Team S8-G3, Bailey Spring 2019 Участник UMass Dartmouth, Team S8-G3, Bailey Spring 2019

UMASSD-BAILEY-S19S8G3

4 членов

Автор 16 руководств

0 Комментариев

Добавить комментарий

Просмотр статистики:

За последние 24часов: 0

За последние 7 дней: 1

За последние 30 дней: 4

За всё время: 808