Перейти к основному содержанию

Asus ROG G53SW-XT1 Hard Drive Replacement

Выберете то, что вам нужно

  1. Asus ROG G53SW-XT1 Hard Drive  Replacement, Battery: шаг 1, изображение 1 из 1
    • Unplug the power cable and flip the computer over.

  2. Asus ROG G53SW-XT1 Hard Drive  Replacement: шаг 2, изображение 1 из 1
    • Unlock the battery by pushing the switch to the right.

  3. Asus ROG G53SW-XT1 Hard Drive  Replacement: шаг 3, изображение 1 из 2 Asus ROG G53SW-XT1 Hard Drive  Replacement: шаг 3, изображение 2 из 2
    • Push and hold the left switch, then pull the battery out.

  4. Asus ROG G53SW-XT1 Hard Drive  Replacement, Keyboard: шаг 4, изображение 1 из 3 Asus ROG G53SW-XT1 Hard Drive  Replacement, Keyboard: шаг 4, изображение 2 из 3 Asus ROG G53SW-XT1 Hard Drive  Replacement, Keyboard: шаг 4, изображение 3 из 3
    • Insert a spudger, or plastic opening tool, into these five slots and pry upwards to pop up the keyboard.

  5. Asus ROG G53SW-XT1 Hard Drive  Replacement: шаг 5, изображение 1 из 3 Asus ROG G53SW-XT1 Hard Drive  Replacement: шаг 5, изображение 2 из 3 Asus ROG G53SW-XT1 Hard Drive  Replacement: шаг 5, изображение 3 из 3
    • Disconnect the keyboard ribbon cables from the motherboard.

  6. Asus ROG G53SW-XT1 Hard Drive  Replacement, Back Panel: шаг 6, изображение 1 из 3 Asus ROG G53SW-XT1 Hard Drive  Replacement, Back Panel: шаг 6, изображение 2 из 3 Asus ROG G53SW-XT1 Hard Drive  Replacement, Back Panel: шаг 6, изображение 3 из 3
    • Insert your screwdriver into the locking mechanism and slide it to the left. This will unlock the hand rest and allow you to pull it free.

  7. Asus ROG G53SW-XT1 Hard Drive  Replacement: шаг 7, изображение 1 из 1
    • Remove the fourteen Phillips #0 screws.

  8. Asus ROG G53SW-XT1 Hard Drive  Replacement: шаг 8, изображение 1 из 2 Asus ROG G53SW-XT1 Hard Drive  Replacement: шаг 8, изображение 2 из 2
    • Flip the laptop over and pull off the bottom cover.

  9. Asus ROG G53SW-XT1 Hard Drive  Replacement, Hard Drive: шаг 9, изображение 1 из 2 Asus ROG G53SW-XT1 Hard Drive  Replacement, Hard Drive: шаг 9, изображение 2 из 2
    • Place your fingers along the left edge of the hard drive cover, and slide it to the right, then lift up.

  10. Asus ROG G53SW-XT1 Hard Drive  Replacement: шаг 10, изображение 1 из 3 Asus ROG G53SW-XT1 Hard Drive  Replacement: шаг 10, изображение 2 из 3 Asus ROG G53SW-XT1 Hard Drive  Replacement: шаг 10, изображение 3 из 3
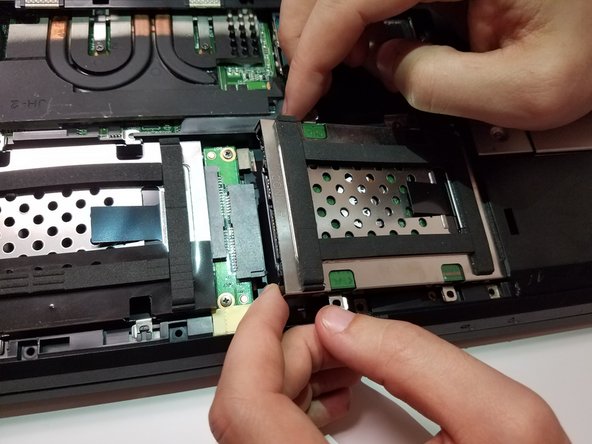
    • Remove the Hard Drive and case from the laptop.

    • Remove the four Phillips #0 screws from the hard drive case.

  11. Asus ROG G53SW-XT1 Hard Drive  Replacement: шаг 11, изображение 1 из 1
    • Slide the hard drive out of the casing.

Заключение

To reassemble your device, follow these instructions in reverse order.

2 участников успешно повторили данное руководство.

Alexander Lovrien

Участник с: 02/12/18

218 Репутация

1 руководство автора

Команда

University of North Texas, Team S4-G4, Thompson Spring 2018 Участник University of North Texas, Team S4-G4, Thompson Spring 2018

UNT-THOMPSON-S18S4G4

3 членов

Автор 5 руководств

Один комментарий

Bottom cover holds only by 9 screws. You don’t need to remove 14 screws. All screws at the bottom with M2 5x7 label (do not remove two small screws. And one scre on the right in the middle without number on the metal plate). You don’t need to remove screw with M2 5x7 label on the right side, second from the corner.

John McCain - Ответить

Добавить комментарий

Просмотр статистики:

За последние 24часов: 0

За последние 7 дней: 10

За последние 30 дней: 28

За всё время: 2,089