Перейти к основному содержанию

Asus ROG G751JL-DS71 Hard Drive Replacement

Выберете то, что вам нужно

  1. Asus ROG G751JL-DS71 Hard Drive Replacement, Hard Drive: шаг 1, изображение 1 из 2 Asus ROG G751JL-DS71 Hard Drive Replacement, Hard Drive: шаг 1, изображение 2 из 2
    • Lift the rubber cover found on the bottom of the laptop.

    • Remove the 5.2 mm screw with a Phillips 1 Screwdriver.

  2. Asus ROG G751JL-DS71 Hard Drive Replacement: шаг 2, изображение 1 из 3 Asus ROG G751JL-DS71 Hard Drive Replacement: шаг 2, изображение 2 из 3 Asus ROG G751JL-DS71 Hard Drive Replacement: шаг 2, изображение 3 из 3
    • Use the black nylon spudger to pry the back panel off the laptop.

  3. Asus ROG G751JL-DS71 Hard Drive Replacement: шаг 3, изображение 1 из 3 Asus ROG G751JL-DS71 Hard Drive Replacement: шаг 3, изображение 2 из 3 Asus ROG G751JL-DS71 Hard Drive Replacement: шаг 3, изображение 3 из 3
    • Use a Phillips 1 Screwdriver to remove the four 2.4 mm screws securing the hard drive.

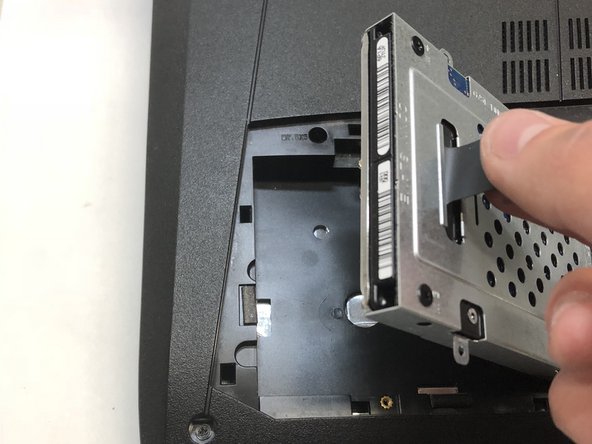
    • Use the black pull-tab located on the shell covering the hard drive, to lift the hard drive housing and pull the hard drive away from the connector.

    • To access the hard drive on the right side of the laptop, perform the same steps, but on hard drive casing to the right of the previous hard drive.

Заключение

To reassemble your device, follow these instructions in reverse order.

2 участников успешно повторили данное руководство.

Vincent Guarino

Участник с: 01/22/18

190 Репутация

1 руководство автора

Команда

Cal Poly, Team S16-G1, Banghart Winter 2018 Участник Cal Poly, Team S16-G1, Banghart Winter 2018

CPSU-BANGHART-W18S16G1

4 членов

Автор 22 руководств

0 Комментариев

Добавить комментарий

Просмотр статистики:

За последние 24часов: 0

За последние 7 дней: 5

За последние 30 дней: 7

За всё время: 507