Перейти к основному содержанию

Asus ROG GL551J Optical Drive Replacement

Выберете то, что вам нужно

  1. Asus ROG GL551J Optical Drive Replacement, Battery: шаг 1, изображение 1 из 1
    • Lay the device on a flat surface with the battery facing up.

    • Be sure to wear ESD or Rubber gloves to protect the computer components.

  2. Asus ROG GL551J Optical Drive Replacement: шаг 2, изображение 1 из 1
    • Push the latch found below the battery to the unlock position.

  3. Asus ROG GL551J Optical Drive Replacement: шаг 3, изображение 1 из 1
    • Pull the battery out.

  4. Asus ROG GL551J Optical Drive Replacement, Optical Drive: шаг 4, изображение 1 из 2 Asus ROG GL551J Optical Drive Replacement, Optical Drive: шаг 4, изображение 2 из 2
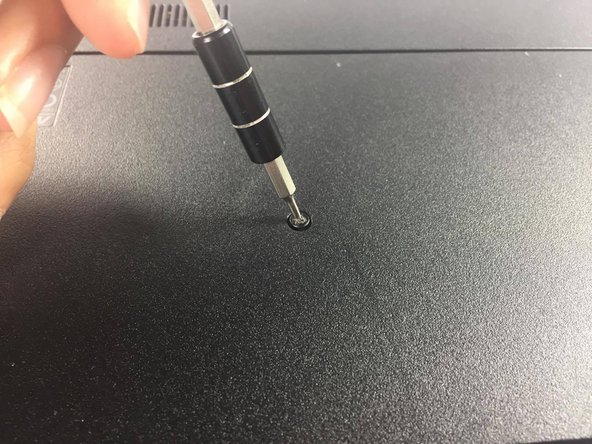
    • Locate and unscrew the screw which connects the optical drive to the chassis

  5. Asus ROG GL551J Optical Drive Replacement: шаг 5, изображение 1 из 1
    • Grasp the edge of the optical drive

  6. Asus ROG GL551J Optical Drive Replacement: шаг 6, изображение 1 из 1
    • Pull on the optical drive gently. With little resistance, the optical drive should just slide out

Заключение

To reassemble your device, follow these instructions in reverse order.

4 участников успешно повторили данное руководство.

Philip Muino

Участник с: 02/15/17

179 Репутация

1 руководство автора

Команда

USF Tampa, Team 5-4, Lacy Spring 2017 Участник USF Tampa, Team 5-4, Lacy Spring 2017

USFT-LACY-S17S5G4

4 членов

Автор 5 руководств

Один комментарий

ok.so , if someone had replaced the dvd rom with a hard disk drive i nust do the same for replace the drive?

anix - Ответить

Добавить комментарий

Просмотр статистики:

За последние 24часов: 0

За последние 7 дней: 2

За последние 30 дней: 4

За всё время: 1,961