Перейти к основному содержанию

Asus ROG Strix GL702VS Speaker Replacement

Выберете то, что вам нужно

  1. Asus ROG Strix GL702VS Speaker Replacement, Back Cover: шаг 1, изображение 1 из 1
    • Flip the computer so the bottom of the laptop is facing up.

  2. Asus ROG Strix GL702VS Speaker Replacement: шаг 2, изображение 1 из 1
    • Remove the ten JIS #0 screws around the edge of the laptop.

    • The two bottom screws are slightly shorter

  3. Asus ROG Strix GL702VS Speaker Replacement: шаг 3, изображение 1 из 2 Asus ROG Strix GL702VS Speaker Replacement: шаг 3, изображение 2 из 2
    • Use a Jimmy to carefully free each side of the bottom casing.

  4. Asus ROG Strix GL702VS Speaker Replacement: шаг 4, изображение 1 из 1
    • Lift up the back casing from the computer.

    • You may hear clicking or snapping sounds. This is just the plastic clips coming loose.

  5. Asus ROG Strix GL702VS Speaker Replacement, Speaker: шаг 5, изображение 1 из 3 Asus ROG Strix GL702VS Speaker Replacement, Speaker: шаг 5, изображение 2 из 3 Asus ROG Strix GL702VS Speaker Replacement, Speaker: шаг 5, изображение 3 из 3
    Инструмент, используемый на этом этапе:
    Tweezers
    $4.99
    Купить
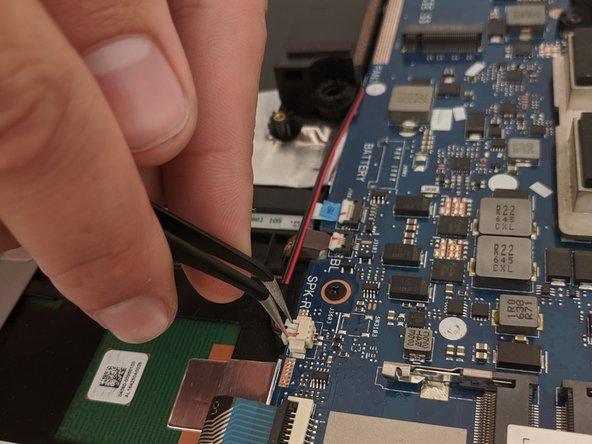
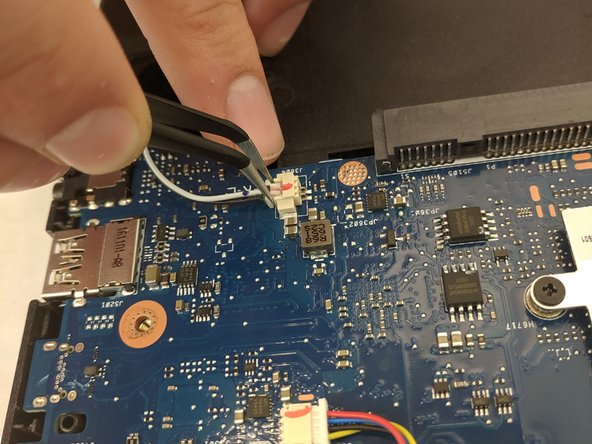
    • Disconnect the two sets of speaker connectors using a pair of tweezers.

  6. Asus ROG Strix GL702VS Speaker Replacement: шаг 6, изображение 1 из 3 Asus ROG Strix GL702VS Speaker Replacement: шаг 6, изображение 2 из 3 Asus ROG Strix GL702VS Speaker Replacement: шаг 6, изображение 3 из 3
    • Gently remove the speakers by lifting up.

Заключение

To reassemble your device, follow these instructions in reverse order.


Conor H Allen

Участник с: 09/16/19

622 Репутация

Автор 5 руководств

Команда

0 Комментариев

Добавить комментарий

Просмотр статистики:

За последние 24часов: 1

За последние 7 дней: 7

За последние 30 дней: 12

За всё время: 955