Перейти к основному содержанию

Asus U50F-RBBAG05 Fan and Heat Sink Replacement

Выберете то, что вам нужно

  1. Asus U50F-RBBAG05  Fan and Heat Sink Replacement, Battery: шаг 1, изображение 1 из 1
    • Turn the laptop over so the bottom is facing up.

    • Slide the two tabs on the bottom of the laptop toward the edges of laptop.

    • Slide the left tab to the left to lock it into the unlocked position. The red showing next to the tab signifies that it's unlocked.

    • You will have to hold the right tab to the right to keep the slot unlocked while removing the battery.

  2. Asus U50F-RBBAG05  Fan and Heat Sink Replacement: шаг 2, изображение 1 из 2 Asus U50F-RBBAG05  Fan and Heat Sink Replacement: шаг 2, изображение 2 из 2
    • Hold down the tab on the right side, then begin sliding the battery out.

    • Remove the old battery.

    • Next, insert the new battery into the empty slot. Release the right tab to begin locking the new battery into place. Slide the left tab to the right to completely lock the battery into the slot. The red that was showing near the left tab should be gone. This signifies that the battery is locked into place.

  3. Asus U50F-RBBAG05  Fan and Heat Sink Replacement, Underpanel: шаг 3, изображение 1 из 1
    • Remove the six screws using a Phillips #1 screwdriver.

  4. Asus U50F-RBBAG05  Fan and Heat Sink Replacement: шаг 4, изображение 1 из 1
    • Pry the lower panel up with your fingernail or a spudger.

  5. Asus U50F-RBBAG05  Fan and Heat Sink Replacement: шаг 5, изображение 1 из 2 Asus U50F-RBBAG05  Fan and Heat Sink Replacement: шаг 5, изображение 2 из 2
    • Lift up on the panel and remove it.

  6. Asus U50F-RBBAG05  Fan and Heat Sink Replacement, Fan and Heat Sink: шаг 6, изображение 1 из 2 Asus U50F-RBBAG05  Fan and Heat Sink Replacement, Fan and Heat Sink: шаг 6, изображение 2 из 2
    • Use the Phillips #1 to remove two screws from the fan that attach it to the motherboard.

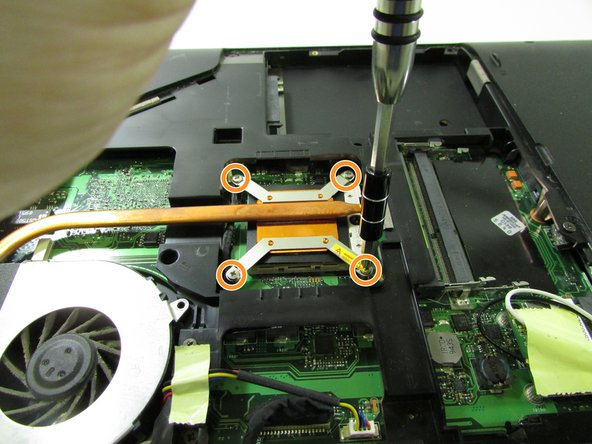
    • Remove the four screws on the heat sink.

  7. Asus U50F-RBBAG05  Fan and Heat Sink Replacement: шаг 7, изображение 1 из 1
    • Pull the bundled cable away from the connector in the same direction the individual wires are running.

    • Potential for device damage: Pull evenly on the connector so that no individual wires are overly strained.

  8. Asus U50F-RBBAG05  Fan and Heat Sink Replacement: шаг 8, изображение 1 из 2 Asus U50F-RBBAG05  Fan and Heat Sink Replacement: шаг 8, изображение 2 из 2
    • Pull up the heat sink a bit and then pull back.

    • There's an overhanging piece of the lower panel near the fan that you have to scoot out of.

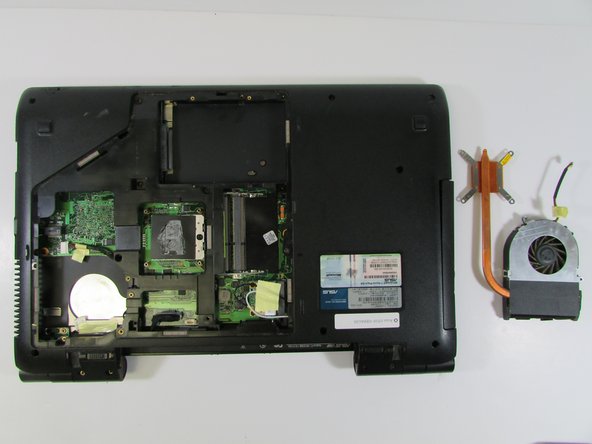
    • Lift and remove both the fan and heat sink.

Заключение

To reassemble your device, follow these instructions in reverse order.

Kelly Greeling

Участник с: 02/07/17

1 044 Репутация

Автор 10 руководств

Команда

0 Комментариев

Добавить комментарий

Просмотр статистики:

За последние 24часов: 0

За последние 7 дней: 6

За последние 30 дней: 14

За всё время: 409