Перейти к основному содержанию

Asus UL30VT-X1 Hard Drive Replacement

Выберете то, что вам нужно

  1. Asus UL30VT-X1 Hard Drive Replacement, Hard Drive: шаг 1, изображение 1 из 2 Asus UL30VT-X1 Hard Drive Replacement, Hard Drive: шаг 1, изображение 2 из 2
    • Flip the laptop over onto the back.

  2. Asus UL30VT-X1 Hard Drive Replacement: шаг 2, изображение 1 из 2 Asus UL30VT-X1 Hard Drive Replacement: шаг 2, изображение 2 из 2
    • Unscrew the three screws on the hard drive panel using a Phillips Head #00 screwdriver.

  3. Asus UL30VT-X1 Hard Drive Replacement: шаг 3, изображение 1 из 2 Asus UL30VT-X1 Hard Drive Replacement: шаг 3, изображение 2 из 2
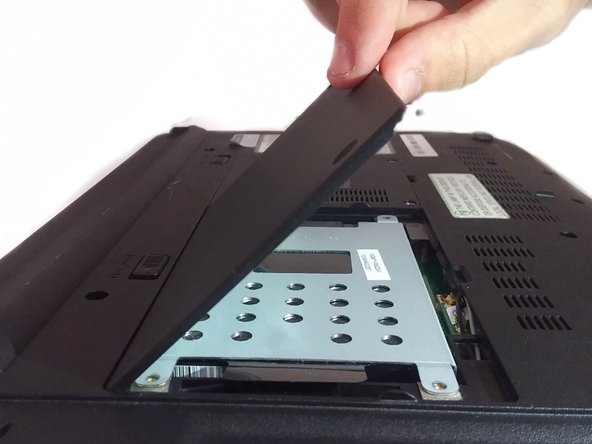
    • Lift the hard drive panel up from the small cut out at the bottom with your finger to expose the hard drive.

  4. Asus UL30VT-X1 Hard Drive Replacement: шаг 4, изображение 1 из 2 Asus UL30VT-X1 Hard Drive Replacement: шаг 4, изображение 2 из 2
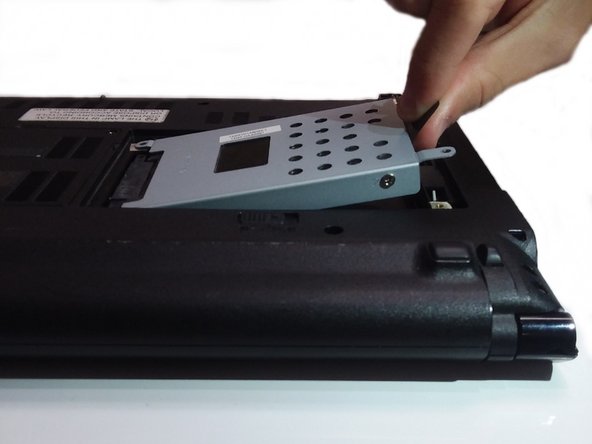
    • Grab the black pull tab with your fingers. Pull upwards and then outwards to remove the hard drive.

    • It can sometimes be a little difficult to remove the hard drive.

Заключение

To reassemble your device, follow these instructions in reverse order.

Robert Wilcox

Участник с: 09/20/17

218 Репутация

Автор 2 руководств

Команда

University of North Texas, Team S6-G7, Thomas Fall 2017 Участник University of North Texas, Team S6-G7, Thomas Fall 2017

UNT-THOMAS-F17S6G7

3 членов

Автор 5 руководств

0 Комментариев

Добавить комментарий

Просмотр статистики:

За последние 24часов: 0

За последние 7 дней: 0

За последние 30 дней: 0

За всё время: 176