Перейти к основному содержанию

Asus VivoBook Q200E-BSI3T08 Motherboard Replacement

Выберете то, что вам нужно

  1. Asus VivoBook Q200E-BSI3T08 Motherboard Replacement, Back Panel: шаг 1, изображение 1 из 1
    • Turn off the computer and unplug the charge cable.

    • If the computer is on or plugged in, it could cause electric shock.

    • Turn the computer upside down.

  2. Asus VivoBook Q200E-BSI3T08 Motherboard Replacement: шаг 2, изображение 1 из 1
    • Remove the nine Philips #00 screws holding the back panel in place (four 5.6mm, four 7.7mm, and one 9.2mm).

  3. Asus VivoBook Q200E-BSI3T08 Motherboard Replacement: шаг 3, изображение 1 из 2 Asus VivoBook Q200E-BSI3T08 Motherboard Replacement: шаг 3, изображение 2 из 2
    • Use a plastic opening tool to gently remove the back panel.

  4. Asus VivoBook Q200E-BSI3T08 Motherboard Replacement, Battery: шаг 4, изображение 1 из 1
    • Remove the eight 4.7mm Philips #00 screws holding the battery in place.

  5. Asus VivoBook Q200E-BSI3T08 Motherboard Replacement: шаг 5, изображение 1 из 3 Asus VivoBook Q200E-BSI3T08 Motherboard Replacement: шаг 5, изображение 2 из 3 Asus VivoBook Q200E-BSI3T08 Motherboard Replacement: шаг 5, изображение 3 из 3
    • The battery is attached by a set of wires.

    • Use your finger to disconnect the set of wires. It should come off very easily.

  6. Asus VivoBook Q200E-BSI3T08 Motherboard Replacement: шаг 6, изображение 1 из 2 Asus VivoBook Q200E-BSI3T08 Motherboard Replacement: шаг 6, изображение 2 из 2
    • Now just lift the battery out of place.

  7. Asus VivoBook Q200E-BSI3T08 Motherboard Replacement, Cooling Fan: шаг 7, изображение 1 из 1
    • Unscrew the five 4.9mm screws holding the cooling fan in place using a Phillips #0 screwdriver.

  8. Asus VivoBook Q200E-BSI3T08 Motherboard Replacement: шаг 8, изображение 1 из 1
    • Unplug the power bus for the fan.

  9. Asus VivoBook Q200E-BSI3T08 Motherboard Replacement: шаг 9, изображение 1 из 1
    • Lift up and remove the cooling fan from the slot.

  10. Asus VivoBook Q200E-BSI3T08 Motherboard Replacement, Wireless Card: шаг 10, изображение 1 из 2 Asus VivoBook Q200E-BSI3T08 Motherboard Replacement, Wireless Card: шаг 10, изображение 2 из 2
    • Locate wireless card next to battery.

  11. Asus VivoBook Q200E-BSI3T08 Motherboard Replacement: шаг 11, изображение 1 из 1
    • Remove the one 4.9mm screw that holds the wireless card in place with a Phillips #00 screwdriver.

  12. Asus VivoBook Q200E-BSI3T08 Motherboard Replacement: шаг 12, изображение 1 из 1
    • Unplug the black coaxial cable from the wireless card.

  13. Asus VivoBook Q200E-BSI3T08 Motherboard Replacement: шаг 13, изображение 1 из 1
    • Pull the wireless card from connector slot.

  14. Asus VivoBook Q200E-BSI3T08 Motherboard Replacement, Motherboard: шаг 14, изображение 1 из 1
    • Locate the motherboard under the cooling fan.

  15. Asus VivoBook Q200E-BSI3T08 Motherboard Replacement: шаг 15, изображение 1 из 1
    • Unscrew the two 5.9mm screws on the PCB board with a Phillips #0 screwdriver.

  16. Asus VivoBook Q200E-BSI3T08 Motherboard Replacement: шаг 16, изображение 1 из 1
    • Remove the PCB board from the motherboard.

  17. Asus VivoBook Q200E-BSI3T08 Motherboard Replacement: шаг 17, изображение 1 из 1
    • Unscrew the four 5.9mm hard drive bracket screws with a Phillips #0 screwdriver.

  18. Asus VivoBook Q200E-BSI3T08 Motherboard Replacement: шаг 18, изображение 1 из 2 Asus VivoBook Q200E-BSI3T08 Motherboard Replacement: шаг 18, изображение 2 из 2
    • Unscrew the four 5.9mm screws with a Phillips #0 screwdriver.

    • Next, carefully lift the LAN bracket out of the slot.

  19. Asus VivoBook Q200E-BSI3T08 Motherboard Replacement: шаг 19, изображение 1 из 1
    • Remove the five 5.9mm screws holding the motherboard in place with a Phillips #0 screwdriver.

    • Remove the five 3.5mm screws holding the motherboard with a Phillips #00 screwdriver.

  20. Asus VivoBook Q200E-BSI3T08 Motherboard Replacement: шаг 20, изображение 1 из 1
    • Carefully lift the motherboard up out of the slot.

  21. Asus VivoBook Q200E-BSI3T08 Motherboard Replacement: шаг 21, изображение 1 из 2 Asus VivoBook Q200E-BSI3T08 Motherboard Replacement: шаг 21, изображение 2 из 2
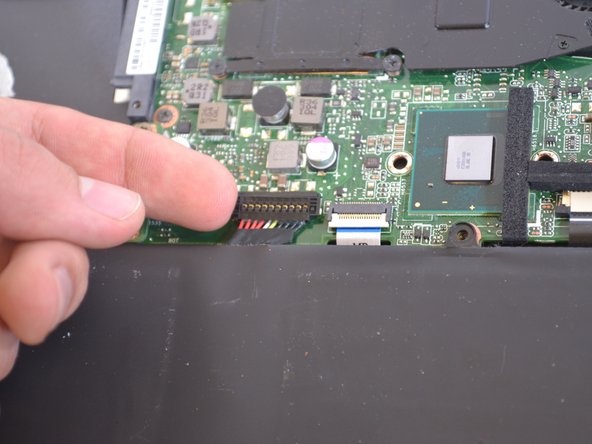
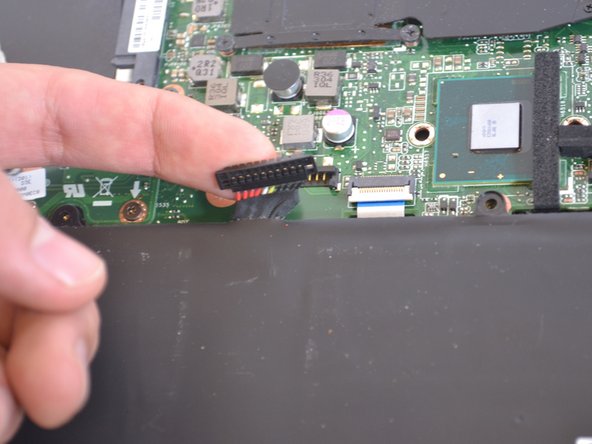
    • Locate and unplug the power bus from the motherboard.

    • The motherboard can now be replaced.

Заключение

To reassemble your device, follow these instructions in reverse order.

Mitchell Jackson

Участник с: 05/17/17

742 Репутация

Автор 7 руководств

Команда

IUPUI, Team S4-G4, Wilson Summer 2017 Участник IUPUI, Team S4-G4, Wilson Summer 2017

IUPUI-WILSON-SU17S4G4

4 членов

Автор 7 руководств

Один комментарий

Very useful tutorial with nice photos indicating even different type of screws n different color..

This was more useful than a YouTube video..

I just replaced my mother board..

Thank you and God bless u for ur effort..

Gs Mobile - Ответить

Добавить комментарий

Просмотр статистики:

За последние 24часов: 0

За последние 7 дней: 1

За последние 30 дней: 5

За всё время: 2,188