Перейти к основному содержанию

Asus VivoBook X540SA-BPD0602V Speaker Replacement

Выберете то, что вам нужно

  1. Asus VivoBook X540SA-BPD0602V Speaker Replacement, Keyboard: шаг 1, изображение 1 из 1
    • Power down the laptop using the device's power button in top right corner of the keyboard. Ensure that the device's power cord is disconnected.

  2. Asus VivoBook X540SA-BPD0602V Speaker Replacement: шаг 2, изображение 1 из 1
    • Flip the laptop over so the back panel is displayed.

  3. Asus VivoBook X540SA-BPD0602V Speaker Replacement: шаг 3, изображение 1 из 1
    • Using a Phillips #1 screwdriver, remove the ten screws from the back panel.

    • Remove the two battery screws (15.6 mm)

    • Two top corner screws (12.5 mm)

    • Six case screws (9.7mm)

  4. Asus VivoBook X540SA-BPD0602V Speaker Replacement: шаг 4, изображение 1 из 1
    • Flip the laptop back over and open it, revealing the screen and keyboard.

  5. Asus VivoBook X540SA-BPD0602V Speaker Replacement: шаг 5, изображение 1 из 1
    • Using the blue plastic opening tool, wedge and loosen the seal all the way around the edges. Carefully lift up the keyboard panel.

    • When lifting the keyboard panel, do not lift it all the way as the two connection ribbons to the motherboard must be disconnected.

    • It is recommended to break the seal of the case starting at the upper corners closest to the display monitor .

  6. Asus VivoBook X540SA-BPD0602V Speaker Replacement: шаг 6, изображение 1 из 1
    • Observe where the ribbons connect to the motherboard, there are two connections. Each connection has a black clamp. To remove the ribbon, lift the black clamp up to disconnect it.

  7. Asus VivoBook X540SA-BPD0602V Speaker Replacement, Battery: шаг 7, изображение 1 из 1
    • Very carefully, remove the batteries with the blue plastic iFixit opening tool. Focus removing the battery near the highlighted area.

    • The batteries should all be connected to one another and come out of the device as a single unit.

    • Be careful not to rip any of the black plastic covering the batteries. Exposed battery parts can lead to explosions. If the case is ripped, re-wrap them, or properly dispose of them. Do not reuse them.

  8. Asus VivoBook X540SA-BPD0602V Speaker Replacement, Disk Drive: шаг 8, изображение 1 из 1
    • The Disk Drive is located within the upper right hand corner of the laptop.

  9. Asus VivoBook X540SA-BPD0602V Speaker Replacement: шаг 9, изображение 1 из 1
    • Using a Phillips #0 screwdriver, remove the two screws (5.6 mm) around the disc drive.

    • Note which screws go where. The two smaller screws fasten onto the disc drive, while the three larger screws secure the drive on the outside.

  10. Asus VivoBook X540SA-BPD0602V Speaker Replacement: шаг 10, изображение 1 из 1
    • Use the Phillips #00 screwdriver to remove the two screws (2.7 mm) on the side of the disc drive fastener.

  11. Asus VivoBook X540SA-BPD0602V Speaker Replacement: шаг 11, изображение 1 из 1
    • After removing the seven screws, lift the metal fastener from the disc drive with the plastic opening tool.

  12. Asus VivoBook X540SA-BPD0602V Speaker Replacement: шаг 12, изображение 1 из 1
    • Slide the disc drive to the right, removing it from the laptop case.

  13. Asus VivoBook X540SA-BPD0602V Speaker Replacement, Hard Drive: шаг 13, изображение 1 из 1
    • The Hard Drive is located in the bottom right hand corner. It should be the device covered in black foam.

    • Do not remove the foam. It's anti-static foam and protects the hard drive from static and any bumps as you move around your device.

  14. Asus VivoBook X540SA-BPD0602V Speaker Replacement: шаг 14, изображение 1 из 1
    • Using the Phillips #0 screwdriver, unscrew the four (5.7cm) screws around the hard drive.

  15. Asus VivoBook X540SA-BPD0602V Speaker Replacement: шаг 15, изображение 1 из 1
    • Using the blue plastic opening tool in the iFixit tool kit, slide the hard drive to the right to remove it from the case.

    • Some models don't come with a foam insert. This will cause a bit of a rattle if you're replacing the old hard drive with an SSD drive.

  16. Asus VivoBook X540SA-BPD0602V Speaker Replacement, Speaker: шаг 16, изображение 1 из 2 Asus VivoBook X540SA-BPD0602V Speaker Replacement, Speaker: шаг 16, изображение 2 из 2
    • Disconnect speaker wire from motherboard.

  17. Asus VivoBook X540SA-BPD0602V Speaker Replacement: шаг 17, изображение 1 из 3 Asus VivoBook X540SA-BPD0602V Speaker Replacement: шаг 17, изображение 2 из 3 Asus VivoBook X540SA-BPD0602V Speaker Replacement: шаг 17, изображение 3 из 3
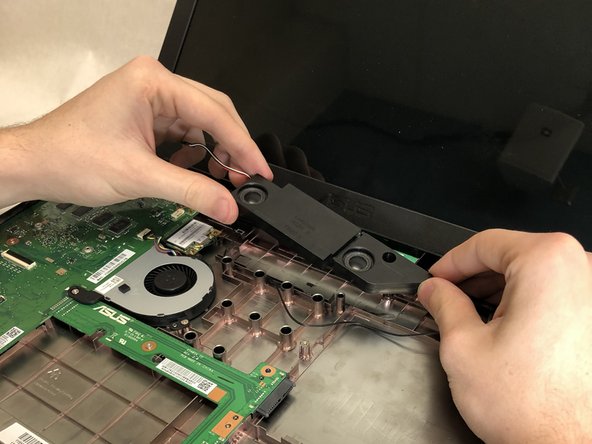
    • Gently use the metal spudger to loosen speaker from adhesive, by first loosening the far right side and working your way to the left.

    • When removing the speaker, you may hear a cracking sound. This is okay; it is just the speaker separating from the adhesive.

Заключение

To reassemble your device, follow these instructions in reverse order.

Еще один человек закончил это руководство.

Taylor Peters

Участник с: 11/01/18

309 Репутация

Автор 2 руководств

Команда

IUPUI, Team S2-G6, Harley Fall 2018 Участник IUPUI, Team S2-G6, Harley Fall 2018

IUPUI-HARLEY-F18S2G6

3 членов

Автор 4 руководств

0 Комментариев

Добавить комментарий

Просмотр статистики:

За последние 24часов: 0

За последние 7 дней: 7

За последние 30 дней: 35

За всё время: 1,124