Введение
A hard drive is an essential part of the laptop which is needed in order to store data. This guide will show you how to replace the battery of your Asus Vivobook Max X541SA-PD0703X.
Выберете то, что вам нужно
-
-
Flip the laptop upside down so that the back of the laptop faces you.
-
-
-
Remove the following ten Phillips #0 screws from the bottom of the laptop:
-
Six 13mm screws.
-
Four 11mm screws.
-
-
-
Using a plastic opening tool, pry up the palm rest from the bottom case of the laptop.
-
-
-
-
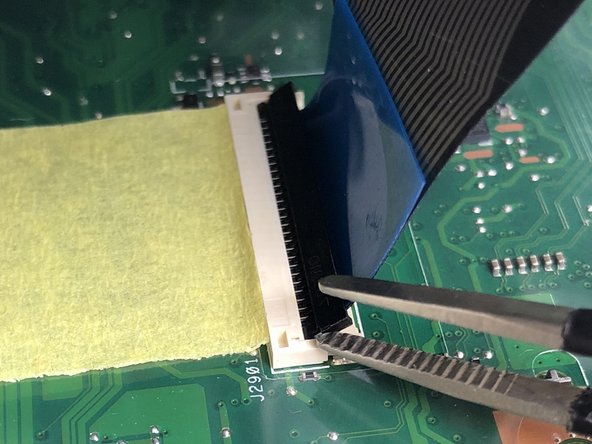
Use a spudger to flip up the retaining flaps on both keyboard ribbon cable ZIF sockets.
-
Pull the ribbon cables out of their sockets.
-
-
-
Pull the Wi-Fi card out of the motherboard.
-
-
-
Remove the hard drive by pulling it towards the right, and removing it from the laptop case
I have an ASUS x451N. I changed the storage to an ssd since its very slow and now it doesn't boot. It just gets stuck in bios. It appears in the storage section but not on the boot menu. The ssd has an os and I have already tried to boot it in my pc and it works. I hope you can help me with this problem. Thank you!
-


To reassemble your device, follow these instructions in reverse order.
To reassemble your device, follow these instructions in reverse order.
Отменить: Я не выполнил это руководство.
3 участников успешно повторили данное руководство.
Команда

USF Tampa, Team S1-G4, Cagle Spring 2018 Участник USF Tampa, Team S1-G4, Cagle Spring 2018
USFT-CAGLE-S18S1G4
4 членов
Автор 7 руководств
2 Комментариев
Thanx a million
is it possible to upgrade the hard drive of any laptop? from 500GB to 1T?