Перейти к основному содержанию

Asus X401A Internal Fan Replacement

Выберете то, что вам нужно

  1. Asus X401A Internal Fan Replacement, Internal Fan: шаг 1, изображение 1 из 1
    • Flip over the laptop and remove the battery for ease of replacement.

  2. Asus X401A Internal Fan Replacement: шаг 2, изображение 1 из 3 Asus X401A Internal Fan Replacement: шаг 2, изображение 2 из 3 Asus X401A Internal Fan Replacement: шаг 2, изображение 3 из 3
    Инструмент, используемый на этом этапе:
    Magnetic Project Mat
    $19.95
    Купить
    • Remove the screws located underneath the laptop by using a Phillips #00 screwdriver. This will assist you when disconnecting the keyboard cover from the rest of the laptop.

    • Remove the two 4mm screws.

    • Place the screws on a magnetic mat to not lose them.

  3. Asus X401A Internal Fan Replacement: шаг 3, изображение 1 из 2 Asus X401A Internal Fan Replacement: шаг 3, изображение 2 из 2
    • Flip the laptop back over and begin prying the keyboard cover from the rest of the laptop by using a plastic spudger.

    • The keyboard is still attached to the motherboard via two ribbon cables. Do not pull the keyboard away from the laptop.

  4. Asus X401A Internal Fan Replacement: шаг 4, изображение 1 из 3 Asus X401A Internal Fan Replacement: шаг 4, изображение 2 из 3 Asus X401A Internal Fan Replacement: шаг 4, изображение 3 из 3
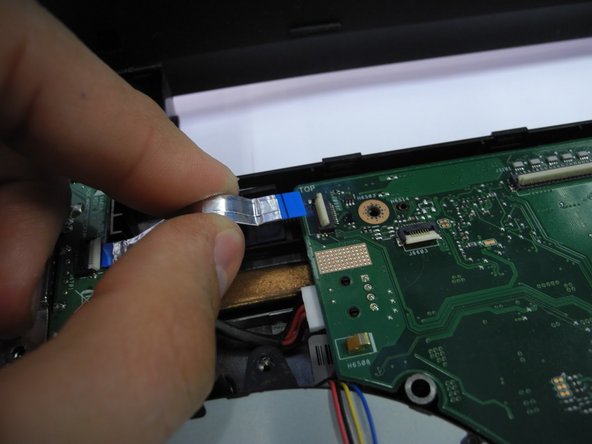
    • Use a spudger to lift the ZIF tabs.

    • Remove both the black and white ribbon cables in order to completely detach the cover from the rest of the device.

  5. Asus X401A Internal Fan Replacement: шаг 5, изображение 1 из 3 Asus X401A Internal Fan Replacement: шаг 5, изображение 2 из 3 Asus X401A Internal Fan Replacement: шаг 5, изображение 3 из 3
    • Remove all screws that connect the motherboard to the bottom of the laptop.

    • The motherboard holds the internal fan in place

    • Before attempting to remove the motherboard, be sure to disconnect both sets of wires as pictured.

  6. Asus X401A Internal Fan Replacement: шаг 6, изображение 1 из 2 Asus X401A Internal Fan Replacement: шаг 6, изображение 2 из 2
    • Once all screws are removed and both sets of wires are detached, use a spudger to carefully pry up the motherboard along with the attached internal fan.

    • Set the rest of the laptop aside and direct your attention to only the motherboard.

  7. Asus X401A Internal Fan Replacement: шаг 7, изображение 1 из 3 Asus X401A Internal Fan Replacement: шаг 7, изображение 2 из 3 Asus X401A Internal Fan Replacement: шаг 7, изображение 3 из 3
    • Flip the motherboard over and you will notice four screws (circled in yellow) that are connecting the fan's bracket to the motherboard. Using your screwdriver, remove the four screws and place them off to the side.

  8. Asus X401A Internal Fan Replacement: шаг 8, изображение 1 из 2 Asus X401A Internal Fan Replacement: шаг 8, изображение 2 из 2
    • One final group of wiring will also be connecting the internal fan to the motherboard. Careful disconnect it as shown.

    • With the internal fan completely disconnected from the motherboard, you should be able to freely remove it.

    • Replace the faulty internal fan with a new one and repeat the previous steps for reassembly.

Заключение

To reassemble your device, follow these instructions in reverse order.

Skylar Alexander

Участник с: 02/07/17

137 Репутация

1 руководство автора

Команда

Ohio State, Team 1-4, Wilder Spring 2017 Участник Ohio State, Team 1-4, Wilder Spring 2017

OSU-WILDER-S17S1G4

4 членов

Автор 5 руководств

0 Комментариев

Добавить комментарий

Просмотр статистики:

За последние 24часов: 0

За последние 7 дней: 4

За последние 30 дней: 9

За всё время: 777