Перейти к основному содержанию

Beats Pill XL 'b' Button Replacement

Выберете то, что вам нужно

  1. Beats Pill XL 'b' Button Replacement, Case: шаг 1, изображение 1 из 2 Beats Pill XL 'b' Button Replacement, Case: шаг 1, изображение 2 из 2
    • Using a plastic opening tool, pry the casing from the rest of the device.

    • Pry all the way around the edge and then pull apart.

    • It should be relatively easy, to pull apart. Don't be afraid to apply a necessary force.

  2. Beats Pill XL 'b' Button Replacement: шаг 2, изображение 1 из 1
    • Using your thumb, remove the 8 rubber plugs in order to get to the screws.

    • Simply rub them towards the speakers and they will slide out enough to grip the edge and pull them out.

    • In the picture provided, we labeled four of them on one side of the Beats Pill XL. The other four are symmetrical to these four on the other side of the device.

  3. Beats Pill XL 'b' Button Replacement: шаг 3, изображение 1 из 2 Beats Pill XL 'b' Button Replacement: шаг 3, изображение 2 из 2
    • Using a Phillips #2 screwdriver, remove the 8 (10mm maxi-loc Phillips #2) screws that hold the casing together.

  4. Beats Pill XL 'b' Button Replacement: шаг 4, изображение 1 из 2 Beats Pill XL 'b' Button Replacement: шаг 4, изображение 2 из 2
    • Pull apart the front casing from the back casing, slowly. Try to avoid any tension on any of the connected cables.

    • Separate at a slow constant force to avoid damage to the ribbon cables.

  5. Beats Pill XL 'b' Button Replacement: шаг 5, изображение 1 из 2 Beats Pill XL 'b' Button Replacement: шаг 5, изображение 2 из 2
    • Gently pull on the plastic tab at the base of the ribbon cable to remove it from the motherboard.

    • Never pull the cables by the cord, as this could cause damage to the cables and/or motherboard. Always disconnect the cables from the base by the motherboard.

  6. Beats Pill XL 'b' Button Replacement: шаг 6, изображение 1 из 2 Beats Pill XL 'b' Button Replacement: шаг 6, изображение 2 из 2
    • Using your thumb and index finger, pull upwards on the base of the the power cable to remove it from the motherboard.

    • Even though there are two batteries, there is only one cable connecting the two to the motherboard.

  7. Beats Pill XL 'b' Button Replacement, 'b' Button: шаг 7, изображение 1 из 2 Beats Pill XL 'b' Button Replacement, 'b' Button: шаг 7, изображение 2 из 2
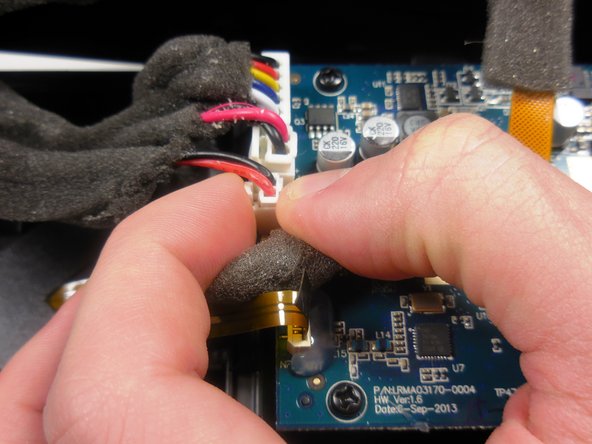
    • Remove the speaker cables by using gentle constant force with fingers.

  8. Beats Pill XL 'b' Button Replacement: шаг 8, изображение 1 из 1
    • Separate the front case with the speakers and 'b' button from the mother board housing.

  9. Beats Pill XL 'b' Button Replacement: шаг 9, изображение 1 из 2 Beats Pill XL 'b' Button Replacement: шаг 9, изображение 2 из 2
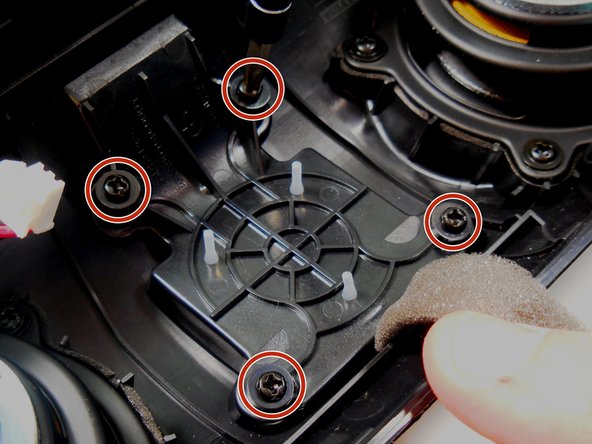
    • Using a Phillips #2 screwdriver, remove the 4 (8mm pan head Phillips #2) screws using a Philips #02 screwdriver.

  10. Beats Pill XL 'b' Button Replacement: шаг 10, изображение 1 из 2 Beats Pill XL 'b' Button Replacement: шаг 10, изображение 2 из 2
    • Using a plastic opening tool pry the 'b' button housing from the casing.

    • Note: Little to no resistance is met when prying the housing from the casing.

    • Use fingers to completely remove the 'b' button housing from the casing.

  11. Beats Pill XL 'b' Button Replacement: шаг 11, изображение 1 из 1
    • Use fingers to remove 'b' button from circuit board.

    • Note: Circuit board and housing should be replaced as an assembly.

Заключение

To reassemble your device, follow these instructions in reverse order.

2 участников успешно повторили данное руководство.

Alejandro Velez

Участник с: 03/11/15

125 Репутация

1 руководство автора

Команда

Colorado Springs, Team 9-2, Panko Spring 2015 Участник Colorado Springs, Team 9-2, Panko Spring 2015

UCCS-PANKO-S15S9G2

3 членов

Автор 7 руководств

0 Комментариев

Добавить комментарий

Просмотр статистики:

За последние 24часов: 0

За последние 7 дней: 1

За последние 30 дней: 15

За всё время: 3,795