Перейти к основному содержанию

Boston Electric Pencil Sharpener Cutter Replacement

Выберете то, что вам нужно

  1. Boston Electric Pencil Sharpener Cutter Replacement, Cutter: шаг 1, изображение 1 из 3 Boston Electric Pencil Sharpener Cutter Replacement, Cutter: шаг 1, изображение 2 из 3 Boston Electric Pencil Sharpener Cutter Replacement, Cutter: шаг 1, изображение 3 из 3
    • Remove the tray from the front of the pencil sharpener and empty the pencil shavings.

    • Make sure the pencil sharpener is unplugged!

  2. Boston Electric Pencil Sharpener Cutter Replacement: шаг 2, изображение 1 из 3 Boston Electric Pencil Sharpener Cutter Replacement: шаг 2, изображение 2 из 3 Boston Electric Pencil Sharpener Cutter Replacement: шаг 2, изображение 3 из 3
    • Unscrew the three screws securing the bottom of the sharpener.

    • The screwdriver must be 6” long to reach the two screws in the front of the sharpener.

  3. Boston Electric Pencil Sharpener Cutter Replacement: шаг 3, изображение 1 из 2 Boston Electric Pencil Sharpener Cutter Replacement: шаг 3, изображение 2 из 2
    • Lift the motor and cutter from the top case of the sharpener.

    • Carefully move the wires so that the case can be completely removed.

    • You shouldn’t have to disconnect any wires to take the case off. If so, contact the manufacturer.

  4. Boston Electric Pencil Sharpener Cutter Replacement: шаг 4, изображение 1 из 2 Boston Electric Pencil Sharpener Cutter Replacement: шаг 4, изображение 2 из 2
    • Unscrew the protective case around the cutter by locating the two screw on the front of the sharpener.

  5. Boston Electric Pencil Sharpener Cutter Replacement: шаг 5, изображение 1 из 3 Boston Electric Pencil Sharpener Cutter Replacement: шаг 5, изображение 2 из 3 Boston Electric Pencil Sharpener Cutter Replacement: шаг 5, изображение 3 из 3
    • Use the socket wrench to remove the two bolts in the back of the sharpener.

    • You need to remove the motor in order to reach the back of the cutter.

  6. Boston Electric Pencil Sharpener Cutter Replacement: шаг 6, изображение 1 из 1
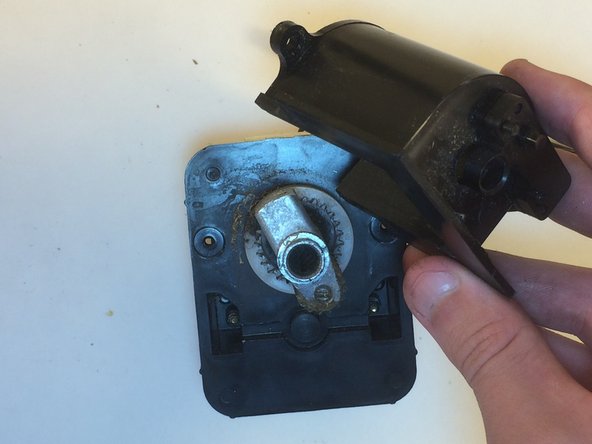
    • Carefully separate the motor and the case around the motor from the cutter.

    • Guide the wires through the holes in the casing to detach them from the cutter section of the sharpener.

  7. Boston Electric Pencil Sharpener Cutter Replacement: шаг 7, изображение 1 из 2 Boston Electric Pencil Sharpener Cutter Replacement: шаг 7, изображение 2 из 2
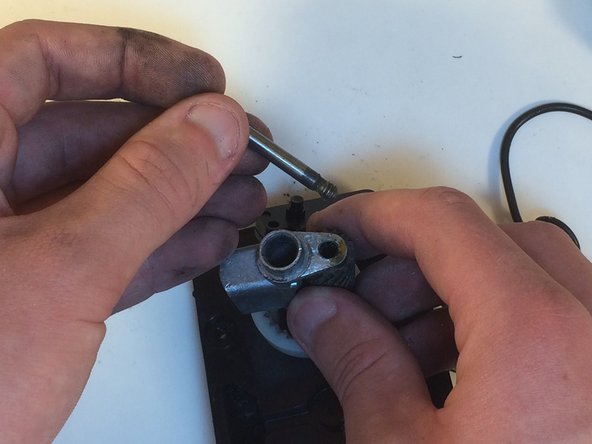
    • Unscrew the sharpener with a small standard screwdriver and remove the long screw to loosen the cutter.

    • Make sure to hold the cutter to keep it from rotating.

  8. Boston Electric Pencil Sharpener Cutter Replacement: шаг 8, изображение 1 из 1
    • Replace the cutter.

    • WD-40 would be helpful, but not necessary.

Заключение

To reassemble your device, follow these instructions in reverse order.

Еще один человек закончил это руководство.

Randy Yonce

Участник с: 09/29/15

101 Репутация

1 руководство автора

Команда

Cal Poly, Team 10-1, Green Fall 2015 Участник Cal Poly, Team 10-1, Green Fall 2015

CPSU-GREEN-F15S10G1

4 членов

Автор 6 руководств

6 Комментариев

Great instructions on replacing the sharpener. My father took the model 18 apart but failed to document with pictures on the step by step breakdown. I'm left with out a crucial part of the re- installment. The question is in step 7, the piece right behind and below the screw driver is a plastic piece with two wires comming out of it. where does this piece fit? any help or redirection to a site that might have this info. direct reply at

thopper1@satx.rr.com

tah33 - Ответить

tah33 - that part is the switch that senses the pencil to turn on power. There is a plastic piece that goes over the top of the cutting mechanism to help guide all the shavings down into the shavings tray. The switch goes onto the front of that piece. If you look at step 4 it shows the switch mounted to the piece I am talking about,  Randy (the author) calls it the protective case.

David Ryan - Ответить

Steps 5 and 6 are not required.

jffleck - Ответить

The wire nuts were loose and came off, is there a way to know for certain which wires go together?

Alan Budd - Ответить

The link to purchase a new cutting blade brings you to Amazon, and it's not available. Any other place that FOR sure the part is available?

North Flower - Ответить

Добавить комментарий

Просмотр статистики:

За последние 24часов: 1

За последние 7 дней: 10

За последние 30 дней: 41

За всё время: 8,318