Перейти к основному содержанию

Braven BRV-HD Charging Port Replacement

Выберете то, что вам нужно

  1. Braven BRV-HD Charging Port Replacement, Battery: шаг 1, изображение 1 из 2 Braven BRV-HD Charging Port Replacement, Battery: шаг 1, изображение 2 из 2
    • Placing the device on its back with the BRV-HD logo facing up, remove the eight 5mm hexagon 2.0 screws on the front panel.

    • Make sure the device is turned off before starting.

  2. Braven BRV-HD Charging Port Replacement: шаг 2, изображение 1 из 1
    • Lift the front panel off of the speaker using a plastic opening tool.

  3. Braven BRV-HD Charging Port Replacement: шаг 3, изображение 1 из 2 Braven BRV-HD Charging Port Replacement: шаг 3, изображение 2 из 2
    • Placing the device with the back panel facing up, remove the eight 5mm hexagon 2.0 screws from the back panel.

  4. Braven BRV-HD Charging Port Replacement: шаг 4, изображение 1 из 1
    • Lift the back panel off of the device with a plastic opening tool.

  5. Braven BRV-HD Charging Port Replacement: шаг 5, изображение 1 из 2 Braven BRV-HD Charging Port Replacement: шаг 5, изображение 2 из 2
    • Turning the device on its side, unscrew the four 15mm hexagon 2.0 screws on the charging port panel.

  6. Braven BRV-HD Charging Port Replacement: шаг 6, изображение 1 из 1
    • Remove the outer rubber flap and the plastic side port panel.

  7. Braven BRV-HD Charging Port Replacement: шаг 7, изображение 1 из 2 Braven BRV-HD Charging Port Replacement: шаг 7, изображение 2 из 2
    • Place the device on its front.

    • Loosen the four 12mm Phillips screws in the four corners with a J1 screwdriver.

    • Loosen the two 8mm Phillips screws in the center with a J1 screwdriver.

    • These screws are difficult to reach and will require a screwdriver extension piece.

  8. Braven BRV-HD Charging Port Replacement: шаг 8, изображение 1 из 1
    • Pull off the rubber sleeve surrounding the speaker using your hands.

    • There is adhesive binding the sleeve to the speaker and force will be required to remove the sleeve.

  9. Braven BRV-HD Charging Port Replacement: шаг 9, изображение 1 из 1
    • Lift the black covering off of the speaker using both hands.

    • Loose screws that you were unable to remove with the screwdriver will be removed when you lift off the black covering.

  10. Braven BRV-HD Charging Port Replacement: шаг 10, изображение 1 из 1
    • Remove the four 12mm Phillips screws securing the two battery brackets with a J1 screwdriver.

    • Move any wires aside to have better access to the screws securing the battery.

  11. Braven BRV-HD Charging Port Replacement: шаг 11, изображение 1 из 1
    • Remove the two brackets that hold down the battery using your hands.

  12. Braven BRV-HD Charging Port Replacement: шаг 12, изображение 1 из 2 Braven BRV-HD Charging Port Replacement: шаг 12, изображение 2 из 2
    • Use the plastic opening tool to lift up the battery.

    • Remove the battery using your hands.

    • The wires connecting the battery to the motherboard are still plugged in. Avoid pulling on the battery or these wires may break.

  13. Braven BRV-HD Charging Port Replacement: шаг 13, изображение 1 из 1
    Инструмент, используемый на этом этапе:
    Tweezers
    $4.99
    Купить
    • Disconnect the wire attaching the battery to the motherboard.

    • There is green glue on the wire ports preventing the wires from falling out. Peel and remove this glue as necessary.

    • Be careful when pulling out the wires from their ports. The metal stems attached to the ports can break. A spudger or tweezers may help.

  14. Braven BRV-HD Charging Port Replacement, Charging Port: шаг 14, изображение 1 из 3 Braven BRV-HD Charging Port Replacement, Charging Port: шаг 14, изображение 2 из 3 Braven BRV-HD Charging Port Replacement, Charging Port: шаг 14, изображение 3 из 3
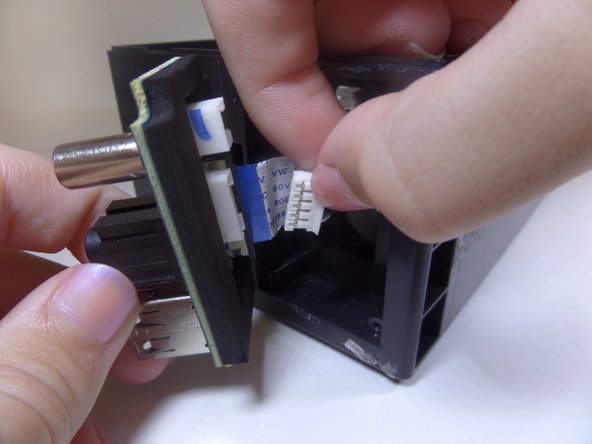
    • Disconnect the three plugs attached to the plastic charging port panel.

    • Remove and replace the plastic panel with a new one.

    • Be careful in removing the 3 plugs as they can break when being pulled out of their white sockets.

Заключение

To reassemble your device, follow these instructions in reverse order.

2 участников успешно повторили данное руководство.

Alex Ku

Участник с: 09/15/16

152 Репутация

1 руководство автора

Команда

CSU Fullerton, Team 1-5, Bruce Fall 2016 Участник CSU Fullerton, Team 1-5, Bruce Fall 2016

CSUF-BRUCE-F16S1G5

5 членов

Автор 5 руководств

3 Комментариев

BRV-HD Bluetooth board parts

michaeadams - Ответить

BRV-HD Bluetooth broad parts

michaeadams - Ответить

Do you know where to find replacement parts, I need to replace the charging port on my braven HD.

br53ett - Ответить

Добавить комментарий

Просмотр статистики:

За последние 24часов: 0

За последние 7 дней: 1

За последние 30 дней: 24

За всё время: 2,920