Перейти к основному содержанию

Brother CS-80 Tire Ring Replacement

Выберете то, что вам нужно

  1. Brother CS-80 Tire Ring Replacement, Tire Ring: шаг 1, изображение 1 из 3 Brother CS-80 Tire Ring Replacement, Tire Ring: шаг 1, изображение 2 из 3 Brother CS-80 Tire Ring Replacement, Tire Ring: шаг 1, изображение 3 из 3
    • Turn off the machine.

    • Unplug both the power cord and the foot pedal.

  2. Brother CS-80 Tire Ring Replacement: шаг 2, изображение 1 из 1
    • Slide the clear flap to the left to remove it.

  3. Brother CS-80 Tire Ring Replacement: шаг 3, изображение 1 из 3 Brother CS-80 Tire Ring Replacement: шаг 3, изображение 2 из 3 Brother CS-80 Tire Ring Replacement: шаг 3, изображение 3 из 3
    • Pull the latch to detach the bobbin cover.

  4. Brother CS-80 Tire Ring Replacement: шаг 4, изображение 1 из 2 Brother CS-80 Tire Ring Replacement: шаг 4, изображение 2 из 2
    • Remove the bobbin from the bobbin shuttle.

  5. Brother CS-80 Tire Ring Replacement: шаг 5, изображение 1 из 2 Brother CS-80 Tire Ring Replacement: шаг 5, изображение 2 из 2
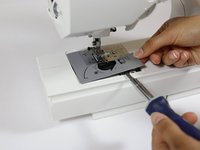
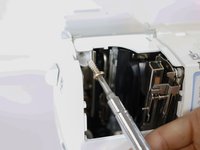
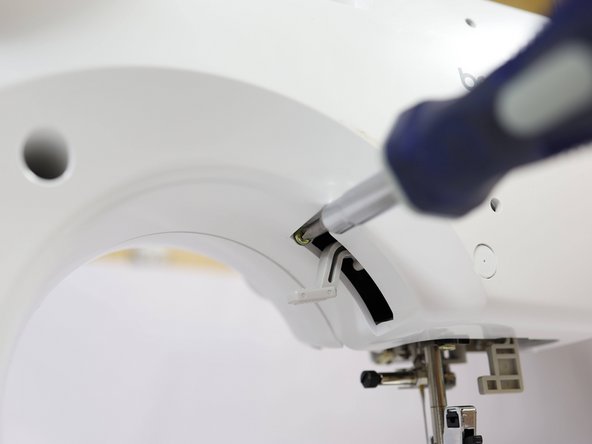
    • Use a flathead screwdriver to pry off the plastic plate that surrounds the bobbin shuttle.

  6. Brother CS-80 Tire Ring Replacement: шаг 6, изображение 1 из 3 Brother CS-80 Tire Ring Replacement: шаг 6, изображение 2 из 3 Brother CS-80 Tire Ring Replacement: шаг 6, изображение 3 из 3
    • Open the bobbin winder cover.

    • Flip up the spool pin.

  7. Brother CS-80 Tire Ring Replacement: шаг 7, изображение 1 из 3 Brother CS-80 Tire Ring Replacement: шаг 7, изображение 2 из 3 Brother CS-80 Tire Ring Replacement: шаг 7, изображение 3 из 3
    • Remove the grey bobbin winder seat from the bobbin winder shaft.

  8. Brother CS-80 Tire Ring Replacement: шаг 8, изображение 1 из 3 Brother CS-80 Tire Ring Replacement: шаг 8, изображение 2 из 3 Brother CS-80 Tire Ring Replacement: шаг 8, изображение 3 из 3
    • Remove the 13 mm Phillips head screw from the left side of the bobbin winder.

    • Place the screw on a magnet (or in a tray) to ensure you don't lose it.

  9. Brother CS-80 Tire Ring Replacement: шаг 9, изображение 1 из 3 Brother CS-80 Tire Ring Replacement: шаг 9, изображение 2 из 3 Brother CS-80 Tire Ring Replacement: шаг 9, изображение 3 из 3
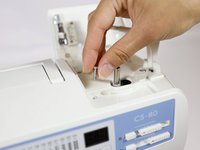
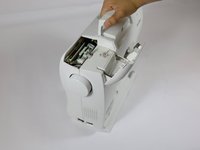
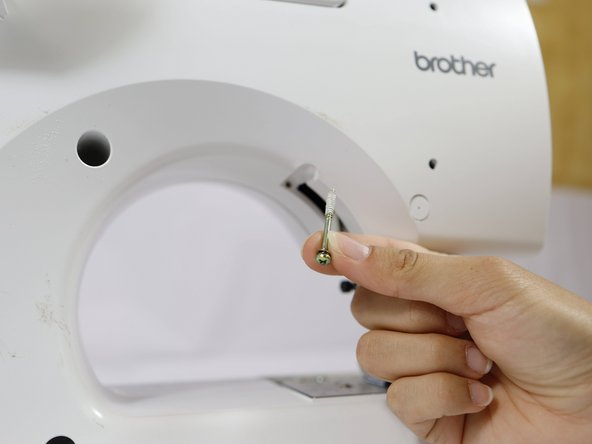
    • Pry off the bobbin winder thread spool pin and the attached bottom plate of the bobbin winder area.

    • Use a flathead screwdriver to assist you in removing the plate.

  10. Brother CS-80 Tire Ring Replacement: шаг 10, изображение 1 из 2 Brother CS-80 Tire Ring Replacement: шаг 10, изображение 2 из 2
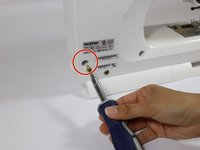
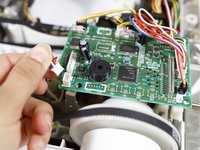
    • Remove the 8 mm Phillips screw from the metal plate to the right of the motherboard.

  11. Brother CS-80 Tire Ring Replacement: шаг 11, изображение 1 из 2 Brother CS-80 Tire Ring Replacement: шаг 11, изображение 2 из 2
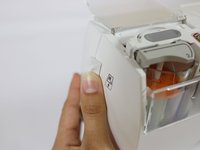
    • Open the thread compartment.

    • Press the back level on left side of the machine to eject the thread cassette compartment.

  12. Brother CS-80 Tire Ring Replacement: шаг 12, изображение 1 из 3 Brother CS-80 Tire Ring Replacement: шаг 12, изображение 2 из 3 Brother CS-80 Tire Ring Replacement: шаг 12, изображение 3 из 3
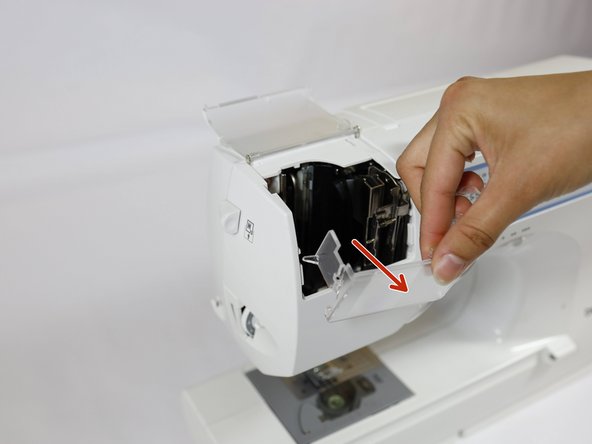
    • Remove the thread cassette compartment by pulling it up.

    • Remove the front clear shield to the thread cassette compartment holder by pulling it away from the machine.

  13. Brother CS-80 Tire Ring Replacement: шаг 13, изображение 1 из 2 Brother CS-80 Tire Ring Replacement: шаг 13, изображение 2 из 2
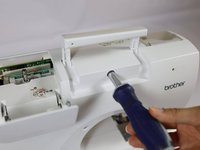
    • Remove the single 19 mm Phillips head screw from the back of the internal thread cassette compartment area.

  14. Brother CS-80 Tire Ring Replacement: шаг 14, изображение 1 из 2 Brother CS-80 Tire Ring Replacement: шаг 14, изображение 2 из 2
    • Turn the machine so the back is facing you.

  15. Brother CS-80 Tire Ring Replacement: шаг 15, изображение 1 из 3 Brother CS-80 Tire Ring Replacement: шаг 15, изображение 2 из 3 Brother CS-80 Tire Ring Replacement: шаг 15, изображение 3 из 3
    • Remove the three large 19 mm Phillips head screws from the back left face of the machine.

  16. Brother CS-80 Tire Ring Replacement: шаг 16, изображение 1 из 2 Brother CS-80 Tire Ring Replacement: шаг 16, изображение 2 из 2
    • Remove the 19 mm Phillips head screw from behind the handle of the machine.

  17. Brother CS-80 Tire Ring Replacement: шаг 17, изображение 1 из 2 Brother CS-80 Tire Ring Replacement: шаг 17, изображение 2 из 2
    • Remove the large 19 mm Phillips screw from the bottom right of the machine.

    • You should have removed a total of five 19 mm large screws from the back face.

  18. Brother CS-80 Tire Ring Replacement: шаг 18, изображение 1 из 3 Brother CS-80 Tire Ring Replacement: шаг 18, изображение 2 из 3 Brother CS-80 Tire Ring Replacement: шаг 18, изображение 3 из 3
    • Remove the 33 mm Phillips head screw by the presser foot lever.

  19. Brother CS-80 Tire Ring Replacement: шаг 19, изображение 1 из 2 Brother CS-80 Tire Ring Replacement: шаг 19, изображение 2 из 2
    • Slowly pull apart the two sides of the sewing machine.

    • The two halves will still be partially attached by cables on the inside. Take care not to damage any of the cables.

  20. Brother CS-80 Tire Ring Replacement: шаг 20, изображение 1 из 2 Brother CS-80 Tire Ring Replacement: шаг 20, изображение 2 из 2
    • Gently disconnect the ribbon cable from the motherboard.

  21. Brother CS-80 Tire Ring Replacement: шаг 21, изображение 1 из 2 Brother CS-80 Tire Ring Replacement: шаг 21, изображение 2 из 2
    • Disconnect the 6-pin connector from the motherboard.

  22. Brother CS-80 Tire Ring Replacement: шаг 22, изображение 1 из 3 Brother CS-80 Tire Ring Replacement: шаг 22, изображение 2 из 3 Brother CS-80 Tire Ring Replacement: шаг 22, изображение 3 из 3
    • Completely pull apart the two halves of the machine.

    • Set aside the front side piece.

    • Place the back piece down so that the inside faces upwards.

  23. Brother CS-80 Tire Ring Replacement: шаг 23, изображение 1 из 3 Brother CS-80 Tire Ring Replacement: шаг 23, изображение 2 из 3 Brother CS-80 Tire Ring Replacement: шаг 23, изображение 3 из 3
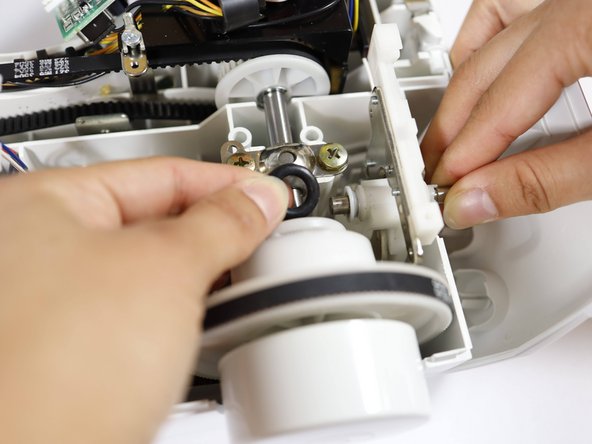
    • Remove the gold 9 mm Phillips screw from the front right of the motherboard.

    • Remove the two silver 7 mm Phillips head screws from the front and back of the left side of the motherboard.

  24. Brother CS-80 Tire Ring Replacement: шаг 24, изображение 1 из 3 Brother CS-80 Tire Ring Replacement: шаг 24, изображение 2 из 3 Brother CS-80 Tire Ring Replacement: шаг 24, изображение 3 из 3
    • Slide out the motherboard from the white plastic motherboard housing.

    • Handle the motherboard gently to avoid damaging the circuits or connectors.

  25. Brother CS-80 Tire Ring Replacement: шаг 25, изображение 1 из 2 Brother CS-80 Tire Ring Replacement: шаг 25, изображение 2 из 2
    • Disconnect the 3-pin connector from the front left side of the motherboard.

  26. Brother CS-80 Tire Ring Replacement: шаг 26, изображение 1 из 2 Brother CS-80 Tire Ring Replacement: шаг 26, изображение 2 из 2
    • Disconnect the 4-pin connector from the left underside of the motherboard.

  27. Brother CS-80 Tire Ring Replacement: шаг 27, изображение 1 из 3 Brother CS-80 Tire Ring Replacement: шаг 27, изображение 2 из 3 Brother CS-80 Tire Ring Replacement: шаг 27, изображение 3 из 3
    • Flip the motherboard over so it rests upside down and away from the balance wheel.

    • Handle the motherboard gently to avoid damaging the circuits or connectors.

  28. Brother CS-80 Tire Ring Replacement: шаг 28, изображение 1 из 2 Brother CS-80 Tire Ring Replacement: шаг 28, изображение 2 из 2
    • Use a flathead screwdriver to pry off the tire ring.

    • The tire ring may have disintegrated and deposited black rubber on the inside of the machine. If so, clean the area with cotton swabs damp with isopropyl alcohol and paper towels. Wearing disposable gloves is recommended.

  29. Brother CS-80 Tire Ring Replacement: шаг 29, изображение 1 из 3 Brother CS-80 Tire Ring Replacement: шаг 29, изображение 2 из 3 Brother CS-80 Tire Ring Replacement: шаг 29, изображение 3 из 3
    • Place the new tire ring onto its seat.

    • You may need to use a flathead screwdriver to help it seat fully.

Заключение

To reassemble your sewing machine, follow the disassembly instructions in reverse order.

Edyn

Участник с: 04/25/24

409 Репутация

1 руководство автора

Команда

UC Davis, Team 1-5, Whithaus Spring 2024 Участник UC Davis, Team 1-5, Whithaus Spring 2024

UCD-WHITHAUS-S24S1G5

3 членов

Автор 1 руководств

0 Комментарии к руководству

Добавить комментарий

Статистика просмотров:

За последние 24 часов: 0

За последние 7 дней: 13

За последние 30 дней: 48

За всё время: 744