Введение
cracked or scratched LCD on your 5D mk II? (or similar camera)
It's just a protector actually, this isn't a display you need to replace, it's just the 'glass', the window protecting the actual lcd.
'''THis is a rework of the tutorial by ANDREW EVANS
- the camera is not a 5D2 but this tutorial is applicable to almost any Canon IF you can find the part nr. for your model.'''
Parts numbers for the 5D:
The replacement screen cover part number - cb3-3103
The replacement tape to secure cover part number - cb3-2864
Parts numbers for the 5D MARK II :
CB3-4948-000 000 WINDOW, TFT DISPLAY
CB3-4949-000 000 TAPE, DOUBLE SIDE
ANDREW EVANS takes the word from here on.
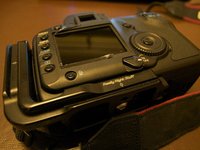
The LCD protector is the exposed piece of plastic at the back of your camera that sits flush with the body of the camera. The good thing about this design is that it can bear the brunt of a knock or impact and result in a £20 repair instead of £200 repair for a cracked LCD screen- ouch!
I found two retailers,
1. USCAMERA in the states, who were most helpful but i couldn't get there website to accept payment via credit card, they have an ebay store http://myworld.ebay.co.uk/uscamera/
2. Lehman in the UK. http://www.hlehmann.co.uk/ Again most helpful, they answered my many emails chasing the order, i was desperate to get my 5d back. I would stress that they are incredibly busy at the moment. If you want to communicate with them i suggest email through their website 'contact us' and ask for a call back. Very nice people to talk to.
Выберете то, что вам нужно
-
-
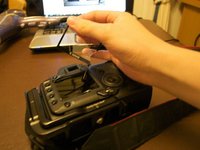
Using a hairdryer or heat gun, heat up the lens for removal. This should not take longer than 30 seconds.
-
Now using a suction cup, I used a suction from a sponge,apply the suction cup to the plastic lens. Now just pull the lens away from the camera to remove the old lens. This may require a small amount of force.
-
If it does not want to budge, try reheating.
-
-
-
At this step you may need to reheat the bottom of the lens if it does not come fully off.
-
You may need to cover the cracked area of the screen with a screen protector, or just regular packing tape. After removal, clean off remaining adhesive.
-
-
-
-
After removal, make sure to remove all pieces of the old lens. Checking for fragments of plastic, and dust on the LCD.
-
-
-
Now grab your new adhesive tape from your new lens, and apply to the camera side only.
-
-
-
Once lined up apply pressure around the sticker until the tape is firmly in place
-
-
-
Remove the protective film from the screen and apply to your camera. Make sure everything is lined up, and placed properly.
-


To reassemble your device, follow these instructions in reverse order.
Отменить: Я не выполнил это руководство.
14 человек успешно провели ремонт по этому руководству.
8 Комментарии к руководству
Thank you for making this guide, it helped me fix my camera!
Randy
Um, that's a window, not a lens.
Sarcasm I hope?
Great guide, thank you for posting it. Fixed my 5DM2 in under 5 minutes!
But where do i buy the windowglas?