Перейти к основному содержанию

Canon PowerShot G3 Screen Replacement

Выберете то, что вам нужно

  1. Canon PowerShot G3 Screen Replacement, Screen: шаг 1, изображение 1 из 1
    • On the bottom of the camera, push and slide open the battery compartment.

    • Remove the battery.

  2. Canon PowerShot G3 Screen Replacement: шаг 2, изображение 1 из 1
    • Open the screen.

    • Remove the Phillips #0 screws on the end of the screen.

  3. Canon PowerShot G3 Screen Replacement: шаг 3, изображение 1 из 1
    • Remove both Phillips #0 screws on the opposite side of the screen, located near the hinge.

  4. Canon PowerShot G3 Screen Replacement: шаг 4, изображение 1 из 1
    • Remove the back panel of the screen, using a spudger or opening tool if necessary.

  5. Canon PowerShot G3 Screen Replacement: шаг 5, изображение 1 из 1
    • Remove both Phillips #0 screws at the top of the screen.

    • The silver bracket in between the screws will come out after removing these screws.

  6. Canon PowerShot G3 Screen Replacement: шаг 6, изображение 1 из 1
    • Turn the screen perpendicular to body of the camera.

    • Remove the Phillips #0 screw at the base of the hinge.

  7. Canon PowerShot G3 Screen Replacement: шаг 7, изображение 1 из 2 Canon PowerShot G3 Screen Replacement: шаг 7, изображение 2 из 2
    • The screen is fragile, handle with care.

    • Push the screen down and away from the camera.

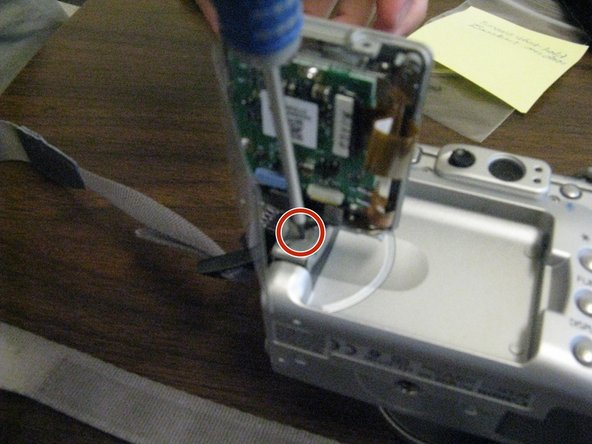
    • Remove the single Phillips #0 screw at the base of the rotating arm. This will allow you to remove the screen cover.

  8. Canon PowerShot G3 Screen Replacement: шаг 8, изображение 1 из 2 Canon PowerShot G3 Screen Replacement: шаг 8, изображение 2 из 2
    • Remove the black bar attached to the data ribbon cable. You will use this with the replacement.

    • The screen will be loose in the front.

    • Slide the black bar from underneath the white socket.

    • The data ribbon will remain attached to the defective screen. Both of these can be discarded.

  9. Canon PowerShot G3 Screen Replacement: шаг 9, изображение 1 из 1
    • Insert the new screen.

    • The ribbon will already be attached.

  10. Canon PowerShot G3 Screen Replacement: шаг 10, изображение 1 из 1
    • The ribbon and black bar are fragile. You will want to be very delicate with it. It will be difficult to insert.

    • Insert the ribbon into the white socket.

    • You will have to hold this ribbon in place while placing the black bar back into the socket. You may need assistance with this part of the step.

  11. Canon PowerShot G3 Screen Replacement: шаг 11, изображение 1 из 2 Canon PowerShot G3 Screen Replacement: шаг 11, изображение 2 из 2
    • Place the screen with monitor side out.

    • You may have to hold this in place until covers are back on properly.

Заключение

Repeat Steps 1-7 in reverse order to reassemble.

2 участников успешно повторили данное руководство.

Ordonez5

Участник с: 09/27/12

7 Репутация

1 руководство автора

Команда

Ohio State, Team 1-4, Buehl Fall 2012 Участник Ohio State, Team 1-4, Buehl Fall 2012

OSU-BUEHL-F12S1G4

3 членов

Автор 1 руководств

2 Комментариев

Great instructions but where can I find a new screen? Canon doesn't carry them any more.

Hank - Ответить

I'm guessing that the screen is OK and the wiring/connections is the problem.

Jon Jensen - Ответить

Добавить комментарий

Просмотр статистики:

За последние 24часов: 0

За последние 7 дней: 2

За последние 30 дней: 9

За всё время: 3,069