Перейти к основному содержанию

Canon PowerShot G7X Motherboard Replacement

Выберете то, что вам нужно

  1. Canon PowerShot G7X Motherboard Replacement, Dial: шаг 1, изображение 1 из 1
    • Remove the five 2mm Phillips #000 screws that are under the screen of the camera.

  2. Canon PowerShot G7X Motherboard Replacement: шаг 2, изображение 1 из 1
    • Remove the two 3mm Phillips #000 screws under the AV-out digital flap.

    • Remove the two 3 mm Phillips #000 screws from the side of the camera.

  3. Canon PowerShot G7X Motherboard Replacement: шаг 3, изображение 1 из 1
    • Remove the two 3 mm Phillips #000 screws on the side of camera with the flash toggle.

  4. Canon PowerShot G7X Motherboard Replacement: шаг 4, изображение 1 из 1
    • Remove the four 4 mm Phillips #000 screws from the plate on the bottom of the camera.

  5. Canon PowerShot G7X Motherboard Replacement: шаг 5, изображение 1 из 1
    • Remove the back plate.

  6. Canon PowerShot G7X Motherboard Replacement: шаг 6, изображение 1 из 1
    • Remove the three 3 mm Phillips #000 screws around the dial.

  7. Canon PowerShot G7X Motherboard Replacement: шаг 7, изображение 1 из 2 Canon PowerShot G7X Motherboard Replacement: шаг 7, изображение 2 из 2
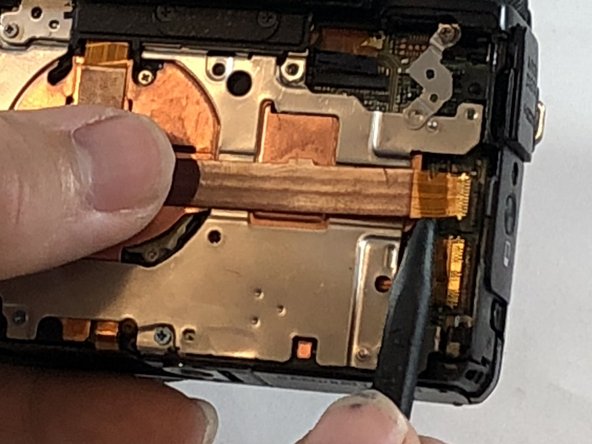
    • Using the nylon spudger, gently lift the ZIF tab.

    • Disconnect the ribbon cable that connects the dial to the motherboard.

    • Remove the dial from the device.

  8. Canon PowerShot G7X Motherboard Replacement, Flash: шаг 8, изображение 1 из 2 Canon PowerShot G7X Motherboard Replacement, Flash: шаг 8, изображение 2 из 2
    • Remove the three, blue 5 mm Phillips screws from the back plate.

    • Remove seven 2 mm Phillips #000 screws.

  9. Canon PowerShot G7X Motherboard Replacement: шаг 9, изображение 1 из 2 Canon PowerShot G7X Motherboard Replacement: шаг 9, изображение 2 из 2
    • While using the plastic opening tool, gently pry the top plate off the camera.

  10. Canon PowerShot G7X Motherboard Replacement: шаг 10, изображение 1 из 2 Canon PowerShot G7X Motherboard Replacement: шаг 10, изображение 2 из 2
    • Using the black nylon spudger, gently lift the ribbon cable connected to the LCD screen housing until it comes out then remove the housing.

  11. Canon PowerShot G7X Motherboard Replacement: шаг 11, изображение 1 из 2 Canon PowerShot G7X Motherboard Replacement: шаг 11, изображение 2 из 2
    • Remove the 2 mm Phillips #000 screw underneath the top plate.

    • Remove silver plate.

  12. Canon PowerShot G7X Motherboard Replacement: шаг 12, изображение 1 из 1
    • Take the Phillips #000 and remove the three 5 mm screws from the front plate.

  13. Canon PowerShot G7X Motherboard Replacement: шаг 13, изображение 1 из 2 Canon PowerShot G7X Motherboard Replacement: шаг 13, изображение 2 из 2
    • Using the spudger, gently lift the ribbon cable from underneath the front plate.

    • Remove the front plate.

  14. Canon PowerShot G7X Motherboard Replacement: шаг 14, изображение 1 из 2 Canon PowerShot G7X Motherboard Replacement: шаг 14, изображение 2 из 2
    • Remove flash toggle plate.

    • Remove the 2mm Phillips #000 screws under the flash toggle.

  15. Canon PowerShot G7X Motherboard Replacement: шаг 15, изображение 1 из 2 Canon PowerShot G7X Motherboard Replacement: шаг 15, изображение 2 из 2
    • Flash contains charged capacitor. Shock hazard.

    • Using the black nylon spudger, gently lift the ribbon cable that connects the flash to motherboard and remove the flash from the device.

  16. Canon PowerShot G7X Motherboard Replacement, Lens: шаг 16, изображение 1 из 1
    • Remove the 5 mm Phillips #000 screw from the copper plate.

  17. Canon PowerShot G7X Motherboard Replacement: шаг 17, изображение 1 из 1
    • Using the black nylon spudger, lift the ribbon cable gently until it comes out.

  18. Canon PowerShot G7X Motherboard Replacement: шаг 18, изображение 1 из 1
    • Remove the copper plate to reveal connections to the lens.

  19. Canon PowerShot G7X Motherboard Replacement: шаг 19, изображение 1 из 1
    • Using the black nylon spudger, lift gently on the pin connector until it comes off.

  20. Canon PowerShot G7X Motherboard Replacement: шаг 20, изображение 1 из 2 Canon PowerShot G7X Motherboard Replacement: шаг 20, изображение 2 из 2
    • Using the spudger, gently lift on the ribbon cable until it comes out.

    • Separate the lens from the motherboard.

  21. Canon PowerShot G7X Motherboard Replacement, Motherboard: шаг 21, изображение 1 из 1
    • Remove the 5 mm Phillips #000 silver, anchor screws from the corners of the motherboard marked in the picture.

  22. Canon PowerShot G7X Motherboard Replacement: шаг 22, изображение 1 из 1
    • Remove motherboard.

Заключение

To reassemble your device, follow these instructions in reverse order.

Еще один человек закончил это руководство.

Brandon Lacy

Участник с: 11/06/19

113 Репутация

1 руководство автора

Команда

IUPUI, Team S1-G5, Stella Fall 2019 Участник IUPUI, Team S1-G5, Stella Fall 2019

IUPUI-STELLA-F19S1G5

3 членов

Автор 5 руководств

Один комментарий

Very Good!
I Think I Want to DIY Rep My DC

sheep free - Ответить

Добавить комментарий

Просмотр статистики:

За последние 24часов: 0

За последние 7 дней: 3

За последние 30 дней: 11

За всё время: 699