Перейти к основному содержанию

Cobra 29 LTD Classic Antenna Connector Replacement

Выберете то, что вам нужно

  1. Cobra 29 LTD Classic Antenna Connector Replacement, Power Cable: шаг 1, изображение 1 из 2 Cobra 29 LTD Classic Antenna Connector Replacement, Power Cable: шаг 1, изображение 2 из 2
    • Turn the power switch, the leftmost knob, counterclockwise to off.

  2. Cobra 29 LTD Classic Antenna Connector Replacement: шаг 2, изображение 1 из 2 Cobra 29 LTD Classic Antenna Connector Replacement: шаг 2, изображение 2 из 2
    • Turn the device around and firmly pull the power cable plug to remove it from the radio.

  3. Cobra 29 LTD Classic Antenna Connector Replacement, Antenna Cable: шаг 3, изображение 1 из 2 Cobra 29 LTD Classic Antenna Connector Replacement, Antenna Cable: шаг 3, изображение 2 из 2
    • Unscrew the securing cap counterclockwise from the antenna connector.

  4. Cobra 29 LTD Classic Antenna Connector Replacement: шаг 4, изображение 1 из 2 Cobra 29 LTD Classic Antenna Connector Replacement: шаг 4, изображение 2 из 2
    • Gently pull the antenna cable to remove it from the back of the radio.

  5. Cobra 29 LTD Classic Antenna Connector Replacement, Microphone: шаг 5, изображение 1 из 2 Cobra 29 LTD Classic Antenna Connector Replacement, Microphone: шаг 5, изображение 2 из 2
    • Unscrew the cap counterclockwise on the microphone plug to disconnect the cable.

    My microphone will not recieve or get out

    Keith Laws - Ответить

  6. Cobra 29 LTD Classic Antenna Connector Replacement: шаг 6, изображение 1 из 1
    • Gently unplug the microphone plug.

  7. Cobra 29 LTD Classic Antenna Connector Replacement, Outer Cover: шаг 7, изображение 1 из 2 Cobra 29 LTD Classic Antenna Connector Replacement, Outer Cover: шаг 7, изображение 2 из 2
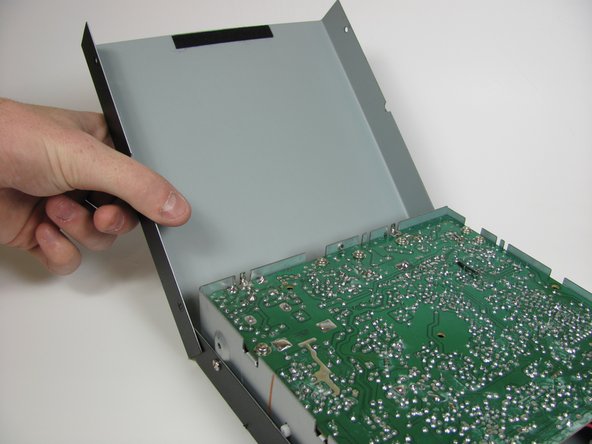
    • Unscrew the top four 6.0mm Phillips head screws counterclockwise on the left and right side of the device using a #1 Phillips head screwdriver.

  8. Cobra 29 LTD Classic Antenna Connector Replacement: шаг 8, изображение 1 из 3 Cobra 29 LTD Classic Antenna Connector Replacement: шаг 8, изображение 2 из 3 Cobra 29 LTD Classic Antenna Connector Replacement: шаг 8, изображение 3 из 3
    • Gently life and remove the top cover.

  9. Cobra 29 LTD Classic Antenna Connector Replacement: шаг 9, изображение 1 из 3 Cobra 29 LTD Classic Antenna Connector Replacement: шаг 9, изображение 2 из 3 Cobra 29 LTD Classic Antenna Connector Replacement: шаг 9, изображение 3 из 3
    • Gently set down on a hard, flat, non-conductive surface to minimize risk of shock or breaking your radio.

    • Carefully flip the radio over.

  10. Cobra 29 LTD Classic Antenna Connector Replacement: шаг 10, изображение 1 из 2 Cobra 29 LTD Classic Antenna Connector Replacement: шаг 10, изображение 2 из 2
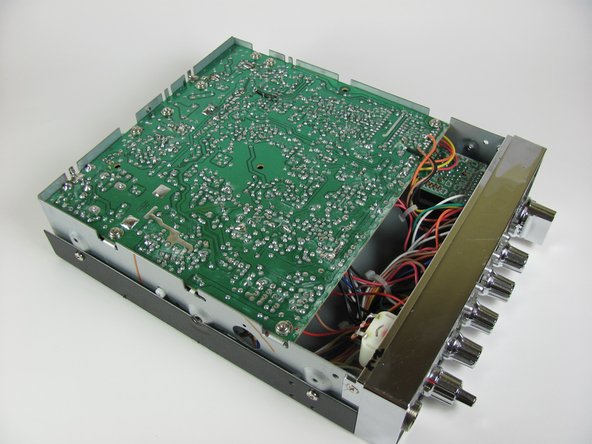
    • Unscrew the four 6.0mm Phillips head screws counterclockwise on the left and right side of the device that connect the remaining cover, using a #1 Phillips head screwdriver.

  11. Cobra 29 LTD Classic Antenna Connector Replacement: шаг 11, изображение 1 из 3 Cobra 29 LTD Classic Antenna Connector Replacement: шаг 11, изображение 2 из 3 Cobra 29 LTD Classic Antenna Connector Replacement: шаг 11, изображение 3 из 3
    • Watch out for the wires connected to the speaker. These short wires will not allow you to move the cover very far.

    • Gently lift and remove the case cover.

  12. Cobra 29 LTD Classic Antenna Connector Replacement, Antenna Connector: шаг 12, изображение 1 из 2 Cobra 29 LTD Classic Antenna Connector Replacement, Antenna Connector: шаг 12, изображение 2 из 2
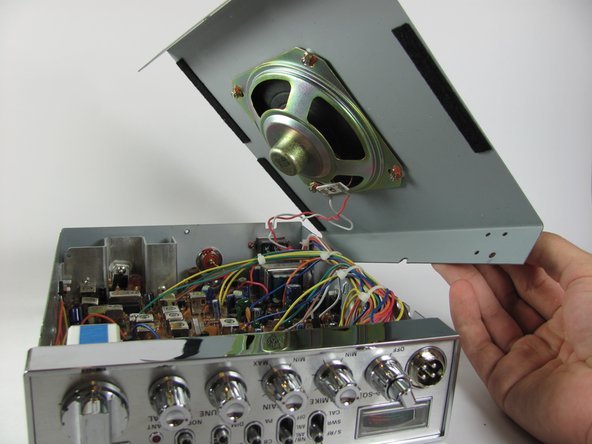
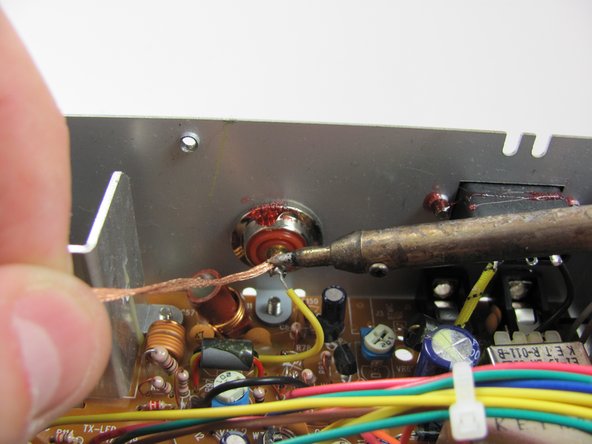
    • De-solder the yellow wire that is connected to the antenna connector, with a soldering iron and the desoldering wick.

    • During reassembly you will need to solder the components back together.

  13. Cobra 29 LTD Classic Antenna Connector Replacement: шаг 13, изображение 1 из 1
    • The wire may still be hot, so let it sit for 30 seconds before continuing.

    • Detach wire from back of antenna connector.

  14. Cobra 29 LTD Classic Antenna Connector Replacement: шаг 14, изображение 1 из 1
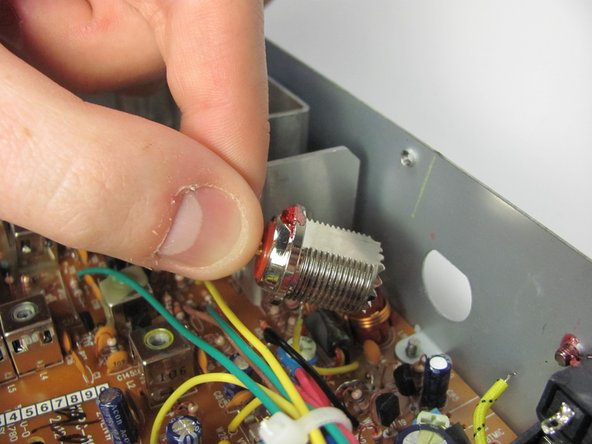
    • Use a wrench to unscrew the nut counterclockwise, that secures the antenna connector to the device.

  15. Cobra 29 LTD Classic Antenna Connector Replacement: шаг 15, изображение 1 из 1
    • Remove the securing nut and washer from the antenna connector.

  16. Cobra 29 LTD Classic Antenna Connector Replacement: шаг 16, изображение 1 из 2 Cobra 29 LTD Classic Antenna Connector Replacement: шаг 16, изображение 2 из 2
    • Gently pull the antenna connector through its hole into the case.

Заключение

To reassemble your device, follow these instructions in reverse order.

danperoni

Участник с: 10/18/13

503 Репутация

Автор 4 руководств

Команда

Cal Poly, Team 11-37, Amido Fall 2013 Участник Cal Poly, Team 11-37, Amido Fall 2013

CPSU-AMIDO-F13S11G37

4 членов

Автор 9 руководств

3 Комментариев

Don't bother with the solder wick. Heat the metal tip, pull the wire away with needle nose pliers. This is a rare repair.

rrmanning06 - Ответить

If the radio is not transmitting, it is a rare thing, this wire could be broken. Solid wire on Galaxy radios, lots of vibration in the vehicle.

rrmanning06 - Ответить

Ok I've got a question for you guy's. I've made some antennas changes and ran some ground straps and stuff to get rid of some of my static and I went to hook up my SWR meter and I couldn't get it to screw in the back of the radio so pulled it out and realized that the inner part of the coax plug pushed in. So I took the cover off the radio and checked it out and pushed it back in, the wire is still in good condition and connected good on both ends,but is it ok to use, or should I put a new plug on the radio?

Evan Slater - Ответить

Добавить комментарий

Просмотр статистики:

За последние 24часов: 0

За последние 7 дней: 1

За последние 30 дней: 11

За всё время: 2,659