Введение
Having trouble with your Conair 169XR blowdryer cord retracting? This guide is for you if your cord will not retract at the bottom of your Conair blowdryer.
The retracting wheel retracts the cord into the bottom of the blowdryer. A faulty retracting wheel will not work when the "retract" button is pressed.
Make sure to power your Conair blowdryer off and disconnect from any external power sources before beginning to ensure safety.
Conair Troubleshooting Page: Conair Cord-Keeper 169XR Troubleshooting Page
Выберете то, что вам нужно
-
-
Unscrew the two 18 mm long Phillips #2 screws on the side of the hair dryer.
-
-
-
Once you have taken the screws out, take the top half of the handle off by lifting it off of the dryer.
-
-
-
Remove the inner white disk piece by gently pulling it out with your finger nail.
-
-
-
Gently remove the tan boxes (power supply) by wiggling them out of place and set them aside so you can take the back part of the handle off.
-
-
-
-
Remove the inner white disk piece from the base of the dryer head by gently pulling it out with your finger nail.
-
-
-
Unscrew the three 12 mm long Phillips #2 screws to remove the back of the hairdryer.
-
-
-
Once the three screws are removed, pop the back of the dryer off by wiggling it until it comes loose. This shouldn't take too much effort.
-
-
-
Unwind the cord and lay it to the side so you can get to the screw in the middle easier.
-
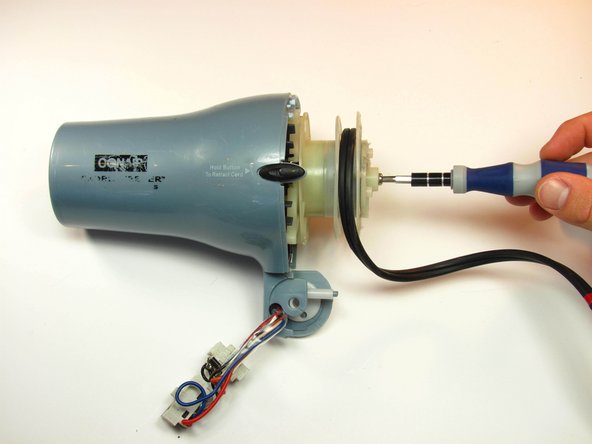
Remove the single 12 mm long Phillips #2 screw in the middle of the cord track.
-
-
-
Take off the white cap that covers the heating coil. You will see a wound up piece of metal (cord retracting coil) underneath once the cap is removed.
-
-
-
Once the coil is removed, unscrew the three 11 mm long Phillips #2 screws underneath to remove the retracting wheel.
-


To reassemble your device, follow these instructions in reverse order.
To reassemble your device, follow these instructions in reverse order.
Отменить: Я не выполнил это руководство.
Еще один человек закончил это руководство.
Команда

Cal Poly, Team 10-33, Maness Winter 2014 Участник Cal Poly, Team 10-33, Maness Winter 2014
CPSU-MANESS-W14S10G33
3 членов
Автор 7 руководств
Один комментарий
Nicely done, just a suggestion, in Step #10 would suggest using fingers or flat object on top of spring when disengaging from frame …to ensure it won’t unravel and jump (as shown in 2nd picture + have some strong tape, string, wire ties, etc. to keep the spring wound up. This works for me when dealing with lawn mower recoil mechanism or tape measures. Tape measures are the worst to work on. lol - AHNauss