Перейти к основному содержанию

Creative Nomad Jukebox Zen Display Screen Replacement

Выберете то, что вам нужно

  1. Creative Nomad Jukebox Zen Display Screen Replacement, Front and Back Cover: шаг 1, изображение 1 из 3 Creative Nomad Jukebox Zen Display Screen Replacement, Front and Back Cover: шаг 1, изображение 2 из 3 Creative Nomad Jukebox Zen Display Screen Replacement, Front and Back Cover: шаг 1, изображение 3 из 3
    • Use a J0 screwdriver to remove the eight 3.5mm screws.

  2. Creative Nomad Jukebox Zen Display Screen Replacement: шаг 2, изображение 1 из 3 Creative Nomad Jukebox Zen Display Screen Replacement: шаг 2, изображение 2 из 3 Creative Nomad Jukebox Zen Display Screen Replacement: шаг 2, изображение 3 из 3
    • Use the plastic opening tool to open the top cover by carefully prying at each corner.

  3. Creative Nomad Jukebox Zen Display Screen Replacement, Screen Cover: шаг 3, изображение 1 из 1
    • Once the front face is removed, remove the three 6.8mm J0 screws from the metal cover and remove it.

  4. Creative Nomad Jukebox Zen Display Screen Replacement, Display Screen: шаг 4, изображение 1 из 1
    • Using the plastic opening tool to pop the metal tab holding the battery in place.

    • By breaking the sticker, it could void your warranty

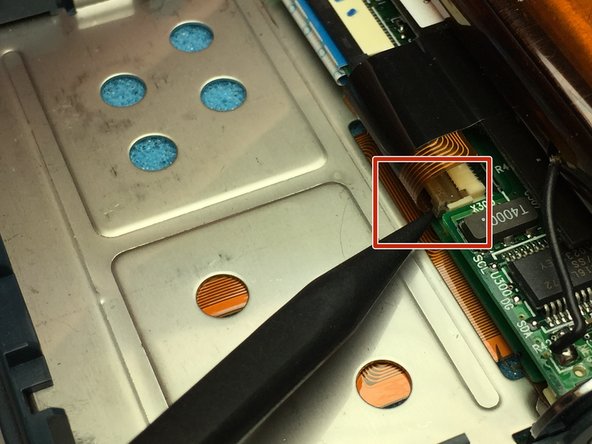
  5. Creative Nomad Jukebox Zen Display Screen Replacement: шаг 5, изображение 1 из 2 Creative Nomad Jukebox Zen Display Screen Replacement: шаг 5, изображение 2 из 2
    • Use the spudger tool to unclip the screens wiring pigtail clipped into the motherboard.

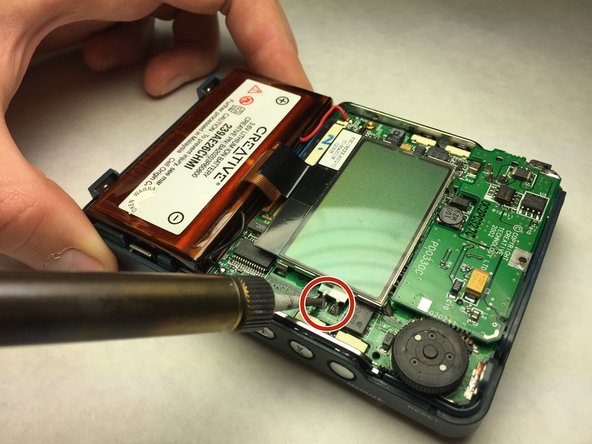
  6. Creative Nomad Jukebox Zen Display Screen Replacement: шаг 6, изображение 1 из 2 Creative Nomad Jukebox Zen Display Screen Replacement: шаг 6, изображение 2 из 2
    • Use soldering iron to melt the solder used to hold the display screen to the motherboard.

    • Using soldering gun with care as it becomes extremely hot and can cause burns.

  7. Creative Nomad Jukebox Zen Display Screen Replacement: шаг 7, изображение 1 из 1
    • Using the spudger tool, gently pry up the corners of the display screen to remove it.

Заключение

To reassemble your device, follow these instructions in reverse order.

Austin Shaw

Участник с: 03/08/17

101 Репутация

1 руководство автора

Команда

IUPUI, Team S4-G5, Baechle Spring 2017 Участник IUPUI, Team S4-G5, Baechle Spring 2017

IUPUI-BAECHLE-S17S4G5

4 членов

Автор 5 руководств

0 Комментариев

Добавить комментарий

Просмотр статистики:

За последние 24часов: 0

За последние 7 дней: 0

За последние 30 дней: 8

За всё время: 508