Перейти к основному содержанию

Cub Cadet OHV 173cc/6.75 Recoil Starter Replacement

Выберете то, что вам нужно

  1. Cub Cadet OHV 173cc/6.75 Recoil Starter Replacement, Recoil Starter: шаг 1, изображение 1 из 1
    • Remove the four screws from the hood of the lawnmower using a Phillips #0 screwdriver.

  2. Cub Cadet OHV 173cc/6.75 Recoil Starter Replacement: шаг 2, изображение 1 из 3 Cub Cadet OHV 173cc/6.75 Recoil Starter Replacement: шаг 2, изображение 2 из 3 Cub Cadet OHV 173cc/6.75 Recoil Starter Replacement: шаг 2, изображение 3 из 3
    • Remove the hood of the lawnmower by pulling up.

  3. Cub Cadet OHV 173cc/6.75 Recoil Starter Replacement: шаг 3, изображение 1 из 3 Cub Cadet OHV 173cc/6.75 Recoil Starter Replacement: шаг 3, изображение 2 из 3 Cub Cadet OHV 173cc/6.75 Recoil Starter Replacement: шаг 3, изображение 3 из 3
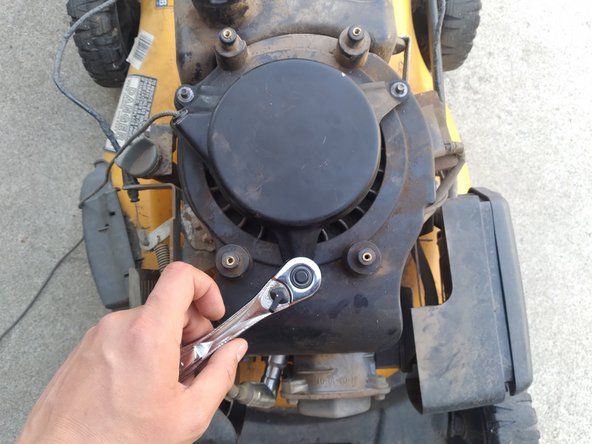
    • Using a wrench, remove the three nuts from the lawnmower’s defective recoil starter.

  4. Cub Cadet OHV 173cc/6.75 Recoil Starter Replacement: шаг 4, изображение 1 из 3 Cub Cadet OHV 173cc/6.75 Recoil Starter Replacement: шаг 4, изображение 2 из 3 Cub Cadet OHV 173cc/6.75 Recoil Starter Replacement: шаг 4, изображение 3 из 3
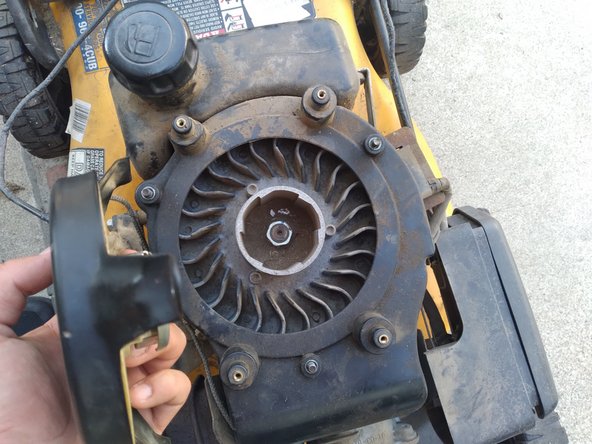
    • Remove the defective recoil starter by pulling up.

  5. Cub Cadet OHV 173cc/6.75 Recoil Starter Replacement: шаг 5, изображение 1 из 3 Cub Cadet OHV 173cc/6.75 Recoil Starter Replacement: шаг 5, изображение 2 из 3 Cub Cadet OHV 173cc/6.75 Recoil Starter Replacement: шаг 5, изображение 3 из 3
    • Place the new recoil starter in the lawnmower where the defective one was prior.

  6. Cub Cadet OHV 173cc/6.75 Recoil Starter Replacement: шаг 6, изображение 1 из 3 Cub Cadet OHV 173cc/6.75 Recoil Starter Replacement: шаг 6, изображение 2 из 3 Cub Cadet OHV 173cc/6.75 Recoil Starter Replacement: шаг 6, изображение 3 из 3
    • Tighten the new recoil starter onto the lawnmower with a wrench and the nuts you had removed earlier.

  7. Cub Cadet OHV 173cc/6.75 Recoil Starter Replacement: шаг 7, изображение 1 из 3 Cub Cadet OHV 173cc/6.75 Recoil Starter Replacement: шаг 7, изображение 2 из 3 Cub Cadet OHV 173cc/6.75 Recoil Starter Replacement: шаг 7, изображение 3 из 3
    • Tighten the hood back onto the lawnmower with a Phillips #0 screwdriver and the four screws you had removed previously.

    • Make sure not to screw the hood on too tightly.

Финишная черта

Andres Dominguez

Участник с: 01/26/22

145 Репутация

1 руководство автора

Команда

CSU Los Angeles, Team Z-69, Briggs Spring 2022 Участник CSU Los Angeles, Team Z-69, Briggs Spring 2022

CSULA-BRIGGS-S22SZG69

1 член

Автор 1 руководств

0 Комментариев

Добавить комментарий

Просмотр статистики:

За последние 24часов: 1

За последние 7 дней: 23

За последние 30 дней: 93

За всё время: 1,694