Перейти к основному содержанию

DeWalt DW920 Lock Switch Replacement

Выберете то, что вам нужно

  1. DeWalt DW920 Lock Switch Replacement, Disassembly: шаг 1, изображение 1 из 1
    • Using an H-5.0 bit driver remove the four T-10 Torx screws.

  2. DeWalt DW920 Lock Switch Replacement: шаг 2, изображение 1 из 1
    • Use 2 H-5.0 bit drivers to take out the main bolt and head.

    • There will be blue locktite on the tread.

  3. DeWalt DW920 Lock Switch Replacement: шаг 3, изображение 1 из 1
    • Carefully remove the two halves of the handle.

  4. DeWalt DW920 Lock Switch Replacement, Lock Switch: шаг 4, изображение 1 из 1
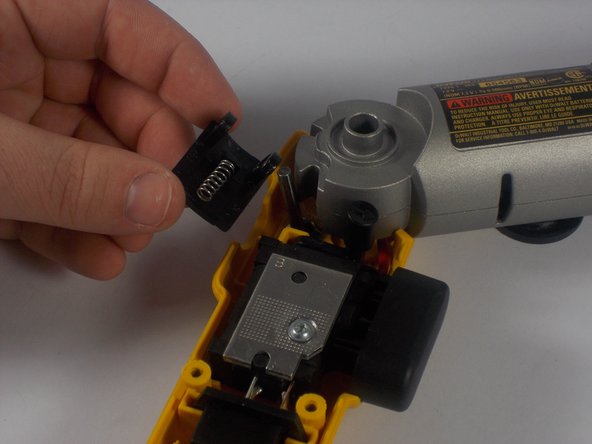
    • Locate the switch on the top of the drill right before the bending joint.

  5. DeWalt DW920 Lock Switch Replacement: шаг 5, изображение 1 из 2 DeWalt DW920 Lock Switch Replacement: шаг 5, изображение 2 из 2
    • Firmly grasp the switch with two fingers and lift it straight up. The spring should remain attached to the switch during this process.

    • It should lift right out. If it is caught on anything do not force it out.

Заключение

To reassemble your device, follow these instructions in reverse order.

Stephen Rada

Участник с: 03/11/16

433 Репутация

Автор 4 руководств

Команда

UMass Dartmouth, Team 8-2, Botvin Spring 2016 Участник UMass Dartmouth, Team 8-2, Botvin Spring 2016

UMASSD-BOTVIN-S16S8G2

2 членов

Автор 6 руководств

Один комментарий

This guide was descriptive and easy to follow. Good job!

DankMemerino - Ответить

Добавить комментарий

Просмотр статистики:

За последние 24часов: 0

За последние 7 дней: 4

За последние 30 дней: 8

За всё время: 264